Lab 3: Agentic Automation
Track 1: Agentic Data Engineering · Day 2 breakout lab
You've defined rules and taught Otto how you want things built. Now you'll put it all to work.
In this lab, you'll help GreenTech Manufacturing tackle a critical sustainability challenge facing their five UK production facilities. The company consumes over 42 million kWh annually running energy-intensive operations, and with UK carbon offset costs at £85/ton CO2, their environmental impact is becoming a significant financial burden. The key insight: the UK's electricity grid carbon intensity swings dramatically throughout the day. Your mission is to build an intelligent forecasting system that learns from 30 days of historical weather and carbon data to predict these low-carbon windows up to 7 days in advance, then identifies which flexible operations can be strategically shifted from high-carbon hours to clean-energy windows.
Before you start
- Complete Hands-On Lab: Getting Agentic on Day 1
- Complete Lab 2: Programmatic Agentic Systems
The plan
- Build the operations optimization pipeline
- Schedule the pipeline to run daily
- Add an automation that alerts you when the pipeline fails, with Otto's diagnosis of what went wrong
- Run the
@command/learning.mdcommand to capture everything Otto learned across all three labs
Step 1: Build the pipeline
You're going to give Otto a single prompt, and it will build the entire operations optimization pipeline — pulling live weather and carbon intensity data, building a predictive model, and layering in your operations data to find the optimal scheduling windows.
Make sure these settings are configured at the bottom of the Otto panel before sending your prompt:
- Attach a runtime — click + Runtime and select your Workspace. You should see your Workspace name appear once it's selected, indicating where Otto is working. This will also start your Workspace if it's been snoozing.
- Web browsing — click the globe icon so it's highlighted (blue). This lets Otto fetch live data from APIs.
- Auto-run queries — click the play icon (▶▶) so it's highlighted. This lets Otto run queries and flow runs without waiting for your manual approval each time.

Open Otto with Ctrl + I (or Cmd + I on Mac), start a new thread, and paste the following prompt:
Review the plan
Asking an agent to plan before building is one of the most effective patterns in agentic work. A plan forces the agent to reason through the full problem — data sources, dependencies, edge cases — before writing any code. It gives you a checkpoint to catch misunderstandings early (wrong API, missing constraint, bad assumption) when they're cheap to fix, instead of after 15 minutes of building the wrong thing. It also gives the agent a reference document it can check back against as it builds, reducing drift and hallucination on long-running tasks.
Otto will create a markdown plan file outlining the components it intends to build, the data sources, the modeling approach, and the pipeline architecture. You can view the plan file in the Files panel by clicking the Files icon in the left tool bar and navigating to the plan/ folder.
Before Otto starts building, review the plan and look for:
- Does it reference the correct API endpoints and coordinates?
- Does it include the carbon price (£85/ton) and tariff values you specified?
- Does it plan to use the
schedulablecolumn to filter machines? - Does it include the iterative build-and-test approach?
If you'd like to make changes to the plan, give your feedback to Otto and it will update the plan file. (This helps Otto learn from your feedback and improve its future plans.)
Once you're satisfied, tell Otto to go ahead and build it.
If you'd rather skip the planning step, you can give Otto a pre-built plan directly. Copy the plan below as your prompt to Otto.
Click to expand the pre-built plan
Watch Otto work
Sit back and watch. Otto will:
- Create Python Read Components for weather and carbon intensity APIs
- Build a weather forecast read component for the next 7 days
- Write transforms to join weather, carbon, and operations data
- Build a predictive model for carbon intensity by hour
- Calculate optimal scheduling windows
- Test each component individually, then run the full flow end to end
Otto isn't generating code in isolation. When it creates the transforms, it's looking at the actual carbon intensity data and weather conditions that came back from the APIs, cross-referenced with your operations data. If something fails, Otto reads the actual error message and execution log, then fixes the issue based on what it observed.
This is a big project — Otto may take 50+ actions to build and debug the full pipeline. As a guardrail, Otto pauses after every 50 actions to ask for your approval before continuing. This prevents agents from running in continuous loops without supervision and spending unnecessary tokens. When Otto asks for approval to keep going, send a message to confirm or offer feedback if you want to make changes.
Once the flow succeeds, open the Python components. Are they using docstrings, type hints, and descriptive variable names as your code_standards_python.md rule requires? Does the optimization logic respect the scheduling constraints from your operations_scheduling.md rule? This is your Lab 2 payoff — the rules you wrote are silently shaping Otto's output.
Your completed flow graph will look something like this — though your exact components and naming may differ depending on the approach Otto took:
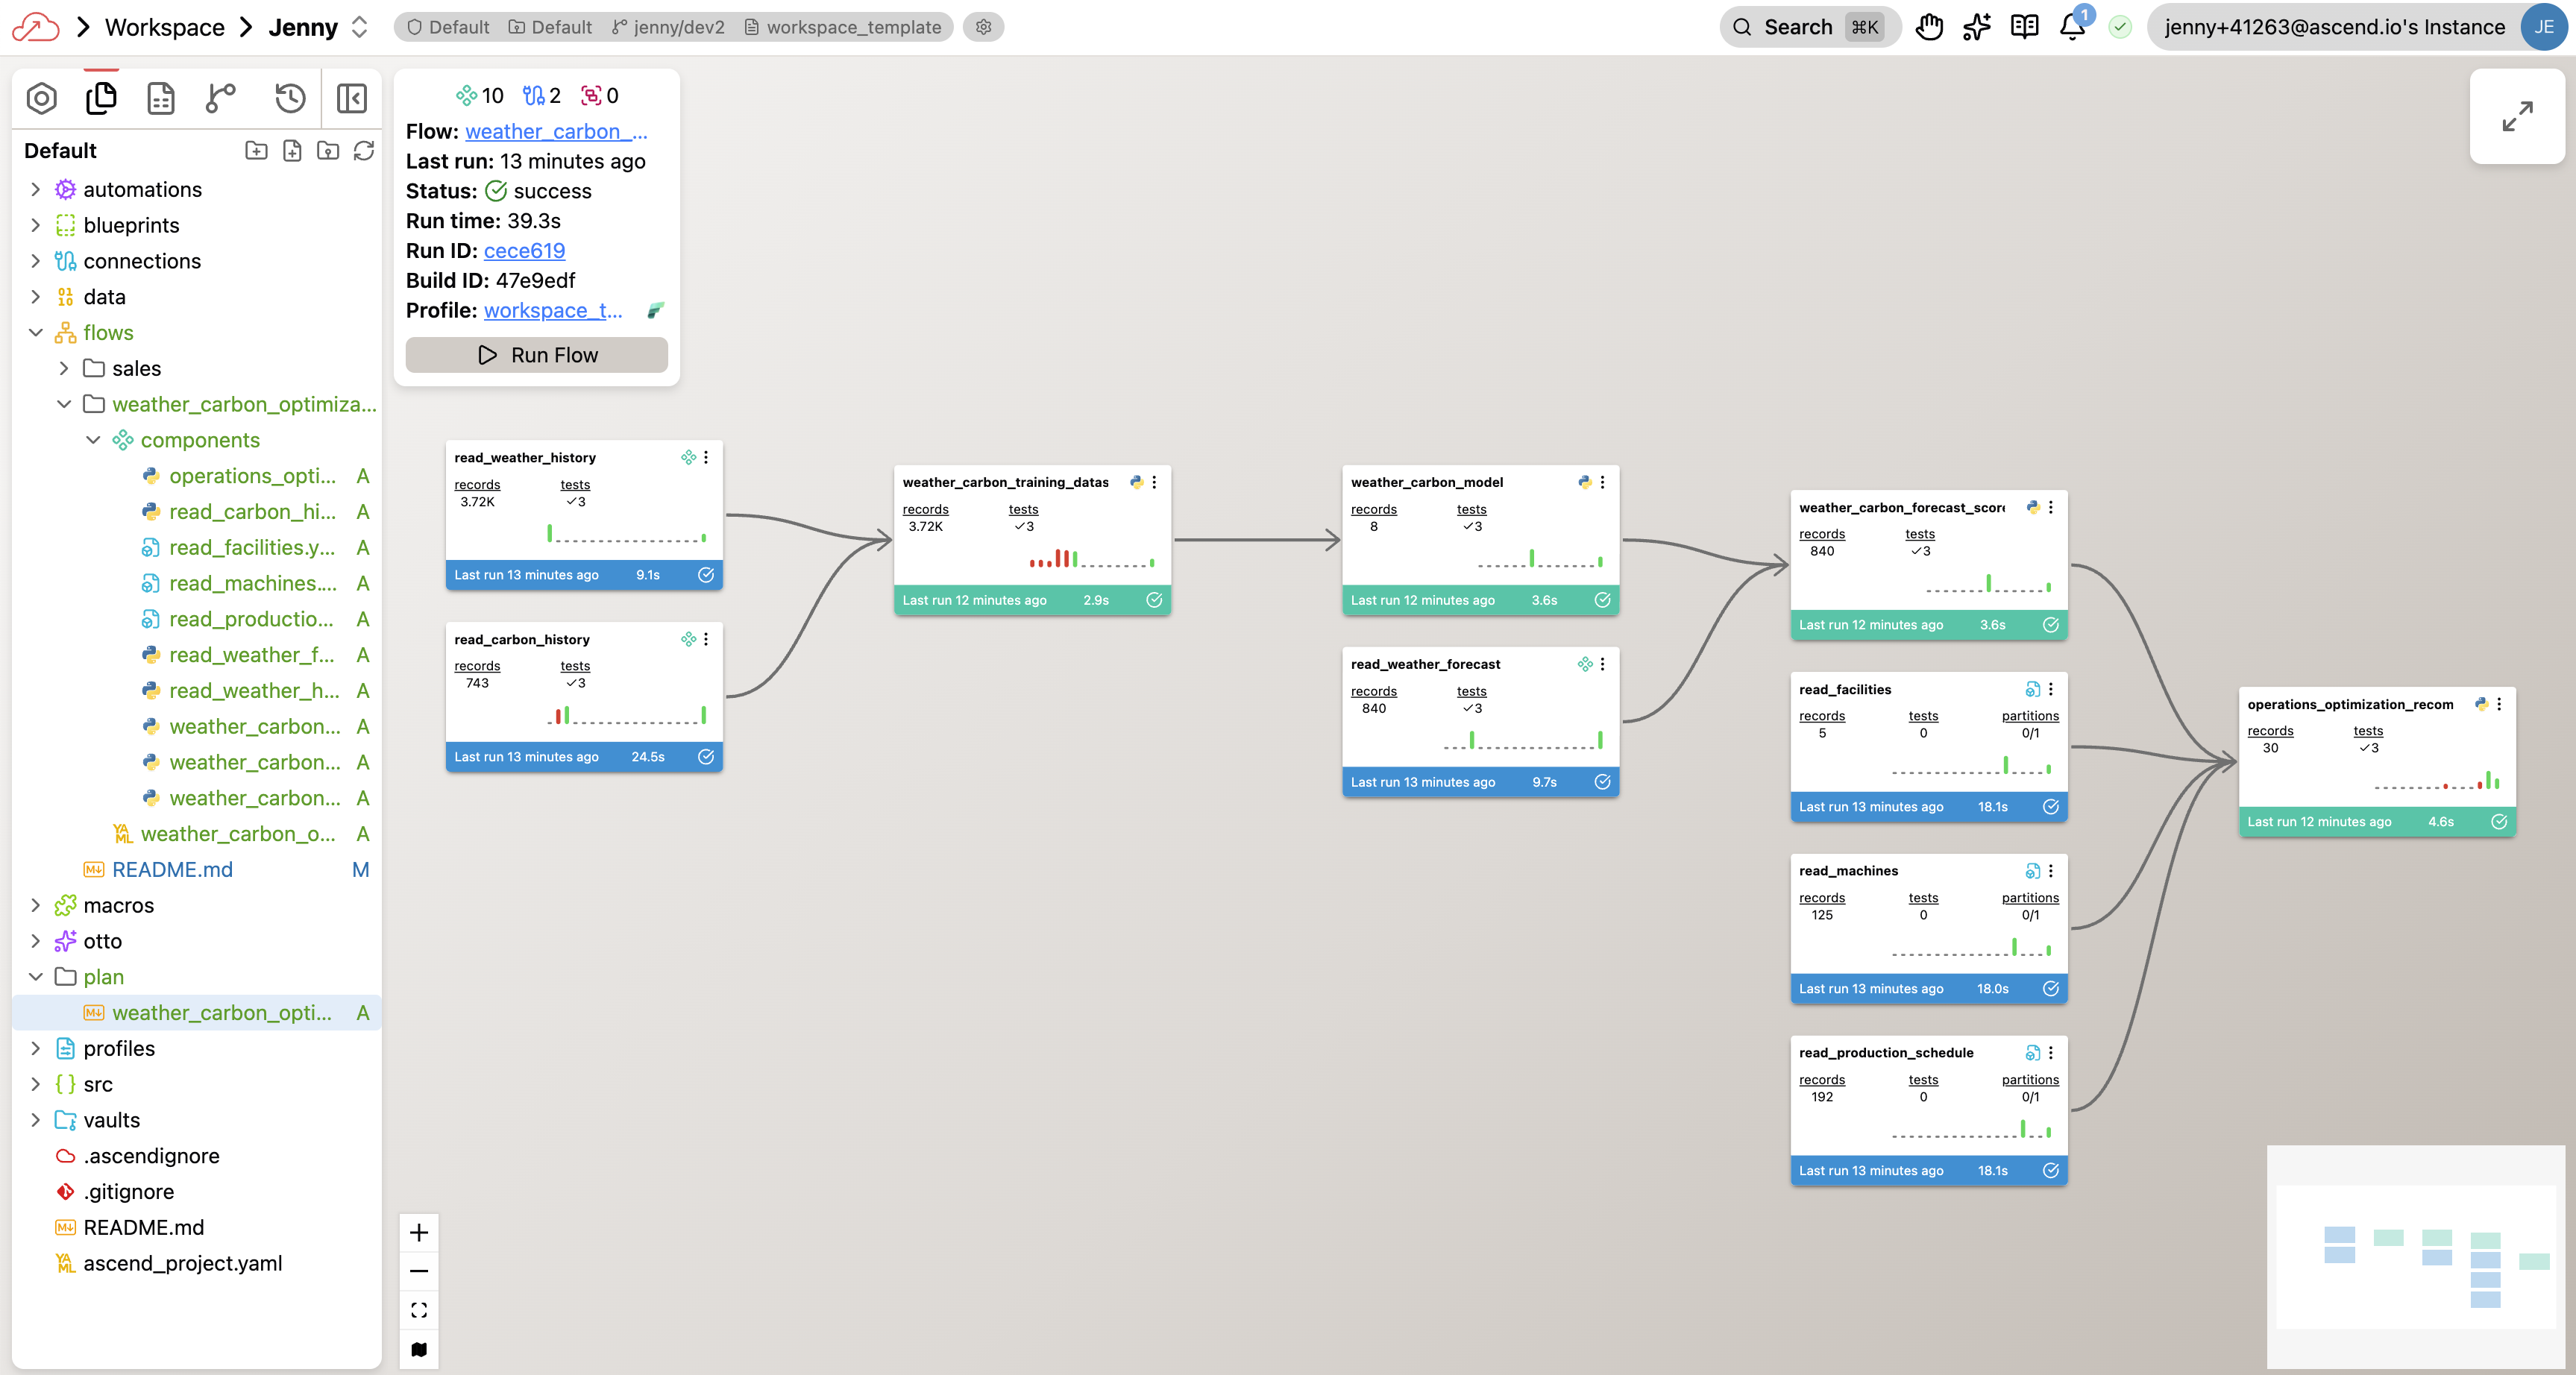
Once Otto finishes, you should have a flow with:
- Python Read Components pulling live data from Open-Meteo and UK Carbon Intensity APIs
- A weather forecast component for the next 7 days
- YAML Read Components for your facilities, machines, and production schedule
- SQL Transforms joining all datasets, building a predictive model, and calculating optimal windows
- A successful Flow run showing scheduling recommendations and cost savings
Step 2: Orchestrate the pipeline
Your pipeline is built. Now let's make it run on its own so operations leaders get fresh recommendations every morning.
Same thread. Paste the following prompt:
Create an Automation YAML file for this Flow to run daily at midnight UTC.
Otto will create the schedule configuration for you. You can find this file under the automations/ folder in your project.

Automations only run in Deployments, not Workspaces. In your trial environment, you can add a new Deployment and merge your current changes in your Workspace to the Deployment to run the pipeline on a schedule.
Step 3: Add failure alerting
The pipeline is built and scheduled. The last piece is making sure you know when something goes wrong — and that you get a real diagnosis, not just a generic "pipeline failed" notification. If the pipeline fails overnight, operations leaders would start the morning without updated scheduling recommendations. You need to know immediately.
Same thread. Paste the following prompt:
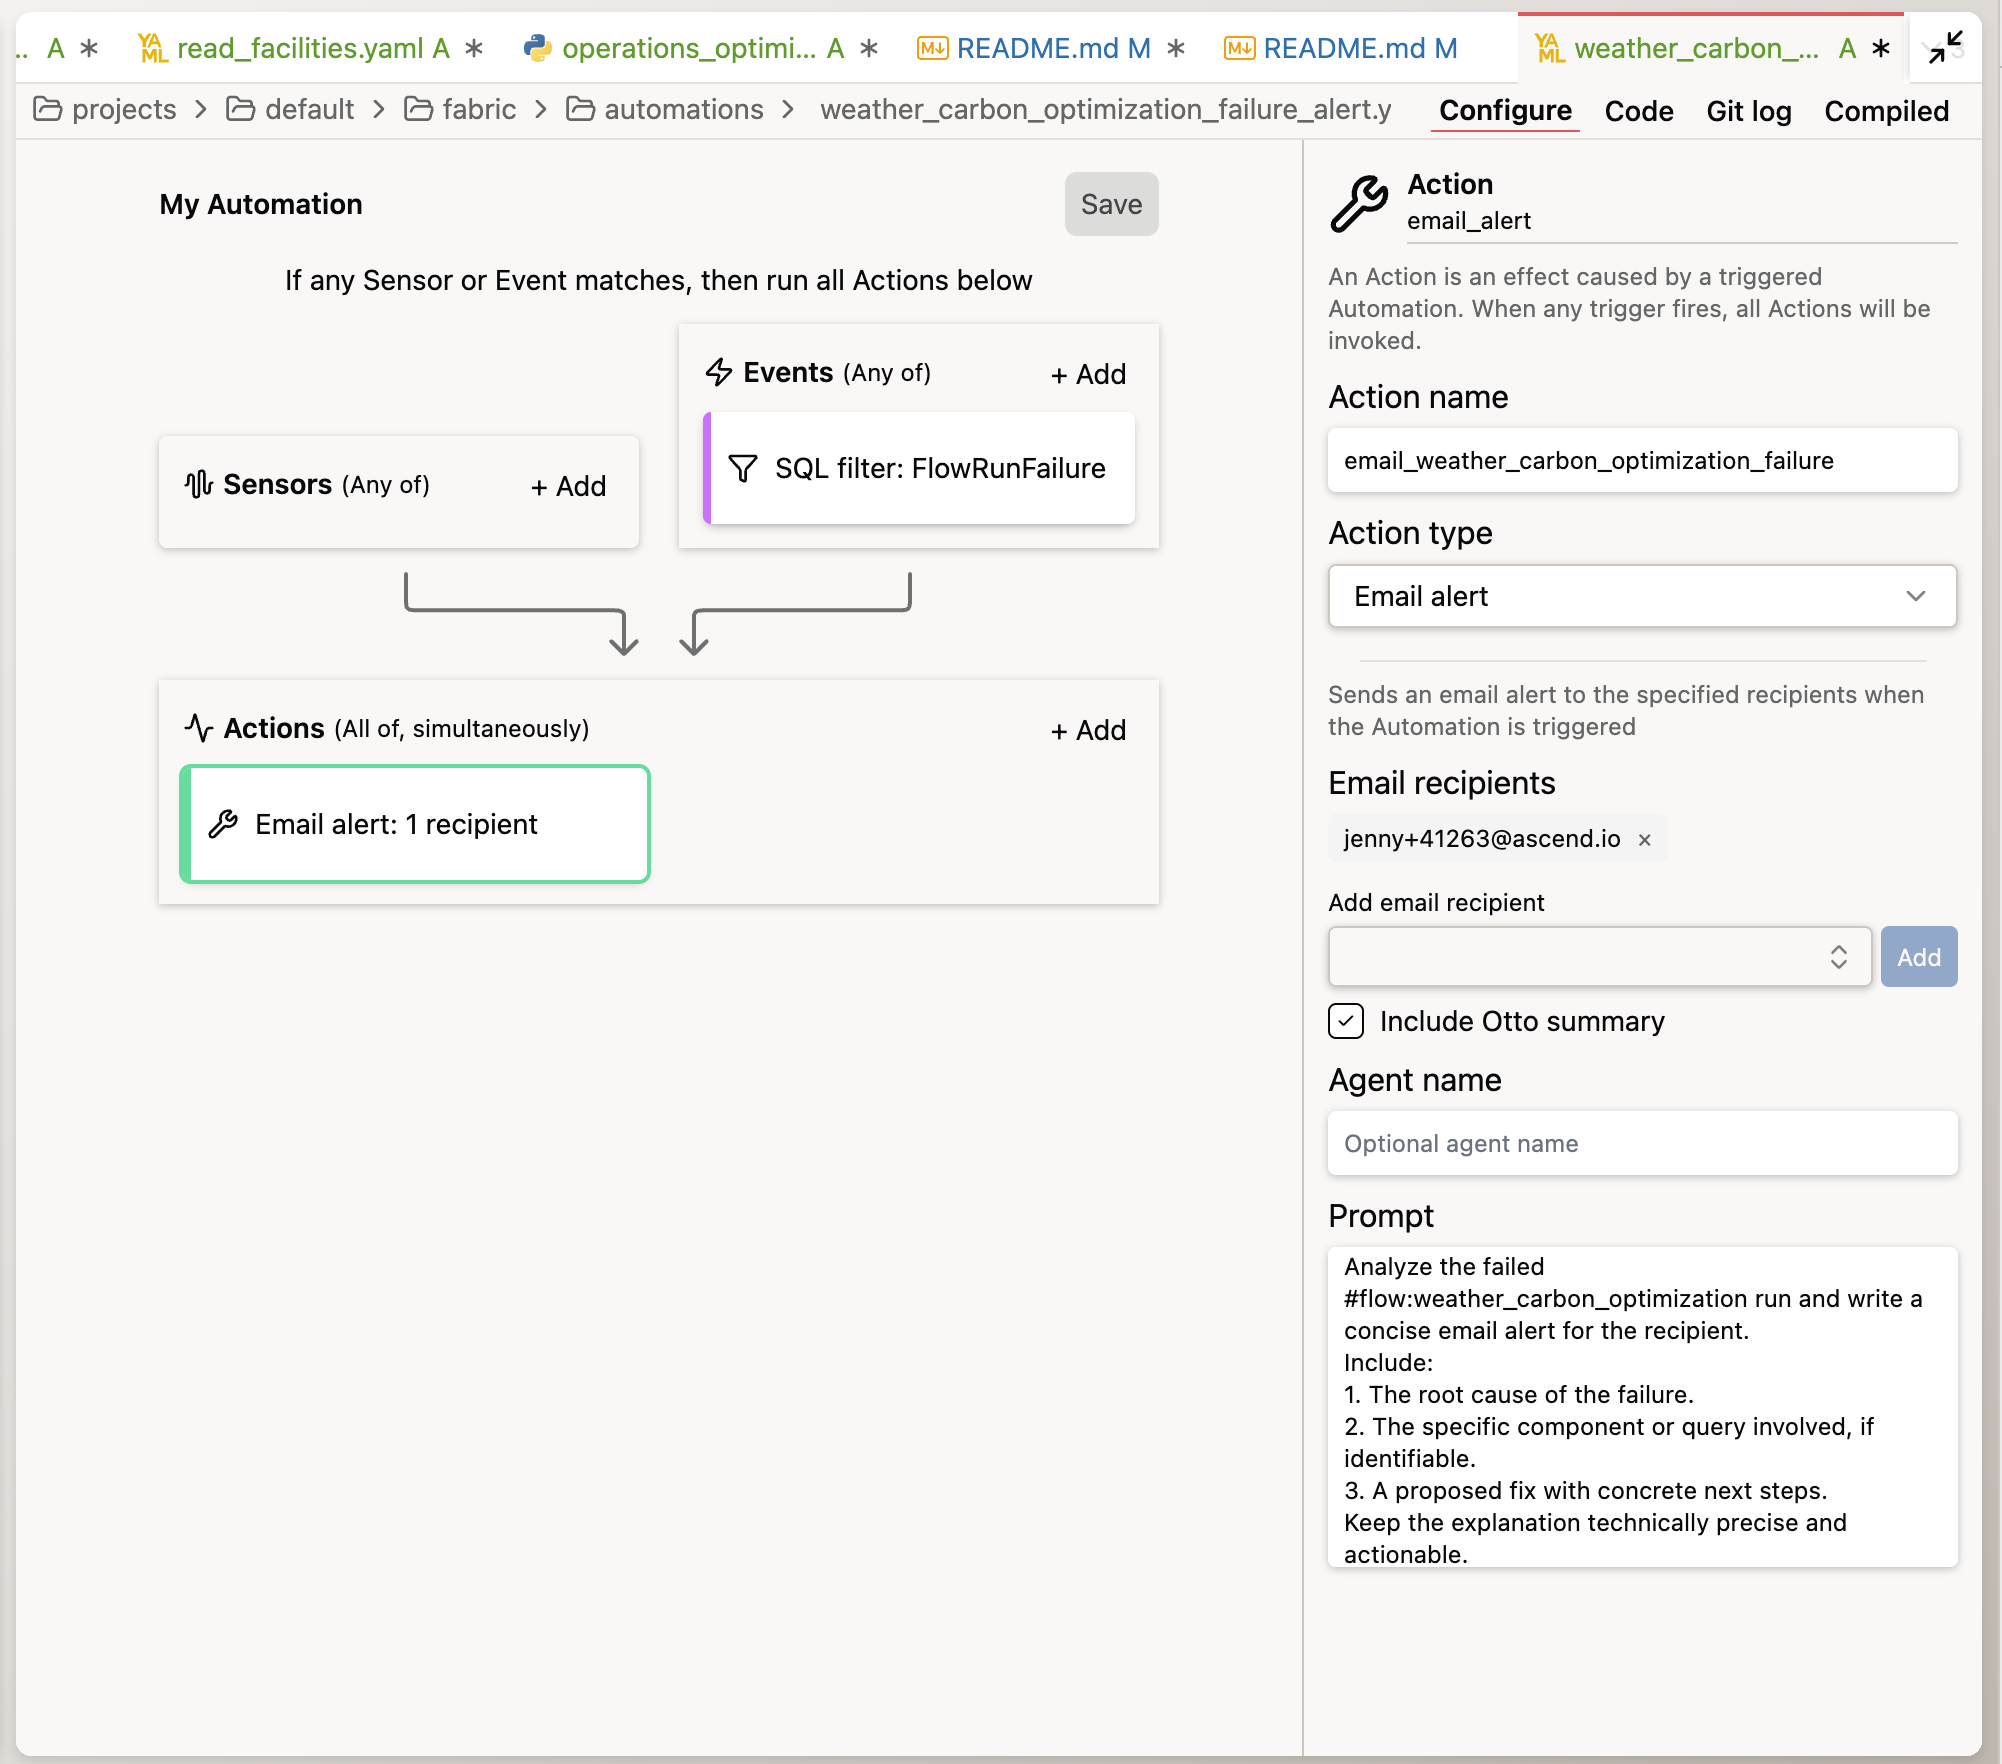
Create a separate Automation YAML file for this flow. It should trigger
on a FlowRunFailure event. The automation should:

1. Send me an email alert
2. Include Otto's root cause analysis of why the run failed
3. Include a proposed fix
Otto will create an Automation YAML file that wires together the trigger (FlowRunFailure), the action (email alert), and the prompt that Otto uses to diagnose the issue.
To see the automation in action, temporarily break something — change a test threshold to make it fail, or modify a transform to produce invalid data. Run the Flow and prompt Otto to perform the tasks in the Automation YAML file to create a root cause analysis. Don't forget to fix the issue before running the flow again and merging your changes to the Deployment.
Step 4: Capture what Otto learned
You've built a pipeline, scheduled it, and wired up alerting. Along the way, Otto made decisions — how to structure the API calls, how to build the predictive model, how to calculate shift-bounded rescheduling, how to handle data quality. Now it's time to capture all of that.
Run the learning command you created in Lab 2 by typing:
run @command/learning.md
Otto will review the current conversation and propose creating new rule files or updating existing ones — each learning goes into the rule file where it belongs. For example, an API pattern might go into a new rule, while a scheduling constraint clarification might update operations_scheduling.md. You can approve or reject each proposal before Otto makes changes.
This is the payoff of the rules system you built in Lab 2. Every time you run the learning command, Otto distributes its new knowledge into the right rule files so it fires in the right context. The knowledge compounds — and it carries forward to every future conversation in this workspace.
Make run @command/learning.md a habit. Run it at the end of any significant Otto session. Over time, your rules library grows into a rich, project-specific knowledge base that makes Otto increasingly effective for your team.
Congratulations! You've completed Lab 3 — and the entire bootcamp track!
By the end of this lab, you should have:
- Built the carbon + operations optimization pipeline from a single prompt (weather, carbon intensity, predictive model, scheduling optimization)
- Verified the pipeline respects scheduling constraints (schedulable flag, ±8 hour shift boundaries)
- Scheduled the pipeline to run daily at midnight UTC
- Set up automated failure alerting with Otto's agentic diagnosis
- Captured accumulated knowledge with
run @command/learning.md
You started the bootcamp building your first pipeline step by step. You're ending it with a production-grade system that ingests live weather and carbon data, cross-references it with your manufacturing operations, identifies millions of pounds in potential savings, runs on a schedule, and diagnoses itself when things break — all driven by the rules and patterns you taught your agent along the way.
Ask a bootcamp instructor or reach out in the Ascend Community Slack.
Next steps
Head to Wrapping Up to submit your lab work and claim your Certificate of Completion and gift card.
Resources
Questions?
Reach out to your bootcamp instructors or support@ascend.io.