Quickstart for Snowflake on Ascend
Scale up using Snowflake with Ascend.
Prerequisites
Before you begin, ensure you have the following:
- An Ascend Instance
- Snowflake account
- Ability to create Snowflake resources (may require elevated permissions for some steps)
- Snowflake user with both SYSADMIN and SECURITYADMIN roles to run the setup script
Snowflake has implemented enhanced security measures that affect user authentication:
- Human users must use Multi-Factor Authentication (MFA) when authenticating with passwords
- Service users (non-human users like Ascend service accounts) must use key-pair authentication instead of passwords
For more details, see Snowflake's MFA rollout documentation.
Generate RSA Key Pair
Run the following commands in your terminal:
This quickstart uses macOS-specific commands like pbcopy for copying text to the clipboard. If you're using a different operating system, adjust the commands accordingly:
- Windows: Use
clipinstead ofpbcopy - Linux: Use
xclip -selection clipboardorxsel --clipboard --inputinstead ofpbcopy
# Generate private key
openssl genrsa 2048 | openssl pkcs8 -topk8 -inform PEM -out rsa_key.p8 -nocrypt

# Generate public key
openssl rsa -in rsa_key.p8 -pubout -out rsa_key.pub

# Copy the public key
cat rsa_key.pub | pbcopy
Refer to the Snowflake documentation for more details.
Create Snowflake resources
Ascend recommends creating dedicated Snowflake resources for your Ascend workloads to ensure proper resource isolation. However, if you cannot create new resources or prefer to use an existing one, you can skip this step.
Additionally, this quickstart grants elevated permissions for the sake of simplicity.
The following script creates a Snowflake service user (via key-pair authentication), warehouse, database, schema, and role. These resources correspond to the existing Ascend Production Environment that comes with your trial Instance.
Run the following in Snowflake:
Replace <PASTE_YOUR_PUBLIC_KEY_HERE> in the SQL code below with the RSA public key you generated in the previous step.
Store your Snowflake private key
Store your Snowflake private key as an Environment Vault secret to securely configure your Snowflake Data Plane:
-
Run this command in your terminal to copy your Snowflake private key (including the BEGIN/END lines):
noteEnsure your private key is in a
.pemformat.cat rsa_key.p8 | pbcopy -
In your Ascend Instance, click on your profile picture in the top-right corner and select Settings
-
Navigate to the Secrets & Vaults section
-
Select the Default Environment Vault
-
Click Add secret
-
Name your secret
SNOWFLAKE_PRIVATE_KEYand paste the key in the Value field -
Click Create to store your secret
Configure your Workspace & Project
Alternatively, you can keep the out-of-the-box Project configuration and create a new Snowflake Data Plane Connection instead. This allows you to use the existing setup and proceed directly to running the sales Flow.
Configure your Default Ascend Project to use the Snowflake-specific template:
-
Navigate to the Projects & Deployments section of your settings
-
Select the Default Project
-
Change the Project root to
projects/default/snowflake -
Click Save to apply your changes
-
Navigate back to your Ascend Workspace via the homepage or with
Cmd+Ksearch navigation -
Open the Files panel and locate
ascend_project.yamltoward the bottom of the file tree. -
Set your Snowflake account along with parameters corresponding to the resources we created above:
snowflake:account: <YOUR_SNOWFLAKE-ACCOUNT> (the Snowflake account you used to create resources above)user: ASCEND_ENV_PRODrole: ASCEND_ENV_PRODwarehouse: ASCEND_ENV_PRODdatabase: ASCEND_ENV_PRODmax_concurrent_queries: 20 -
Use
Cmd + S/Ctrl + Sto save yourascend_project.yaml.
If you customized the resource names in the Snowflake setup script above, make sure these values match what you created.
If you encounter a build error related to a legacy profile, expand the section below for instructions.
Update legacy profile to use private key authentication
Your profile may contain the password field instead of the private_key field.
To fix this:
-
Navigate to the
data_plane_snowflakeConnection configuration file in the build panel, Files panel, or usingCmd+Ksearch -
Replace the
passwordfield with:private_key: ${vaults.environment.SNOWFLAKE_PRIVATE_KEY} -
Test the Connection to verify authentication is successful
Run the sales Flow
- In the Super Graph view of your Ascend Workspace, double-click the
salesFlow to open the Flow Graph view, which shows all Components in thesalesFlow - In the build info panel on the top left, click Run Flow and watch all Components in your Flow execute from left to right
View Ascend tables in Snowflake
- Right-click on the
read_sales_websiteComponent (or any Component) in the Flow Graph - Select Records to view the data in the table created by this Component
- Click open in Snowflake in the top left of the popup tab
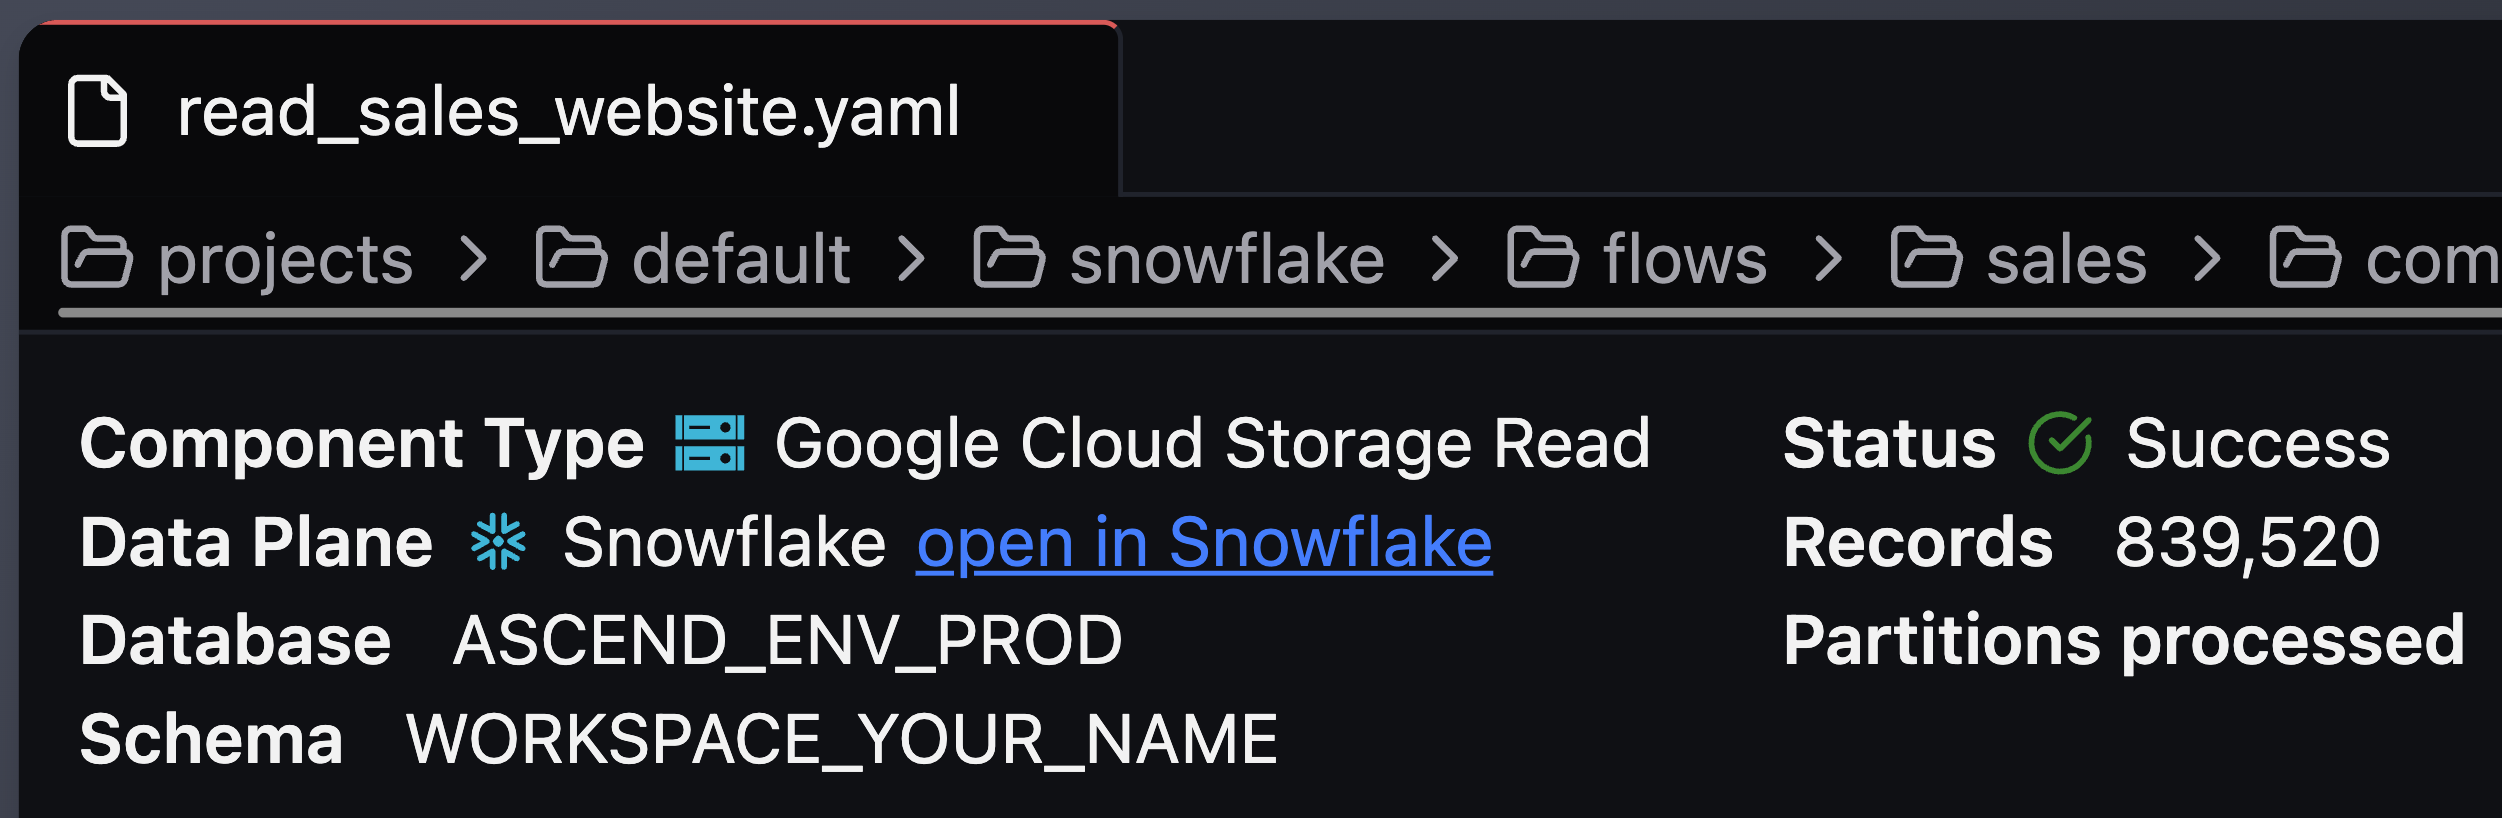
- View your data in the Snowflake console
If you're logged in with a personal Snowflake account, you may need to grant yourself access to view the data.
Grant personal access
GRANT ROLE ASCEND_ENV_PROD TO USER <YOUR-USER-NAME>;
This demonstrates Data Plane persistence in action! With this setup, you can push your compute and storage down to the Snowflake Data Plane for efficient data processing.
Next steps
Try running the demo sales Flow or use Otto to create your first data pipeline with Snowflake on Ascend.