Set up BigQuery with Ascend
Overview
In this quickstart guide, you'll learn how to use Google BigQuery as your Data Plane in Ascend.
This guide will take you through the following steps:
- Create a GCP project for your BigQuery Data Plane
- Grant admin permissions to your Ascend Environment's service account
- Configure your Ascend Workspace & Project with your GCP details
- Run an Ascend Flow and view the resulting tables in BigQuery
Prerequisites
- Ascend Instance
- Google account
- Familiarity with the role of the Data Plane in Ascend
Create a GCP Project
Ascend recommends creating a dedicated GCP project for your Ascend workloads to ensure proper resource isolation. However, if you cannot create a new project or prefer to use an existing one, you can skip this step.
- UI
- CLI
- Log in to your Google account.
- Create a new GCP project. For more information on creating a GCP project, see Google Cloud documentation.
- Project name: We recommend changing the project name to something more descriptive, such as
BigQuery Data Plane for Ascend. - Project ID: Click Edit and enter
bigquery-data-plane-<YOUR-ORG>in the box that appears.noteIf you leave this blank, the project ID will be generated for you.
- Project name: We recommend changing the project name to something more descriptive, such as
- Copy the project ID to your clipboard.
- Billing Account: Choose the appropriate billing account for your project.
- Click Create
-
Set the following variables:
# Create a new ID for your GCP project
PROJECT_ID="bigquery-data-plane-<YOUR-ORG>"

# If you don't know your billing account, run `gcloud billing accounts list`
BILLING_ACCOUNT_ID="<your-billing-account-id>" -
Run the following commands:
Grant permissions to your Environment's service account
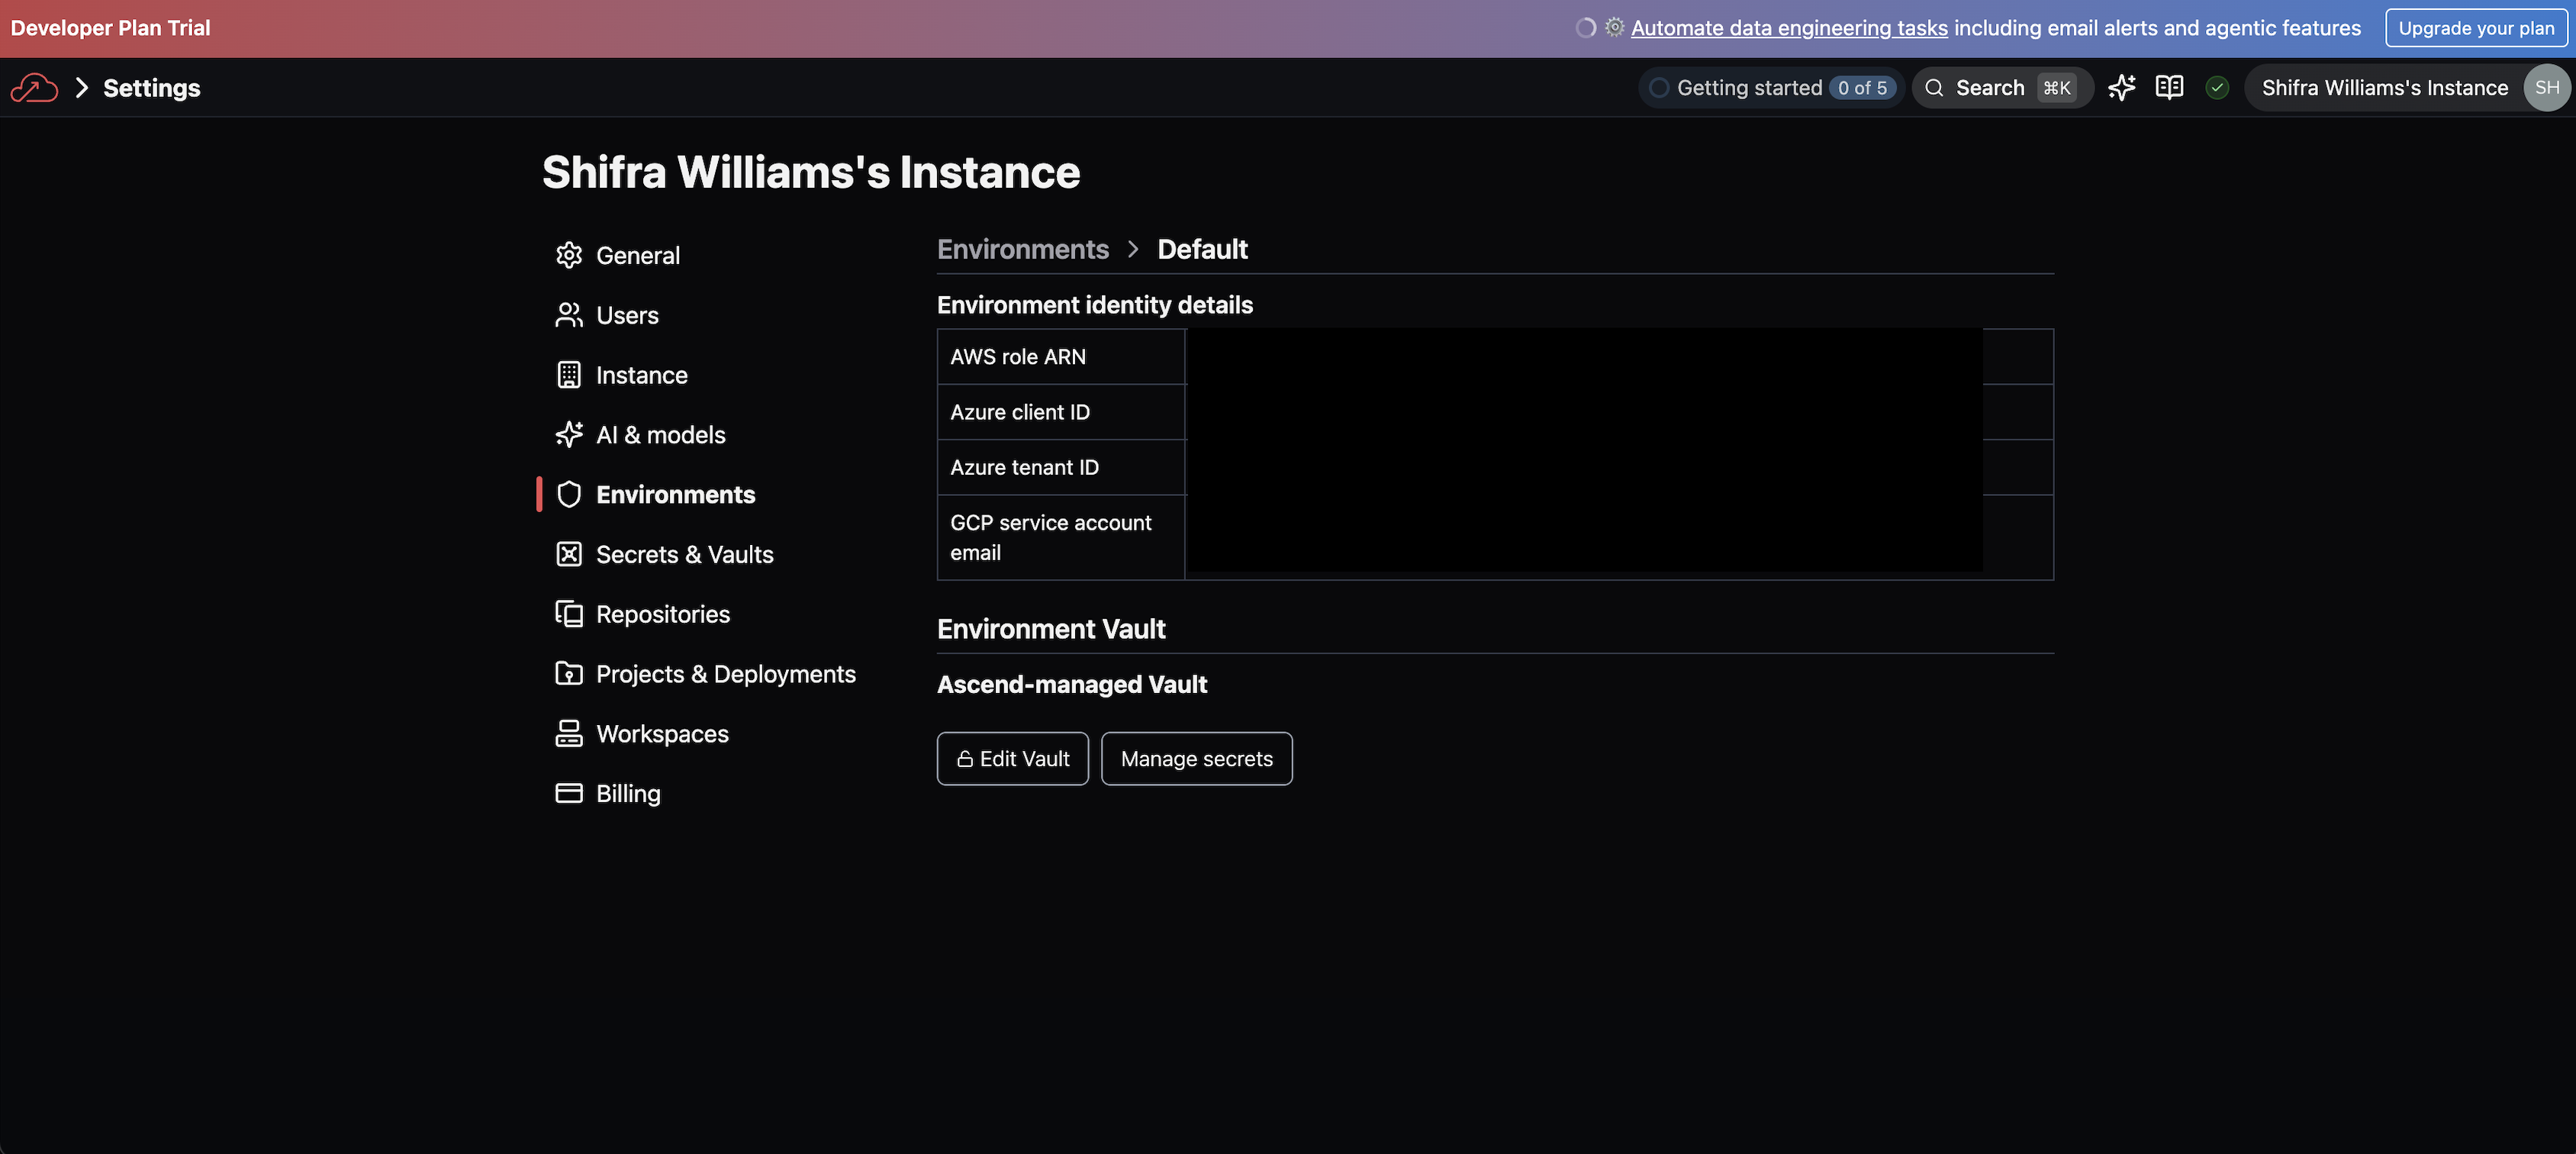
Follow these steps to locate your Environment service account email:
- In the top-right corner of your Ascend Instance, click on your profile picture and select Settings
- Navigate to the Environment section and select the Default Environment
- Copy the GCP service account email
Follow these steps to grant permissions:
For this quickstart, we're granting broad permissions to simplify setup. Later, you can follow the principle of least privilege and grant only the minimum required permissions.
- UI
- CLI
- Navigate to IAM & Admin > Service Accounts in the GCP Console
- Click Select project in the top right
- Select the project named
BigQuery Data Plane for Ascendwith the IDbigquery-data-plane-<YOUR-ORG>(or use the project name you configured above) - Click IAM in the left navigation panel
- Click Grant access in the
View by principalssection - Paste the Ascend Environment service account email in the New principals field
- Click the Select a role dropdown and choose BigQuery admin
- Click Save to apply the changes
- Set the GCP service account email as a variable:
ENVIRONMENT_SERVICE_ACCOUNT_EMAIL="<your-environment-service-account-email>" - Run the following command to grant your GCP service account admin access to your GCP project:
gcloud projects add-iam-policy-binding \
    --member="serviceAccount:${ENVIRONMENT_SERVICE_ACCOUNT_EMAIL}" \
    --role="roles/bigquery.admin" \
    --condition=None \
    ${PROJECT_ID}
Configure your Workspace & Project
Alternatively, you can keep the out-of-the-box Project configuration and create a new BigQuery Data Plane Connection instead. This allows you to use the existing setup and proceed directly to running the sales Flow.
Configure your Default Ascend Project to use the BigQuery-specific template:
- In the top-right corner of your Ascend Instance, click on your profile picture and select Settings
- Go to Projects & Deployments and select the Default Project
- Change the Project root to
projects/default/bigquery - Click Save to apply your changes
- Navigate back to your Ascend Workspace via the homepage or with
Cmd+Ksearch navigation - Open the Files panel and locate
ascend_project.yamltoward the bottom of the file tree. - Set
project_idtobigquery-data-plane-<YOUR-ORG>(to match the GCP project you created above) - Set
datasettosales(or choose another name for your BigQuery dataset) - Use
Cmd + S/Ctrl + Sto save yourascend_project.yaml.
Run the sales Flow
- In the Super Graph view of your Ascend Workspace, double-click the
salesFlow to open the Flow Graph view, which shows all Components in thesalesFlow - In the build info panel on the top left, click Run Flow and watch all Components in your Flow execute from left to right
View Ascend tables in BigQuery
- Right-click on the
read_sales_websiteComponent (or any Component) in the Flow Graph - Select Records to view the data in the table created by this Component
- Click open in BigQuery in the top left of the popup tab
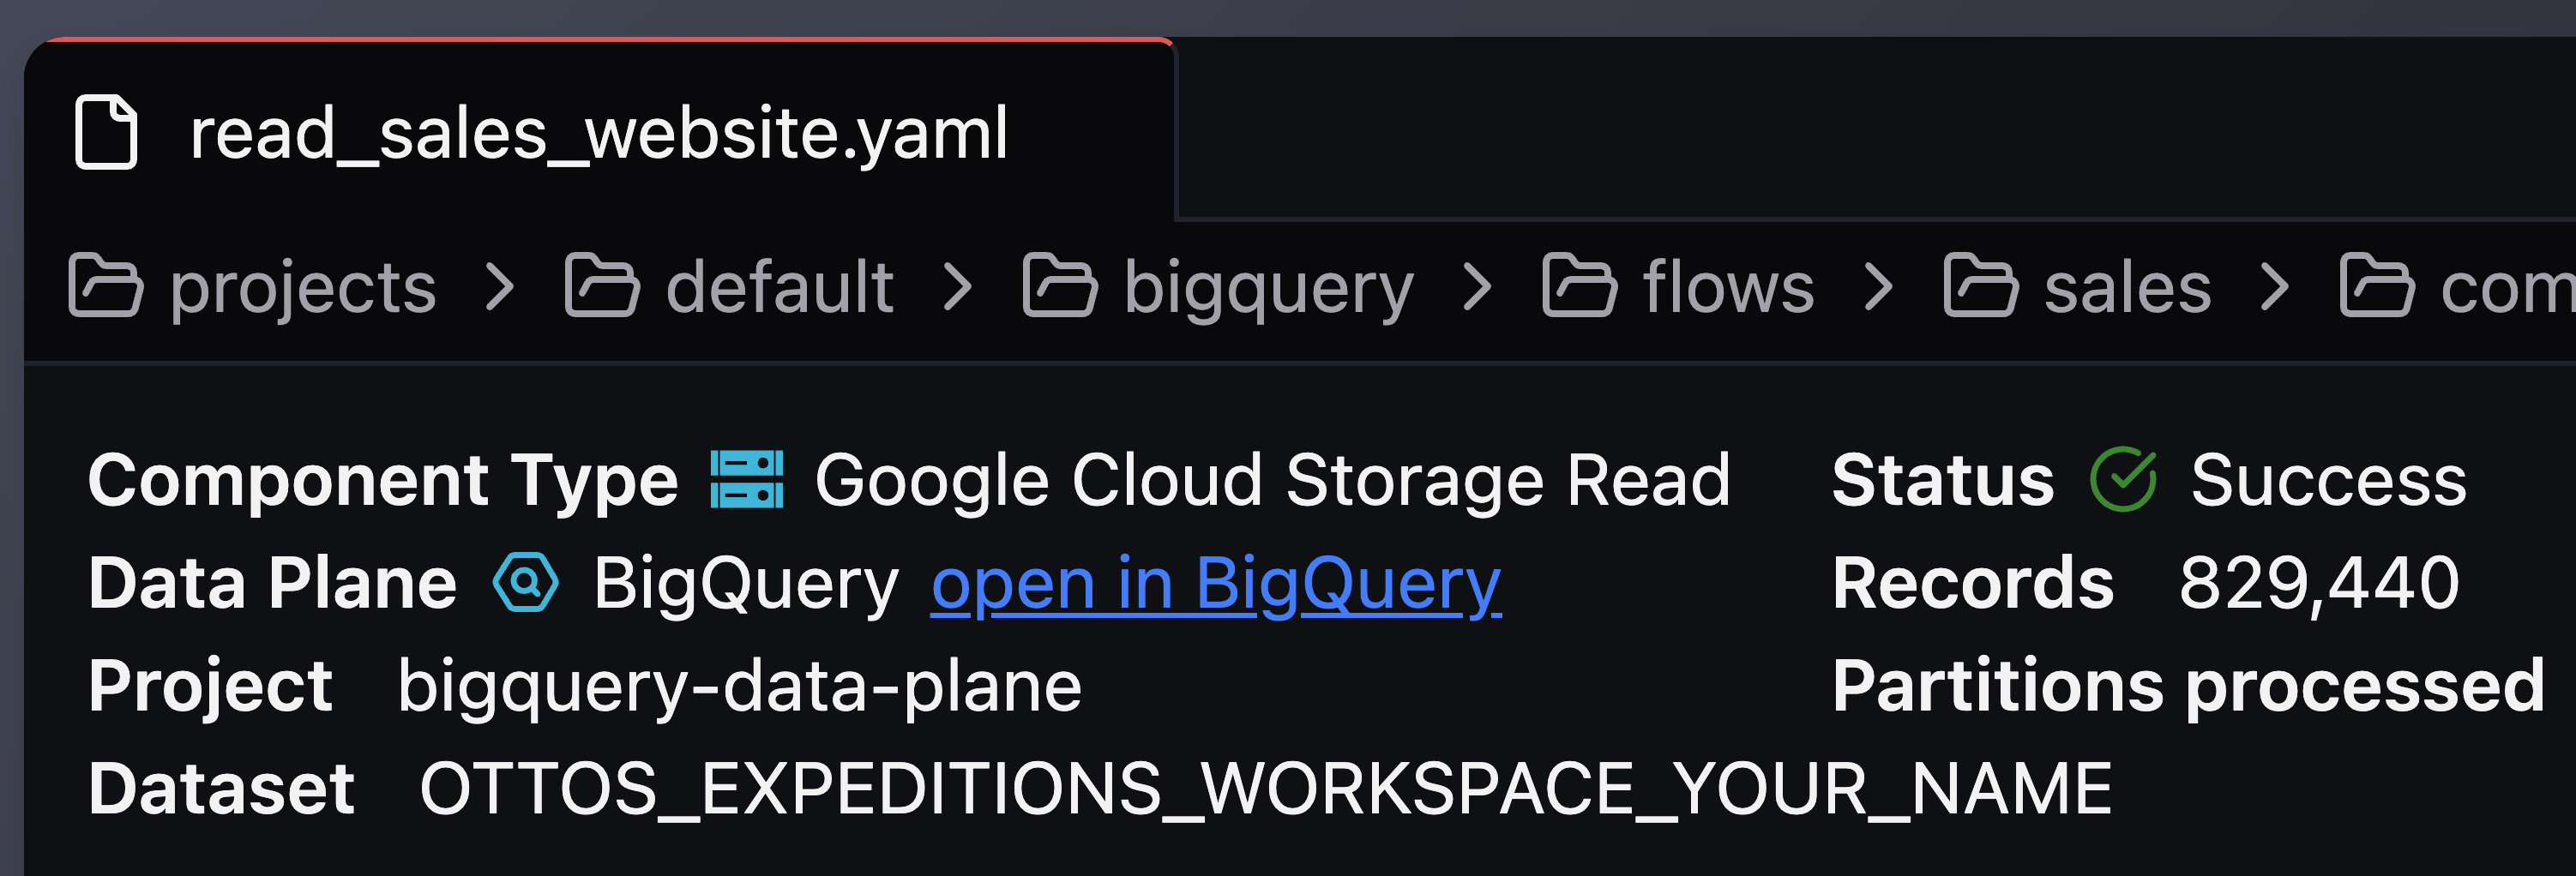
- View your data in the BigQuery console
This demonstrates Data Plane persistence in action! With this setup, you can push your compute and storage down to the BigQuery Data Plane for efficient data processing.
🎉 Congratulations! You've successfully configured BigQuery as your Data Plane and run your first Flow!
Next steps
👩🏻💻 Follow the developer quickstart to build your own Flow in Ascend