Quickstart for Ascend on BigQuery
Introduction​
In this quickstart guide, you'll learn how to use Ascend with Google BigQuery. You will be guided through the process of:
- Creating a GCP project
- Connecting Ascend to BigQuery
- Creating a developer Environment
- Setting up a Git repository
- Creating an Ascend Project
- Creating your developer Workspace
- Building & running your first flow
Prerequisites​
- An Ascend Instance
- A Google account
- The ability to create a GCP project
- The ability to run commands in your terminal to interact with GCP resources (See Google Cloud CLI Docs here)
Create a new GCP Project​
- CLI
- UI
-
Set the following variables:
# The ID of your GCP project
PROJECT_ID="<project-id>"
# If you don't know your billing account, run `gcloud billing accounts list`
BILLING_ACCOUNT_ID="<billing-account-id>" -
Run the following commands:
# Make sure you're logged in and have access
gcloud auth login
# Create your project
gcloud projects create \
--name="Ascend Quickstart on BigQuery" \
${PROJECT_ID}
# Set your billing account... you'll need this to create a project with API access
gcloud billing projects link \
--billing-account=${BILLING_ACCOUNT_ID} \
${PROJECT_ID}
# Set the project
gcloud config set project ${PROJECT_ID}
- Log in to your Google account.
- Create a new GCP project. For more information on creating a GCP project, see Google Cloud documentation.
- Project Name: We recommend changing the project name to something more description, such as
Ascend Quickstart on BigQuery
. - (Optional) Project ID: If you want to specify a project ID, click Edit and enter it in the box that appears. If you leave this blank, the project ID will be generated for you.
- Copy the project ID to your clipboard.
- Billing Account: Choose the appropriate billing account for your project.
- Click Create
- Project Name: We recommend changing the project name to something more description, such as
It's generally recommend to isolate your Ascend workloads in separate GCP projects. If you cannot create a new project or already have one you'd like to use, you can skip this step.
Connect your Ascend Instance to BigQuery​
The Instance Store is a BigQuery dataset that your Ascend Instance will use to store operational data, such as logs, metrics, and other metadata.
It is kept separate from your project's data, and uses a different service account to ensure security.
This quickstart grants elevated permissions for the sake of simplicity. For production use cases, we recommend isolating your Ascend Instance and each Environment's resources in separate GCP projects.
- CLI
- UI
-
In the Ascend UI, navigate to the Settings page by clicking on the instance name and your icon in the top right corner of the screen, then click on the Settings button.
-
Click on the Instance settings tab.
-
Copy the value for GCP Service Account Email listed under Instance Identity Details. Then set the
ASCEND_INSTANCE_SERVICE_ACCOUNT
variable by running the command below in your terminal. (Remember to replace<your-ascend-instance-gcp-service-account-email>
with the email address you copied.) This is the email address of the service account that your Ascend Instance will use to access your BigQuery Instance Store.ASCEND_INSTANCE_SERVICE_ACCOUNT=<your-ascend-instance-gcp-service-account-email>
-
Update your Instance Store settings
- GCP Project ID: The ID of your GCP project.
- Dataset: The name of the dataset you want to use for your Instance Store. We recommend using
ASCEND_INSTANCE
as the name.
-
Click Get Setup Script and copy & paste the commands into your terminal. Alternatively, you can run the commands below (after setting the variables).
# The GCP Project ID if you've not already done so
PROJECT_ID=<project-id>
# The name of the Instance Store dataset.
INSTANCE_DATASET="ASCEND_INSTANCE"# Enable the BigQuery API
gcloud services enable \
bigquery.googleapis.com \
secretmanager.googleapis.com \
--project ${PROJECT_ID}
# Create the Instance Store dataset
bq mk \
--dataset \
--description="Ascend Instance Store" \
${PROJECT_ID}:${INSTANCE_DATASET}
# Grant the BigQuery Job User role to the Ascend Instance service account
gcloud projects add-iam-policy-binding \
--member="serviceAccount:${ASCEND_INSTANCE_SERVICE_ACCOUNT}" \
--role="roles/bigquery.admin" \
--condition=None \
${PROJECT_ID} -
Click Check and Update Instance Store
-
In the Ascend UI, navigate to the Settings page by clicking on the instance name and your icon in the top right corner of the screen, then click on the Settings button.
-
Click on the Instance settings tab.
-
Copy the value for GCP Service Account Email listed under Instance Identity Details.
tipKeep this tab open in your browser.... we'll need it later.
-
Go to your GCP IAM Settings and grant the above service account the
BigQuery Admin
role.- Click Grant Access
- Paste the service account email into the New principals field
- Select BigQuery Admin from the Role dropdown
- Click Save
-
Return to the Ascend UI and update your Instance Store settings
- GCP Project ID: The ID of your GCP project.
- Dataset: The name of the dataset you want to use for your Instance Store. We recommend using
ASCEND_INSTANCE
as the name.
-
In the Ascend UI, click Check and Update Instance Store
Your Ascend Instance is now connected to BigQuery! 🎉 You can view the Instance Store dataset in the BigQuery UI or by running bq ls ${PROJECT_ID}:${INSTANCE_DATASET}
.
Create your Dev Environment​
Each Ascend Instance can have multiple environments. Environments are secure, isolated spaces that physically separate your data and resources.
For this quickstart, we'll just create a single environment. In a real-world scenario, you'll want to create a common set of environments: Dev
, Staging
, and Prod
. Each of these environments will have separate GCP Projects, BigQuery datasets, secrets, and service accounts.
- CLI
- UI
-
Create a GCP Service Account (such as
ascend-quickstart-dev@<project-id>.iam.gserviceaccount.com
)ENVIRONMENT_SERVICE_ACCOUNT_NAME="ascend-quickstart-dev"
ENVIRONMENT_SERVICE_ACCOUNT_EMAIL="${ENVIRONMENT_SERVICE_ACCOUNT_NAME}@${PROJECT_ID}.iam.gserviceaccount.com"
gcloud iam service-accounts create \
--display-name="Ascend Quickstart Dev" \
--description="Service account for Ascend Quickstart Dev environment" \
--project=${PROJECT_ID} \
${ENVIRONMENT_SERVICE_ACCOUNT_NAME} -
Grant the Service Account access to bigquery
gcloud projects add-iam-policy-binding \
--member="serviceAccount:${ENVIRONMENT_SERVICE_ACCOUNT_EMAIL}" \
--role="roles/bigquery.admin" \
--condition=None \
${PROJECT_ID} -
Create a JSON Key for the Service Account
mkdir -p ~/.ascend
gcloud iam service-accounts keys create \
--iam-account=${ENVIRONMENT_SERVICE_ACCOUNT_EMAIL} \
--project=${PROJECT_ID} \
${HOME}/.ascend/${ENVIRONMENT_SERVICE_ACCOUNT_NAME}.json -
Store the JSON Key in Secret Manager (such as
ascend-quickstart-dev-service-account
)ENVIRONMENT_SERVICE_ACCOUNT_SECRET_NAME="${ENVIRONMENT_SERVICE_ACCOUNT_NAME}-service-account"
# Enable Secret Manager
gcloud services enable \
secretmanager.googleapis.com \
--project ${PROJECT_ID}
# Create the Secret Manager Secret
gcloud secrets create \
--project ${PROJECT_ID} \
${ENVIRONMENT_SERVICE_ACCOUNT_SECRET_NAME}
# Add the JSON Key to the Secret Manager Secret
gcloud secrets versions add \
--project ${PROJECT_ID} \
--data-file=${HOME}/.ascend/${ENVIRONMENT_SERVICE_ACCOUNT_NAME}.json \
${ENVIRONMENT_SERVICE_ACCOUNT_SECRET_NAME}Coming Soon!Environment secrets will be available shortly, removing the requirement to use GCP Secret Manager.
-
Grant Ascend access to Google Secret Manager
-
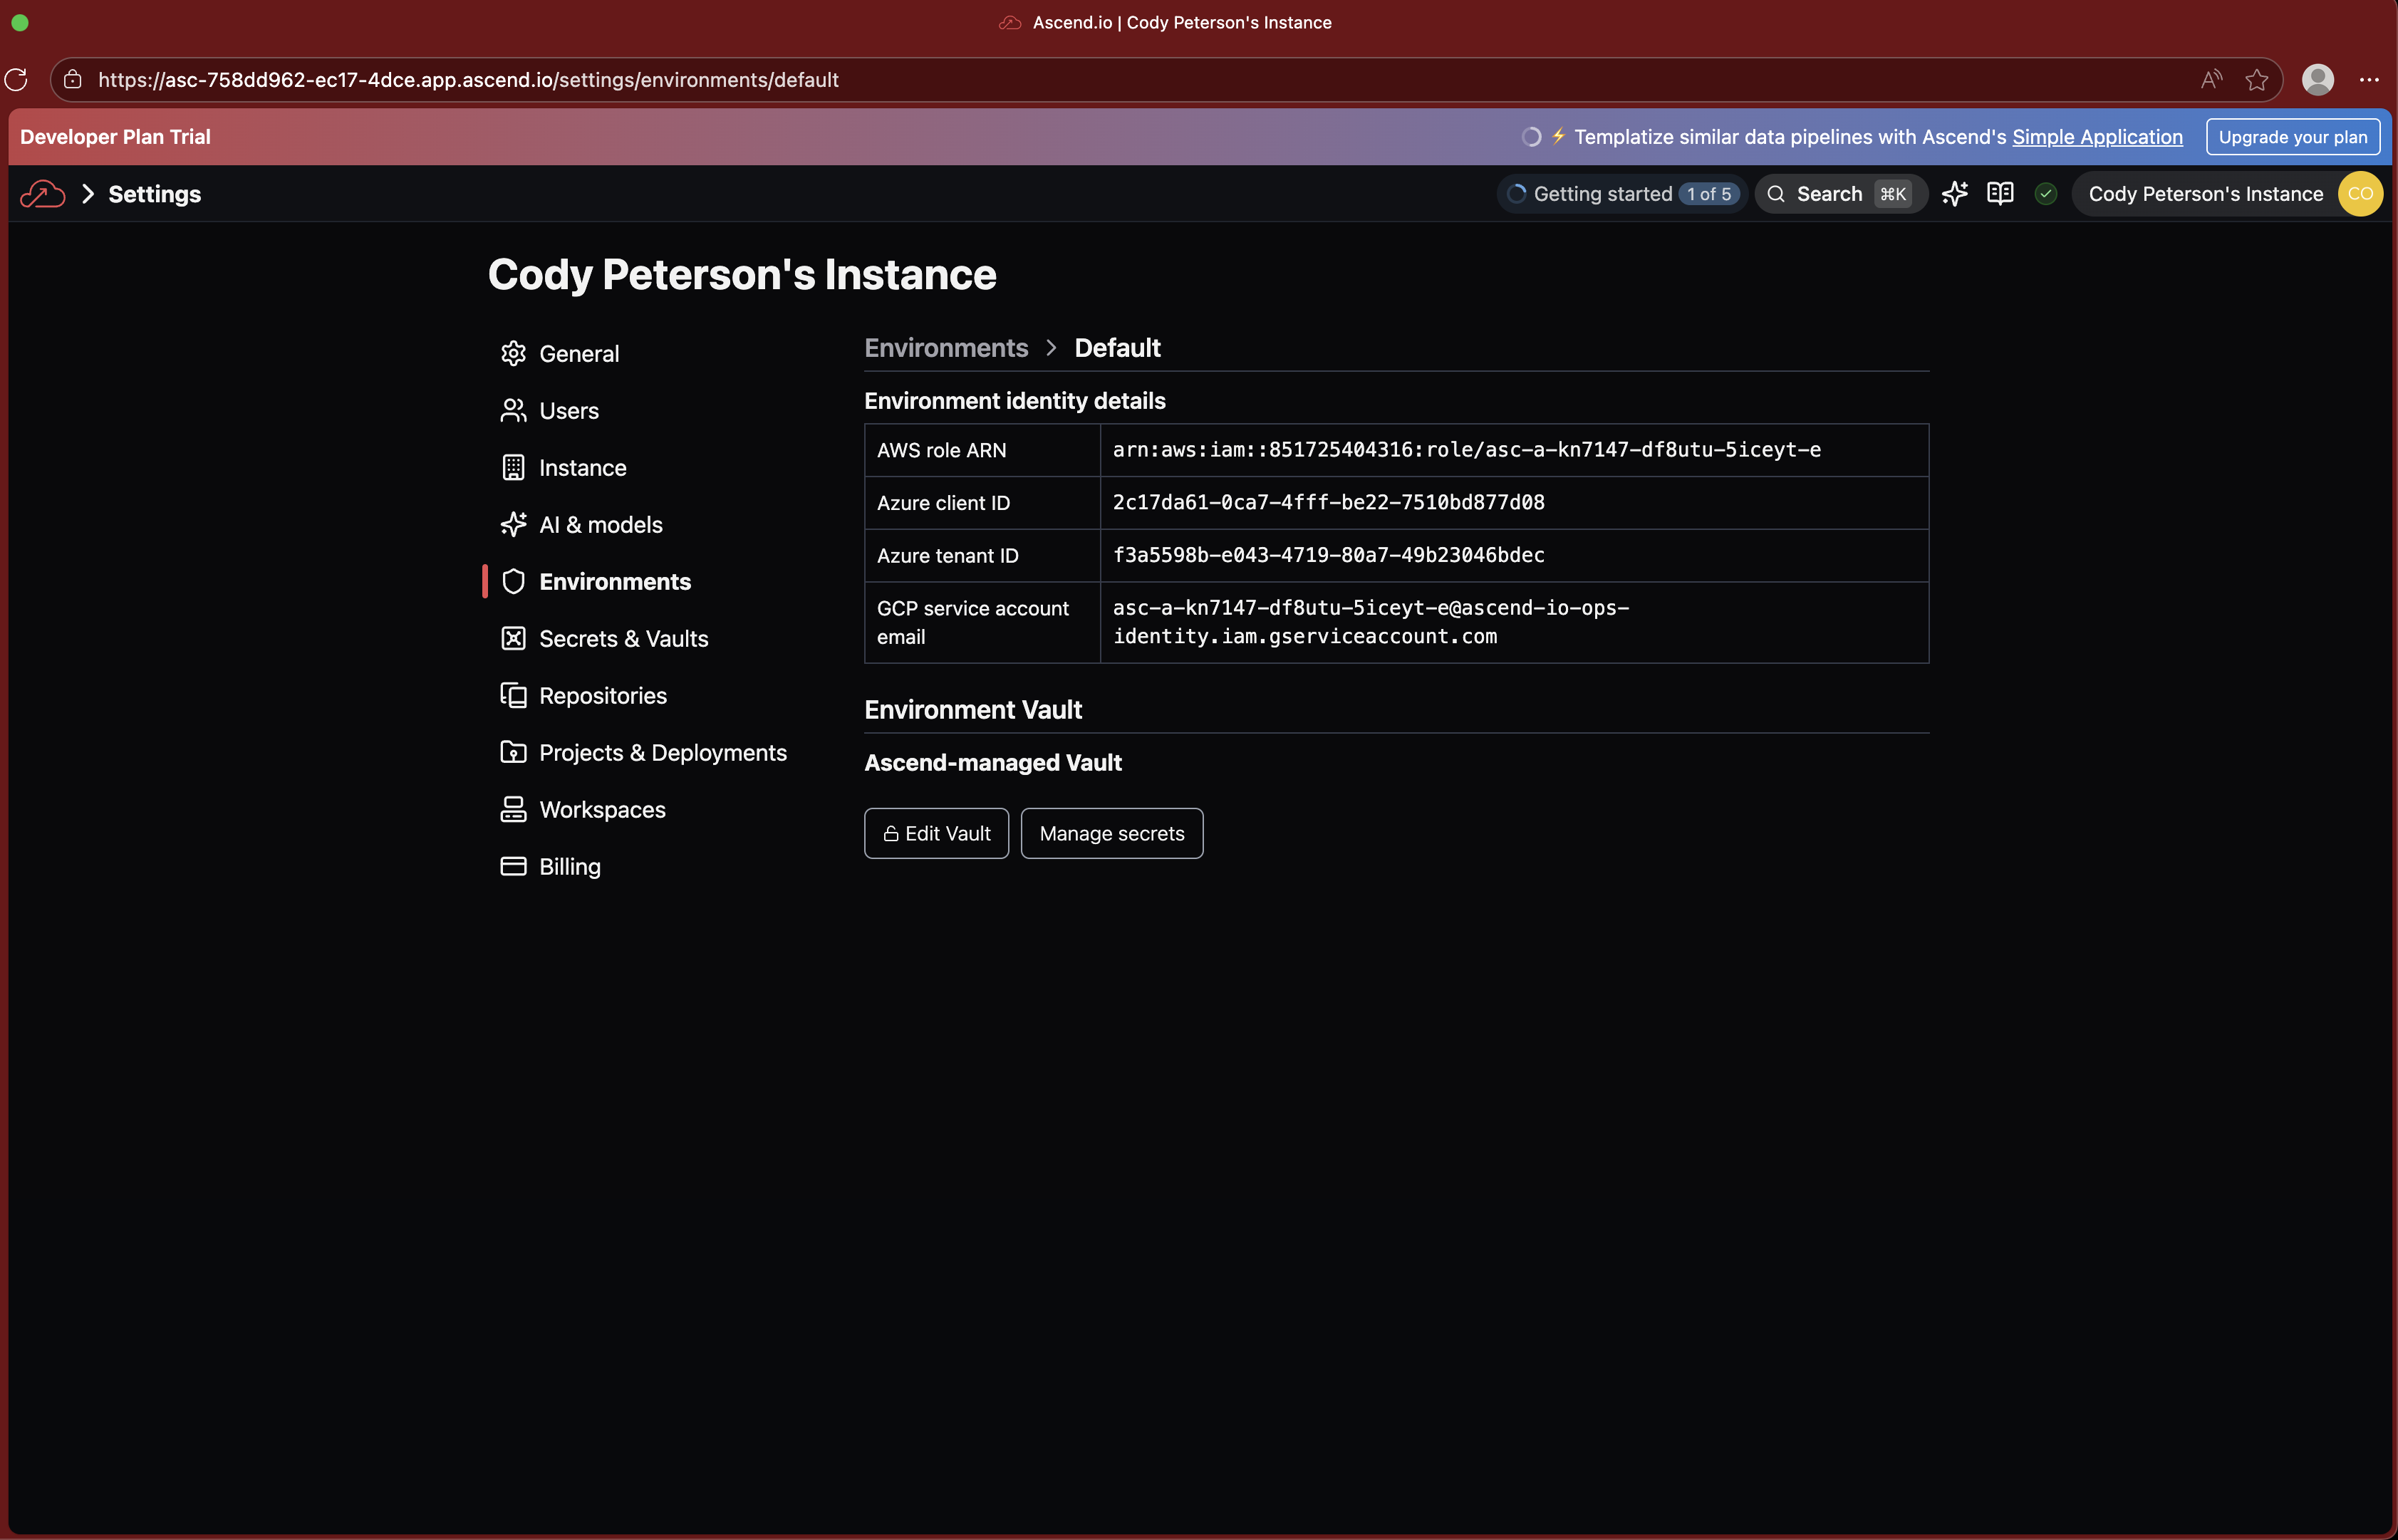
Navigate to your Ascend Settings (top right with your instance name and user icon)
-
Click Environments
-
Select the Dev environment
-
Copy the GCP Service Account Email for the environment
-
Run the script below:
ASCEND_ENVIRONMENT_SERVICE_ACCOUNT_EMAIL=<ascend-environment-gcp-service-account-email>
gcloud projects add-iam-policy-binding \
--member="serviceAccount:${ASCEND_ENVIRONMENT_SERVICE_ACCOUNT_EMAIL}" \
--role="roles/secretmanager.viewer" \
--condition=None \
${PROJECT_ID}
gcloud projects add-iam-policy-binding \
--member="serviceAccount:${ASCEND_ENVIRONMENT_SERVICE_ACCOUNT_EMAIL}" \
--role="roles/secretmanager.secretAccessor" \
--condition=None \
${PROJECT_ID}
-
-
In the Ascend UI, update the Environment Vault from above
- Click Edit Vault
- Set GCP Project ID to your project ID
- Click Check and Update Vault
-
Use the GCP credentials wizard to create a Service Account with BigQuery access. Make sure the project you created above is selected from the dropdown in the top left.
-
For Credential Type (Which API are you using?):
- Select an API: choose BigQuery API
- What data will you be accessing? choose Application data
- Click Next
-
Continue with the wizard and create a service account for your dev environment. For more information, refer to Create a service account in the Google Cloud docs.
- Service account name: enter Ascend Quickstart Dev
- Service account ID: leave the auto-default (
ascend-quickstart-dev
) - Service account description: enter Service account for Ascend Quickstart Dev environment
- Click Create and continue
-
Continue with the wizard and grant the service account the necessary permissions. For more information, refer to Granting roles to a service account in the Google Cloud docs.
- Select a role dropdown: choose BigQuery Admin
- Leave the Grant users access to this service account fields blank
- Click Next
-
Click Done.
-
-
Create a service account key from the Service accounts page.
- Select the service account you created above
- Navigate to the Keys tab
- Click Add Key
- Click Create new key
- Select JSON as the key type
- Click Create
- Move the key somewhere safe, such as your
~/.ascend
directory
-
Add the service account key to Secret Manager.
- Navigate to the Secret Manager page
- If Secret Manager is not enabled, click Enable
- Click Create Secret
- Enter Name:
ascend-quickstart-dev-service-account
- Enter Secret value: Browse and upload the key file you created above
- Leave the remaining fields at their default values
- Click Create Secret
-
Grant Ascend access to Google Secret Manager
- Navigate to your Ascend Settings (top right with your instance name and user icon)
- Click Environments
- Select the Dev environment
- Copy the GCP Service Account Email for the environment
- Go to your GCP IAM Settings and grant the above service account the
Secret Manager Viewer
role.- Click Grant Access
- Paste the service account email into the New principals field
- Select Secret Manager Viewer from the Role dropdown
- Click Save
- In the Ascend UI, update the Environment Vault from above
- Click Edit Vault
- Set GCP Project ID to your project ID
- Click Check and Update Vault
If you need to go back and look at the GCP resources you created, here are some helpful links:
Set up a Git Repository​
When you develop in Ascend, you will need to provide a Git repository in which to store your code. This step will guide you through how to set up a Git repository and add it to your Ascend Instance.
- Create a new repository
- GitHub
- Navigate to GitHub's New Repository page
- Set Owner to either your personal GitHub account, or your organization.
tip
If you have the appropriate permissions to your company's GitHub Organization, you can create a new repository within your organization. If you do not have admin access, you can create a new repository within your personal account, which will show up in the list as your GitHub name.
- Set Repository name to
ascend-quickstart-bigquery
(or your preferred name) - Set Description to
Ascend Quickstart BigQuery
- Set Public/Private to Private
- Click Create repository
-
Next, we'll clone the Ascend Community Repository and push it to your new repository.
# Set the variables
GITHUB_ORG="<your-github-org>" # If you are using your personal account, set this to your username
GITHUB_REPO="ascend-quickstart-bigquery"# Clone the Ascend Community Repository
git clone git@github.com:ascend-io/ascend-community.git ${GITHUB_REPO}
cd ${GITHUB_REPO}
# Set the remote URL to your new repository
git remote set-url origin git@github.com:${GITHUB_ORG}/${GITHUB_REPO}.git
# Push the code to your new repository
git push -u origin main
Connect Ascend to your Git Repository​
Create the SSH key pair​
- Linux
- Mac
- Windows
-
On your local machine, open a terminal and run the following command:
mkdir -p ~/.ssh && ssh-keygen -t ed25519 -f ~/.ssh/ascend_quickstart_repo_key -q -N ""
-
This command will generate a new SSH key pair in the
~/.ssh
directory. -
The public key will be saved in
~/.ssh/ascend_quickstart_repo_key.pub
-
The private key will be saved in
~/.ssh/ascend_quickstart_repo_key
.tipYou can copy the contents of a file (eg: the public key) to your clipboard by running:
cat ~/.ssh/ascend_quickstart_repo_key.pub | xclip -selection clipboard
Or if xclip is not installed:
cat ~/.ssh/ascend_quickstart_repo_key.pub
and manually copy the output.
- On your local machine, open a terminal and run the following command:
mkdir -p ~/.ssh && ssh-keygen -t ed25519 -f ~/.ssh/ascend_quickstart_repo_key -q -N ""
- This command will generate a new SSH key pair in the
~/.ssh
directory. - The public key will be saved in
~/.ssh/ascend_quickstart_repo_key.pub
- The private key will be saved in
~/.ssh/ascend_quickstart_repo_key
.tipYou can copy the contents of the public key to your clipboard by running:
cat ~/.ssh/ascend_quickstart_repo_key.pub | pbcopy
- On your local machine, open PowerShell and run the following commands:
# Create .ssh directory if it doesn't exist
New-Item -ItemType Directory -Force -Path "$env:USERPROFILE\.ssh"
# Generate SSH key
ssh-keygen -t ed25519 -f "$env:USERPROFILE\.ssh\ascend_quickstart_repo_key" -N '""' - This command will generate a new SSH key pair in the
.ssh
directory within your user profile folder. - The public key will be saved in
%USERPROFILE%\.ssh\ascend_quickstart_repo_key.pub
- The private key will be saved in
%USERPROFILE%\.ssh\ascend_quickstart_repo_key
.tipYou can copy the contents of the public key to your clipboard by running:
Get-Content "$env:USERPROFILE\.ssh\ascend_quickstart_repo_key.pub" | Set-Clipboard
Add the public key to your repository​
- Bitbucket
- Github
- Gitlab
To allow for Ascend to have write access to your Bitbucket repository, you will need to add your public key to a Bitbucket account with write access, not to the repository itself.
Please follow the instructions under Provide Bitbucket Cloud with your public key to add the public ssh key to a Bit Bucket user.
Please follow the instructions here to setup the public ssh key in your Github repository.
Please follow the instructions here to setup the public ssh key in your Gitlab repository. You will to need to grant write permissions to the key.
Add the private key to Ascend​
- In the Ascend UI, navigate to the instance settings by clicking on the button in the top right with your instance name and your user icon.
- Click on the Repositories settings tab.
- Click the Add Repository button.
- Set Repository URL to the URL of your repository. This should be in the format
git@github.com:<github-org>/<github-repo>.git
. - Set SSH Private Key to the private key you generated in the previous step.
- Click Create.
Create an Ascend Project​
With your Git Repository connected, you can now create an Ascend Project.
- In the Ascend UI, navigate to the instance settings by clicking on the button in the top right with your instance name and your user icon.
- Click on the Projects settings tab.
- Click the Add Project button.
- Set Title to
Ascend Quickstart BigQuery
- Select Repository from the pulldown options.
- Set Project Root to 'ottos_expeditions/'
- Click Save.
Create your developer Workspace​
Now, let's create a workspace for us to develop in.
- In the Ascend UI, navigate to the instance settings by clicking on the button in the top right with your instance name and your user icon.
- Click on the Workspaces settings tab.
- Click the Add Workspace button.
- Set Title to
Ascend Quickstart BigQuery
- Select Environment as
Dev
- Set Project to the project you created above (
Ascend Quickstart BigQuery
) - Set Git Branch to
my-first-branch
(You can type the branch name and click "New Branch:my-first-branch" to create it if it doesn't already exist) - Set Profile as
prod
- Select Size as
X-Small
- Set Storage to
8GB
- Click Save.