GitLab
Prerequisites
To complete this how-to guide you need:
- A GitLab account
- A terminal with:
- Git CLI installed (pre-installed on macOS and Linux, or use
brew install gitwith Homebrew)
- Git CLI installed (pre-installed on macOS and Linux, or use
Set up variables
Set the GitLab group and repository to use:
Leave GITLAB_GROUP empty to use your GitLab username.
GITLAB_GROUP=""
GITLAB_REPOSITORY="ascend-community"
Choose your Ascend data plane:
- BigQuery
- Databricks
- Snowflake
DATA_PLANE="bigquery"
DATA_PLANE="databricks"
DATA_PLANE="snowflake"
Otto's Expeditions is compatible with multiple data planes. You can explore the demo using separate projects for each data plane or create a single project that uses multiple data planes simultaneously. This guide focuses on a single data plane setup.
Check that the GitLab group is set:
if [ -z "$GITLAB_GROUP" ]; then
  echo "you didn't set a GitLab group, using your GitLab username..."
  GITLAB_GROUP=$(git config user.name)
fi
echo "$GITLAB_GROUP/$GITLAB_REPOSITORY"
Copy Ascend Community code to your repository
You can use the following command to check if the repository already exists:
git ls-remote git@gitlab.com:$GITLAB_GROUP/$GITLAB_REPOSITORY.git
Change the variables above if needed.
- Create a new repository (recommended)
- Use an existing repository
Clone the public ascend-io/ascend-community GitHub repository:
git clone https://github.com/ascend-io/ascend-community.git $GITLAB_REPOSITORY
Change into the repository directory:
cd $GITLAB_REPOSITORY
Remove the .git directory:
rm -rf .git
Initialize a new .git directory:
git init
Create a commit:
git checkout -b main
git add .
git commit -m "copy code from ascend-io/ascend-community"
Set the root of the project:
PROJECT_ROOT="ascend-community/ottos-expeditions/projects/$DATA_PLANE"
If you do not have the existing repository locally, clone it:
git clone git@gitlab.com:$GITLAB_GROUP/$GITLAB_REPOSITORY.git
Change into the repository directory:
cd $GITLAB_REPOSITORY
Check your current Git branch and status:
git branch
git status
Clone the ascend-io/ascend-community GitHub repository:
git clone https://github.com/ascend-io/ascend-community.git ascend-community
Change into the ascend-community directory:
cd ascend-community
Remove the .git directory:
rm -rf .git
Create a commit:
git add .
git commit -m "copy code from ascend-io/ascend-community"
git push
Set the root of the project:
PROJECT_ROOT="ascend-community/ottos-expeditions/projects/$DATA_PLANE"
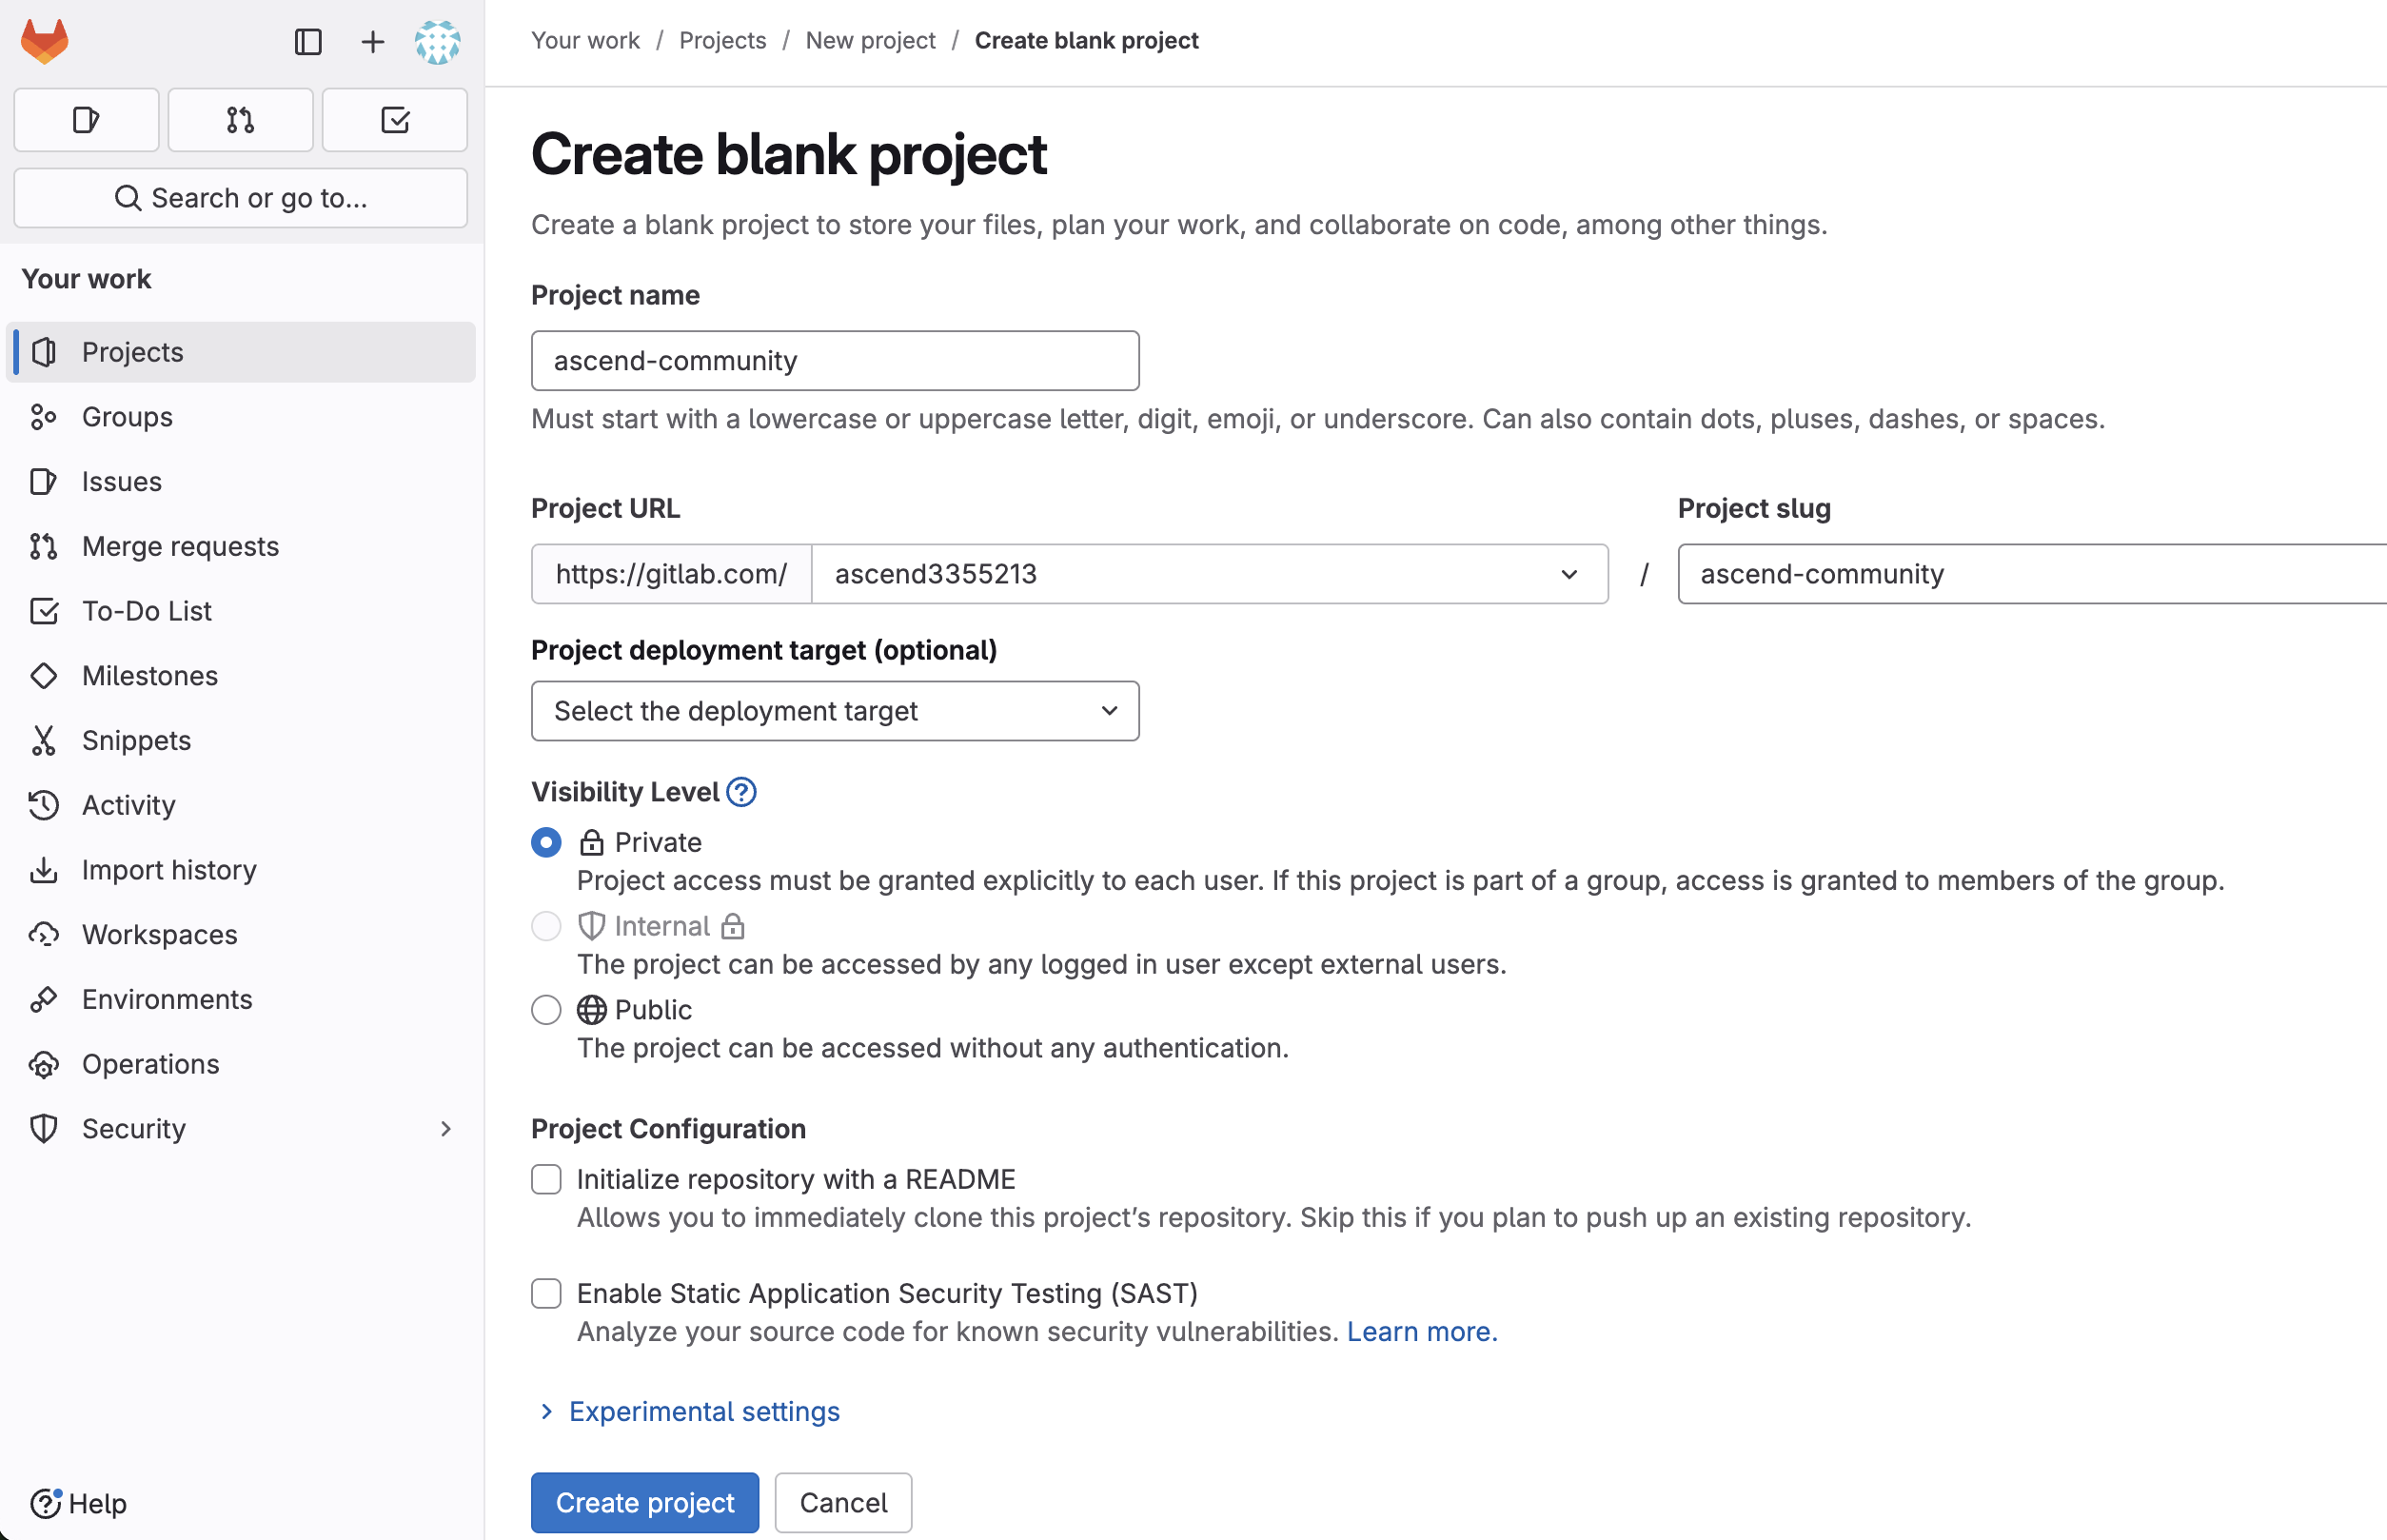
Create a new private repository in GitLab:
- Go to GitLab, click New project, and select Create blank project.
- Set the project name to
ascend-community(matching$GITLAB_REPOSITORY). - Choose Private for visibility level.
- Uncheck the box for Initialize repository with a README
- Click Create project.

Enable SSH access to the GitLab repository
Ascend requires a private SSH key to access your GitLab repository. You must set the corresponding public SSH key in your GitLab account settings.
Set up variables
Choose a name for the SSH key:
SSH_KEY_NAME="ascend_ottos_expeditions"
Create a new SSH key on your local machine
Create a new SSH key:
ssh-keygen -t ed25519 -N "" -f ~/.ssh/$SSH_KEY_NAME
Add the SSH public key to your GitLab account
This section uses the pbcopy command, which is specific to macOS. If you're using a different OS, please use the appropriate command for your system to copy text to the clipboard.
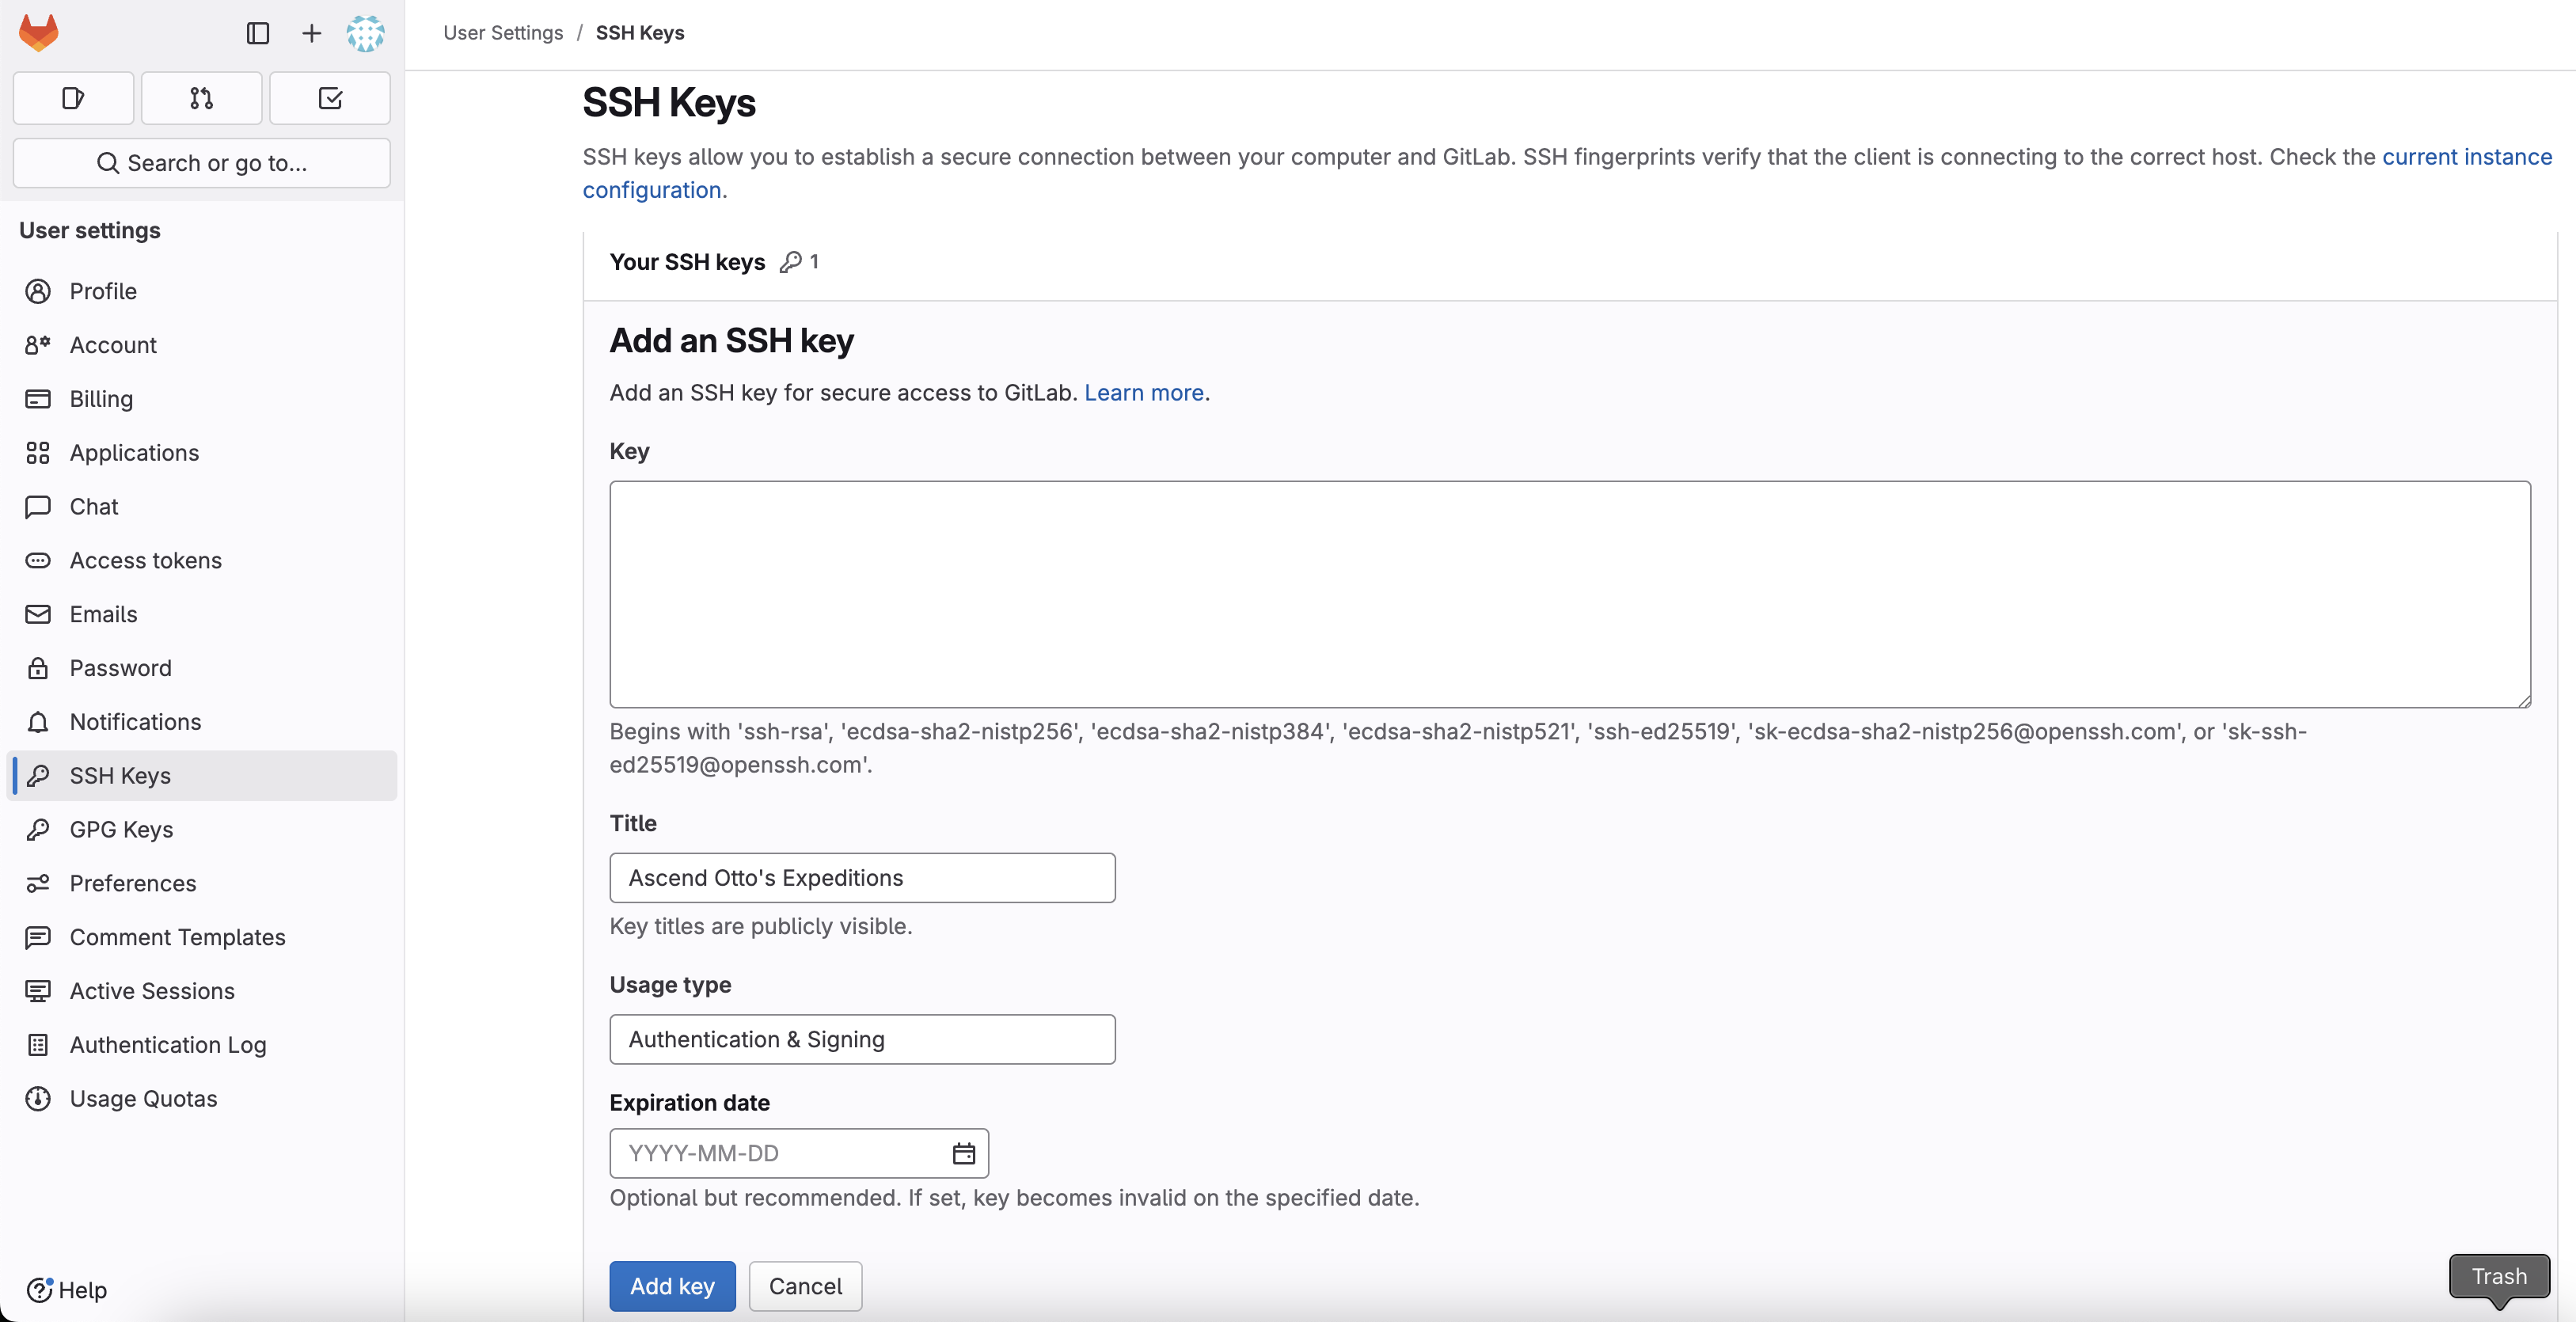
- In GitLab, click Add SSH Key in the pop-up at the top of your Repository (or go to User Settings > SSH Keys)

- Click Add new key
- Copy your public key and paste it into the
Keyfield:
cat ~/.ssh/$SSH_KEY_NAME.pub | pbcopy
- Title: "Ascend Otto's Expeditions"
- Usage Type: "Authentication & Signing"
- Optionally, add an expiration date for security.

- Click
Add key.
Confirm in the GitLab UI
Open your repository in the GitLab UI to confirm everything looks correct:
git remote -v
Push the code to the new repository:
git push -u origin main
If you run into the following error, follow these steps to update your GitLab SSH configuration and try again:
❯ git push -u origin main
git@gitlab.com: Permission denied (publickey).
fatal: Could not read from remote repository.

Please make sure you have the correct access rights
and the repository exists.
Set the root of the project:
PROJECT_ROOT="ottos-expeditions/projects/$DATA_PLANE"
Create the Ascend Repository
In the Ascend UI, navigate to Settings > Repositories and click Add Repository.
This section uses the pbcopy command, which is specific to macOS. If you're using a different OS, please use the appropriate command for your system to copy text to the clipboard.
Copy the repository URI
Copy the repository URI to the clipboard:
echo "git@gitlab.com:$GITLAB_GROUP/$GITLAB_REPOSITORY.git" | pbcopy
Paste it into the Repository URI field in the Ascend UI.
Copy the SSH private key to clipboard
Copy the SSH private key to the clipboard:
cat ~/.ssh/$SSH_KEY_NAME | pbcopy
Paste it into the SSH Private Key field in the Ascend UI.
If you're manually copying the SSH private key, ensure you copy the entire key of the form:
-----BEGIN OPENSSH PRIVATE KEY-----
XXXXXXXXXXXXXXXXXXXXXXXXXXXXXXXXXXXXXXXXXXXXXXXXXXXXXXXXXXXXXXXXXXXXXX
XXXXXXXXXXXXXXXXXXXXXXXXXXXXXXXXXXXXXXXXXXXXXXXXXXXXXXXXXXXXXXXXXXXXXX
XXXXXXXXXXXXXXXXXXXXXXXXXXXXXXXXXXXXXXXXXXXXXXXXXXXXXXXXXXXXXXXXXXXXXX
XXXXXXXXXXXXXXXXXXXXXXXXXXXXXXXXXXXXXXXXXXXXXXXXXXXXXXXXXXXXXXXXXXXXXX
XXXXXXXXXXXXXXXXXXXXXXXXXXXXXXXXXXXXXXXXXXXXXXXXXXXXXXXX
-----END OPENSSH PRIVATE KEY-----
Including the -----BEGIN OPENSSH PRIVATE KEY----- and -----END OPENSSH PRIVATE KEY----- lines.
Click Check and Save.
Create the Ascend Project
In the Ascend UI, navigate to Settings > Projects and click Add Project.
Set the Title to "Otto's Expeditions", or whatever you like! For the Repository field, select the repository you just added from the dropdown.
Copy the Project Root to your clipboard:
echo "$PROJECT_ROOT" | pbcopy
Paste it into the Project Root field in the Ascend UI. Click Save.
Next steps
🎉 Congratulations, you're ready to create an Ascend Workspace and start using Otto's Expeditions!