Ascend Essentials
Overview
Welcome to Ascend Essentials, the foundation of the Ascend Certification Program. In this short, practical course, you’ll build a simple, end-to-end data pipeline and get comfortable ingesting, transforming, and delivering data in Ascend.
In this course, you'll gain practical experience with:
- Core platform concepts - Understand Ascend's architecture and declarative approach
- End-to-end pipeline building - Create a complete data pipeline from scratch
- Connections - Configure Connections to various data sources
- Transforms - Write SQL transformations to manipulate data
- *Plus, preview advanced capabilities including AI, smart data processing, and more!
This course takes approximately 1 hour to complete.
Prerequisites
Before we get started, let's make sure you have all the course requirements based on your data warehouse solution:
- Snowflake
- Browser: Google Chrome recommended for optimal experience (other modern browsers will work)
- Email: Email account for registration and pipeline building sections
- Google account: Required for OAuth authentication
- Snowflake account: For computational processing and data storage
Once you've met these prerequisites, you'll be ready to complete all parts of the course.
What is Ascend?
Ascend is a unified data engineering platform that lets you build, automate, observe, and optimize your data pipelines. With Ascend, you get an all-in-one solution for your data engineering needs.
At its core, Ascend eliminates manual workflow management by handling pipeline orchestration and scaling automatically. The platform intelligently tracks data lineage, detects changes, and only reprocesses what's necessary — reducing redundant computation and lowering cloud costs.
Unlike traditional ETL tools, Ascend uses a primarily declarative approach: you specify what your data should look like, and the platform determines the most efficient processing path. You can also use imperative approaches as needed to customize configurations.
Ascend also enables data mesh architecture, moving data seamlessly across domains. By integrating with data warehousing solutions like Snowflake, Databricks, and BigQuery, Ascend creates an environment where data teams can collaborate effectively and scale their data architecture efficiently.
Setup
Ascend sits on top of your existing data stack. Select your data warehousing solution below to set up the Data Plane for your pipelines.
A Data Plane is the cloud environment where your data pipeline workloads run. In Ascend, you need at least one Data Plane but can use multiple to implement data mesh architecture.
By operating on top of your Data Plane, Ascend orchestrates storage and computation resources. For example, when using Snowflake as your Data Plane, any SQL transform in Ascend executes in Snowflake using your configured resources.
- Snowflake
Using your Snowflake account from the Prerequisites section, you'll set up:
- Instance Store
- Project
- Deployment
- Flow
To begin setup, navigate to the Settings menu by:
- Clicking your profile in the top right
- Selecting Settings
Follow the Snowflake quickstart.
Pipeline Building: You must complete the quickstart guide to proceed with the pipeline building sections of this course.
Prepare to climb
Let's put theory into practice! In this exercise, you’ll be working with Otto's Expeditions, a company that crafts unforgettable mountain adventures led by Otto, the data pipeline GOAT.

While preparing for your expedition, Otto has discovered some route closures in the area. For safety reasons, you need to identify which routes to avoid during your journey.
Data
Otto is quick on his hooves, so he's already compiled information about route closures to help you investigate. Here's a sample of the data:
| Route ID | Start date | End date | Reason |
|---|---|---|---|
| OR-ROC | 2026-01-01 | 2026-12-31 | Construction |
| OHT_ROC | 2026-01-01 | 2026-02-20 | All staff will be on vacation |
| GML-ALP | 2026-02-01 | 2026-02-28 | Renovations |
Otto suspects these closures might relate to recent weather conditions and wants to investigate possible correlations. Luckily, he maintains daily weather data:
| timestamp | location | temperature | precipitation | wind_speed | year | month | day |
|---|---|---|---|---|---|---|---|
| 2025-03-10 00:00:00 | New Joseph | 86.1789 | 2.5993 | 62.8702 | 2025 | 3 | 10 |
| 2025-03-10 00:03:00 | Nielsenville | 84.8883 | 64.5352 | 41.4268 | 2025 | 3 | 10 |
| 2025-03-10 00:04:30 | North Tina | 62.7205 | 91.1594 | 69.9382 | 2025 | 3 | 10 |
| 2025-03-10 00:06:00 | West Joytown | 0.8077 | 52.2875 | 61.6306 | 2025 | 3 | 10 |
| 2025-03-10 00:07:30 | Crystalville | 52.7327 | 23.0598 | 0.5536 | 2025 | 3 | 10 |
The first table route_closures.csv shows us each route's ID and closure dates, but as beginner climbers, we can't easily identify these routes by ID alone. On the other hand, weather.csv shows when and where weather events occurred, but doesn't indicate which climbing routes might be affected.
Data analysis
Our task is to combine these datasets so Otto can analyze potential correlations between weather patterns and route closures. We'll need to:
- Ingest both data files:
route_closures.csvweather.csv
- Join the datasets
- Export the combined dataset for Otto's analysis
Create Connections
To work with our data, we first need to bring both datasets into the same cloud environment. Currently, they exist in separate systems:
route_closures.csvis in an Amazon S3 bucketweather.csvis in a Google Cloud Storage (GCS) bucket
We can unify them by creating Connections to each source and ingesting the data into your Data Plane, we can work with both datasets in the same place.
In Ascend, a Connection establishes a link between the platform and external data sources or destinations such as databases, data lakes, warehouses, or APIs.
Connections provide the configuration details needed to read from or write to these external systems, enabling seamless data movement across different storage locations.
Build activity
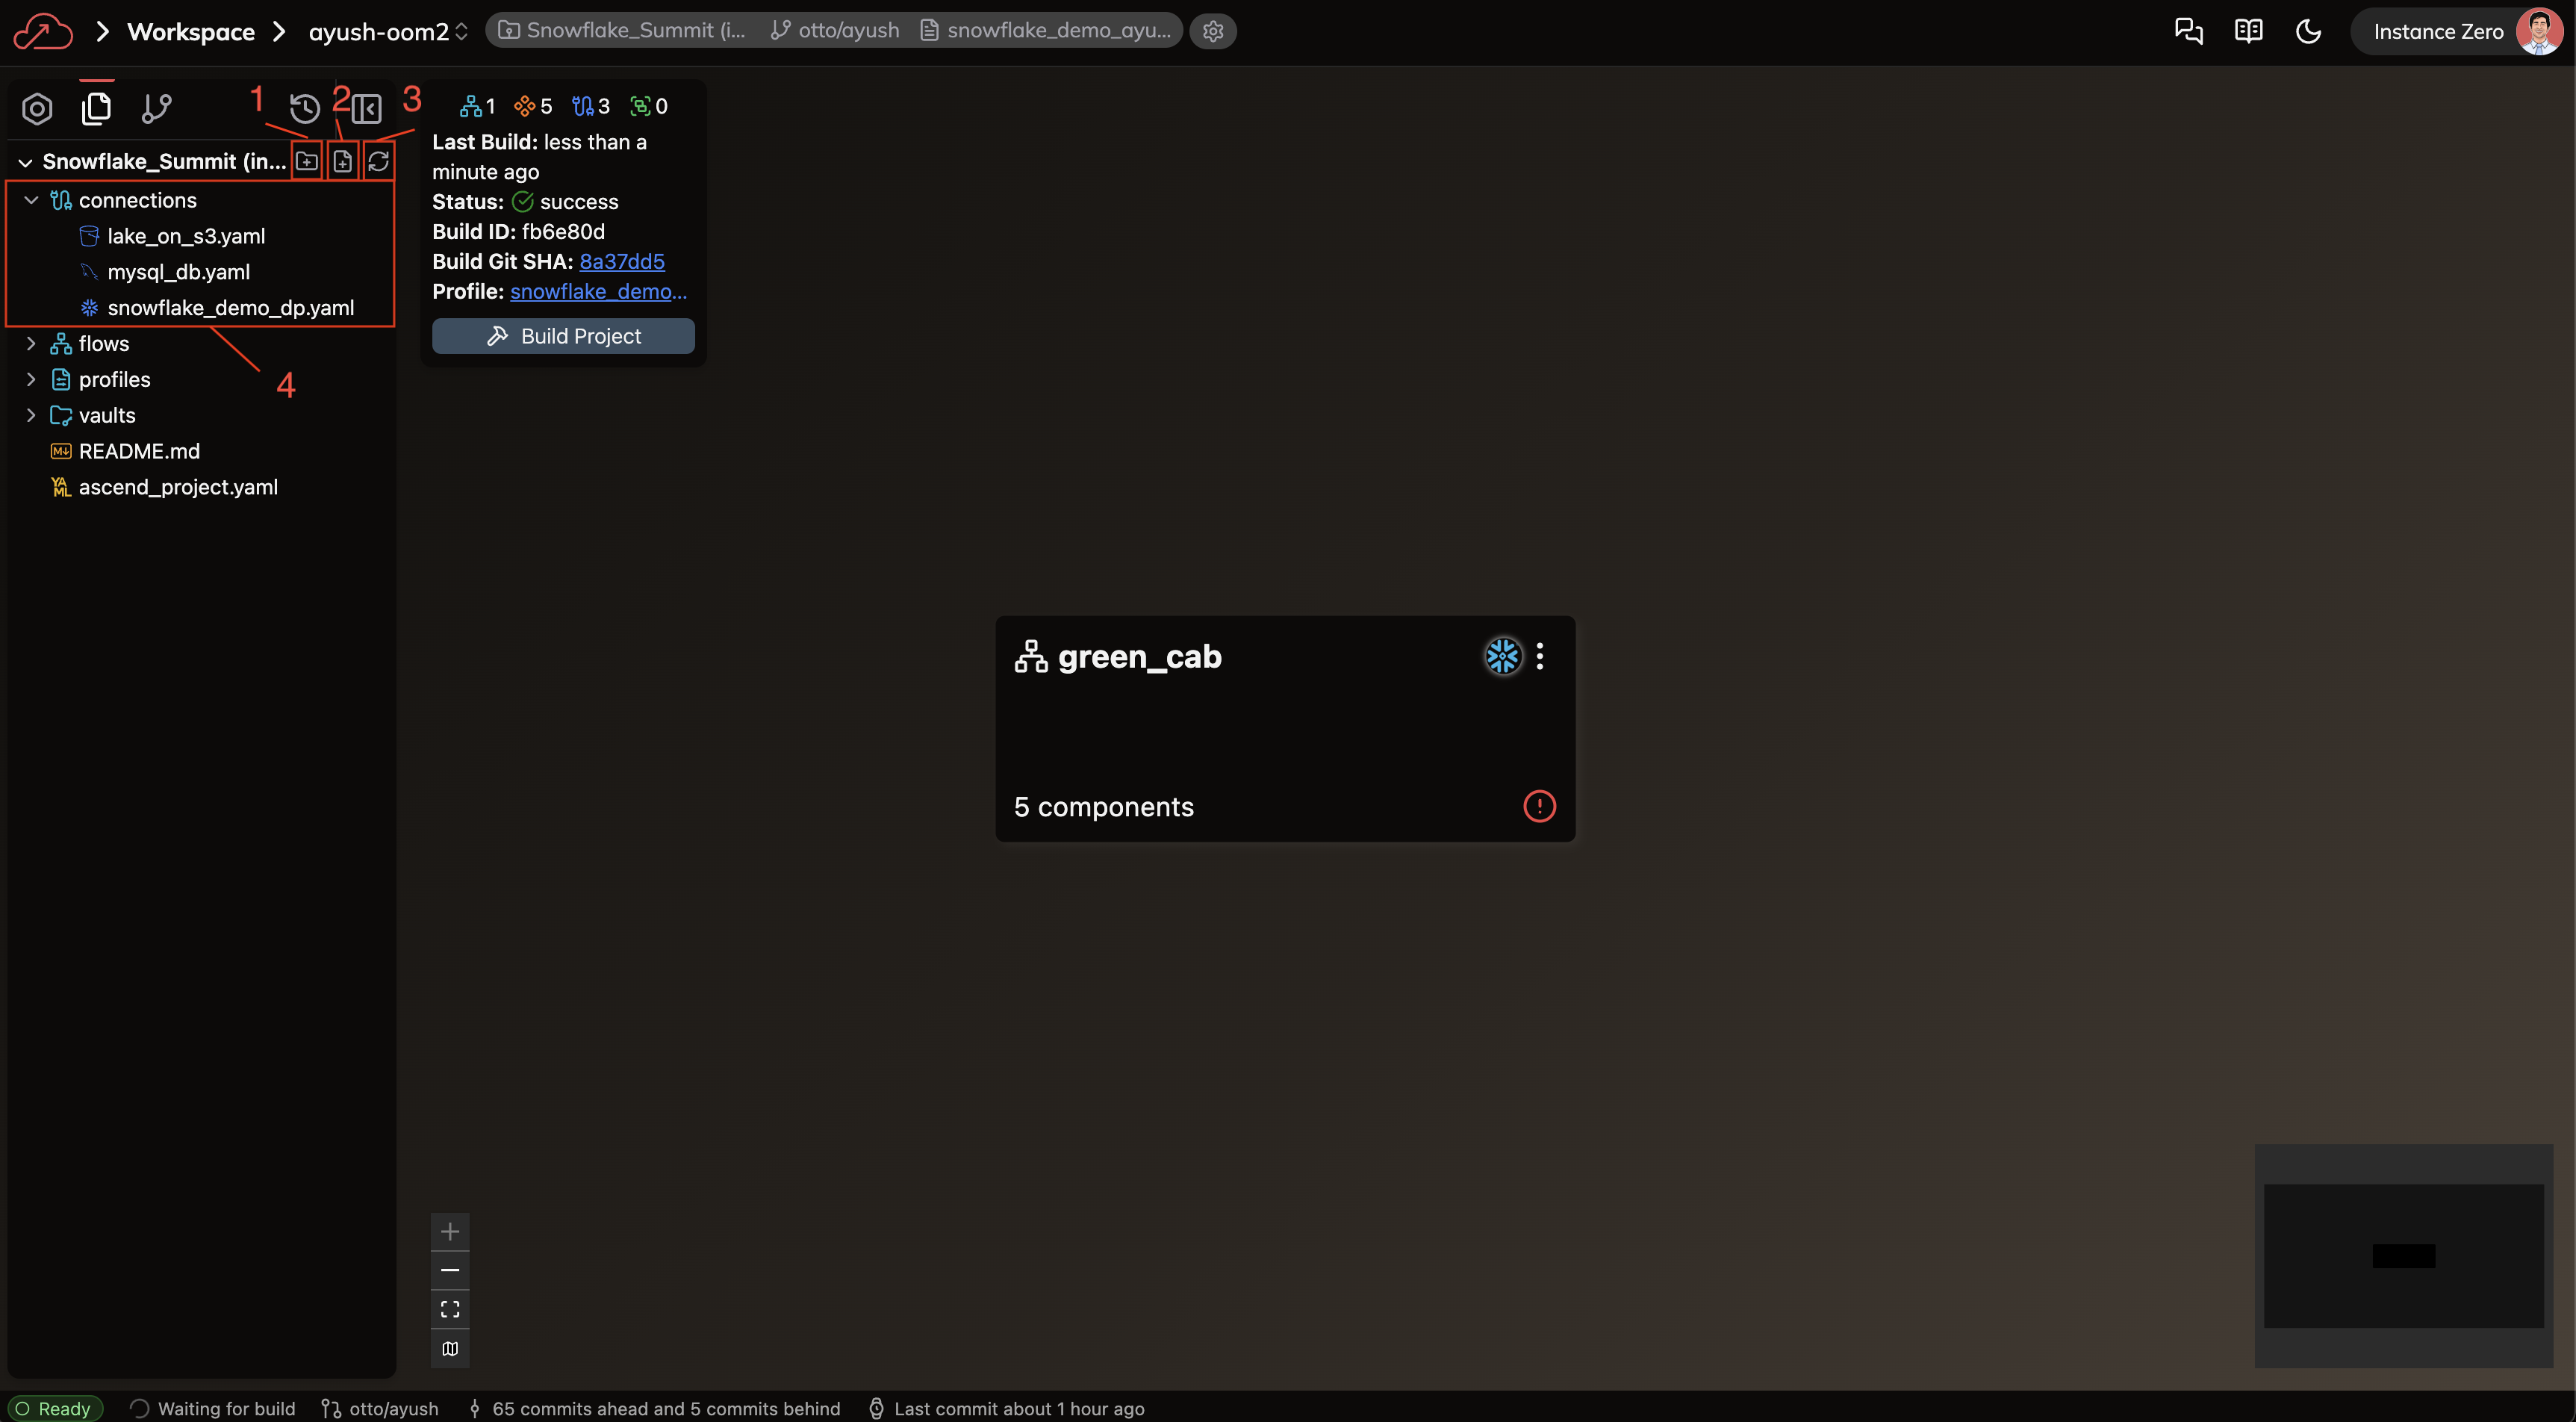
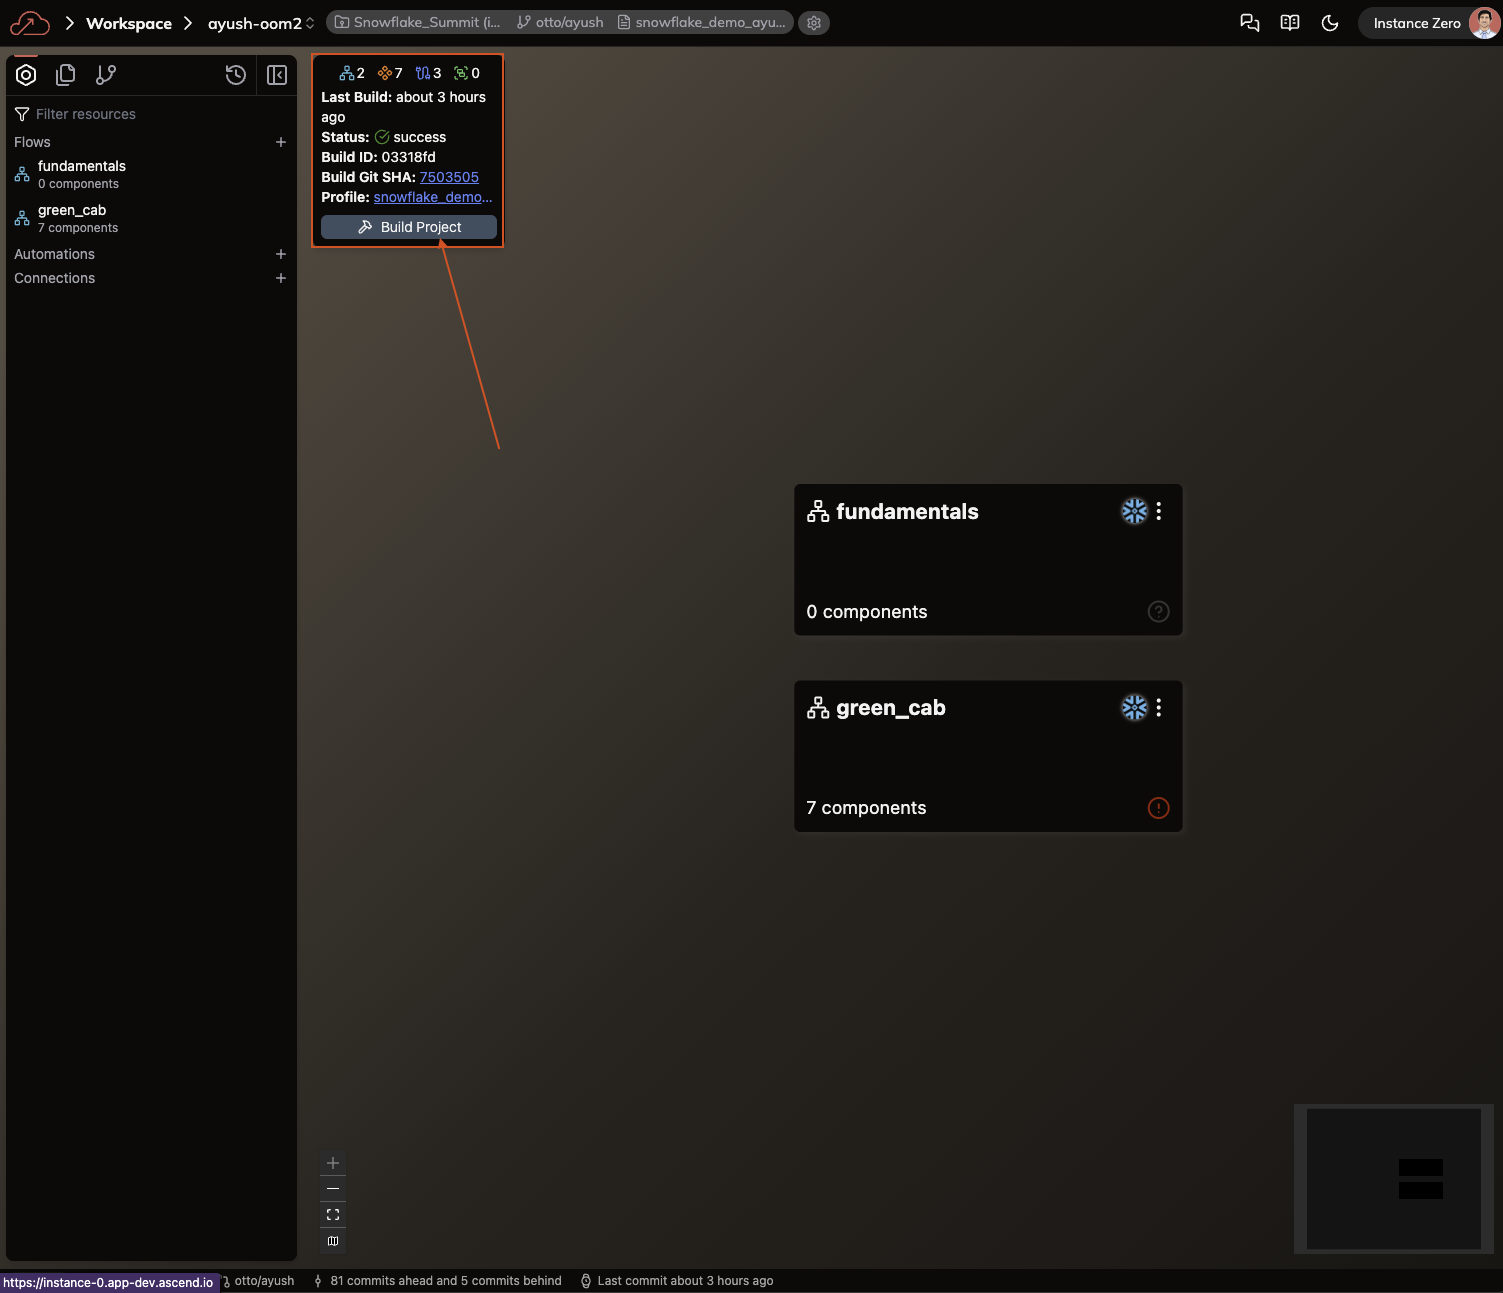
Let's create a Connection to S3. First, let's familiarize ourselves with the interface:
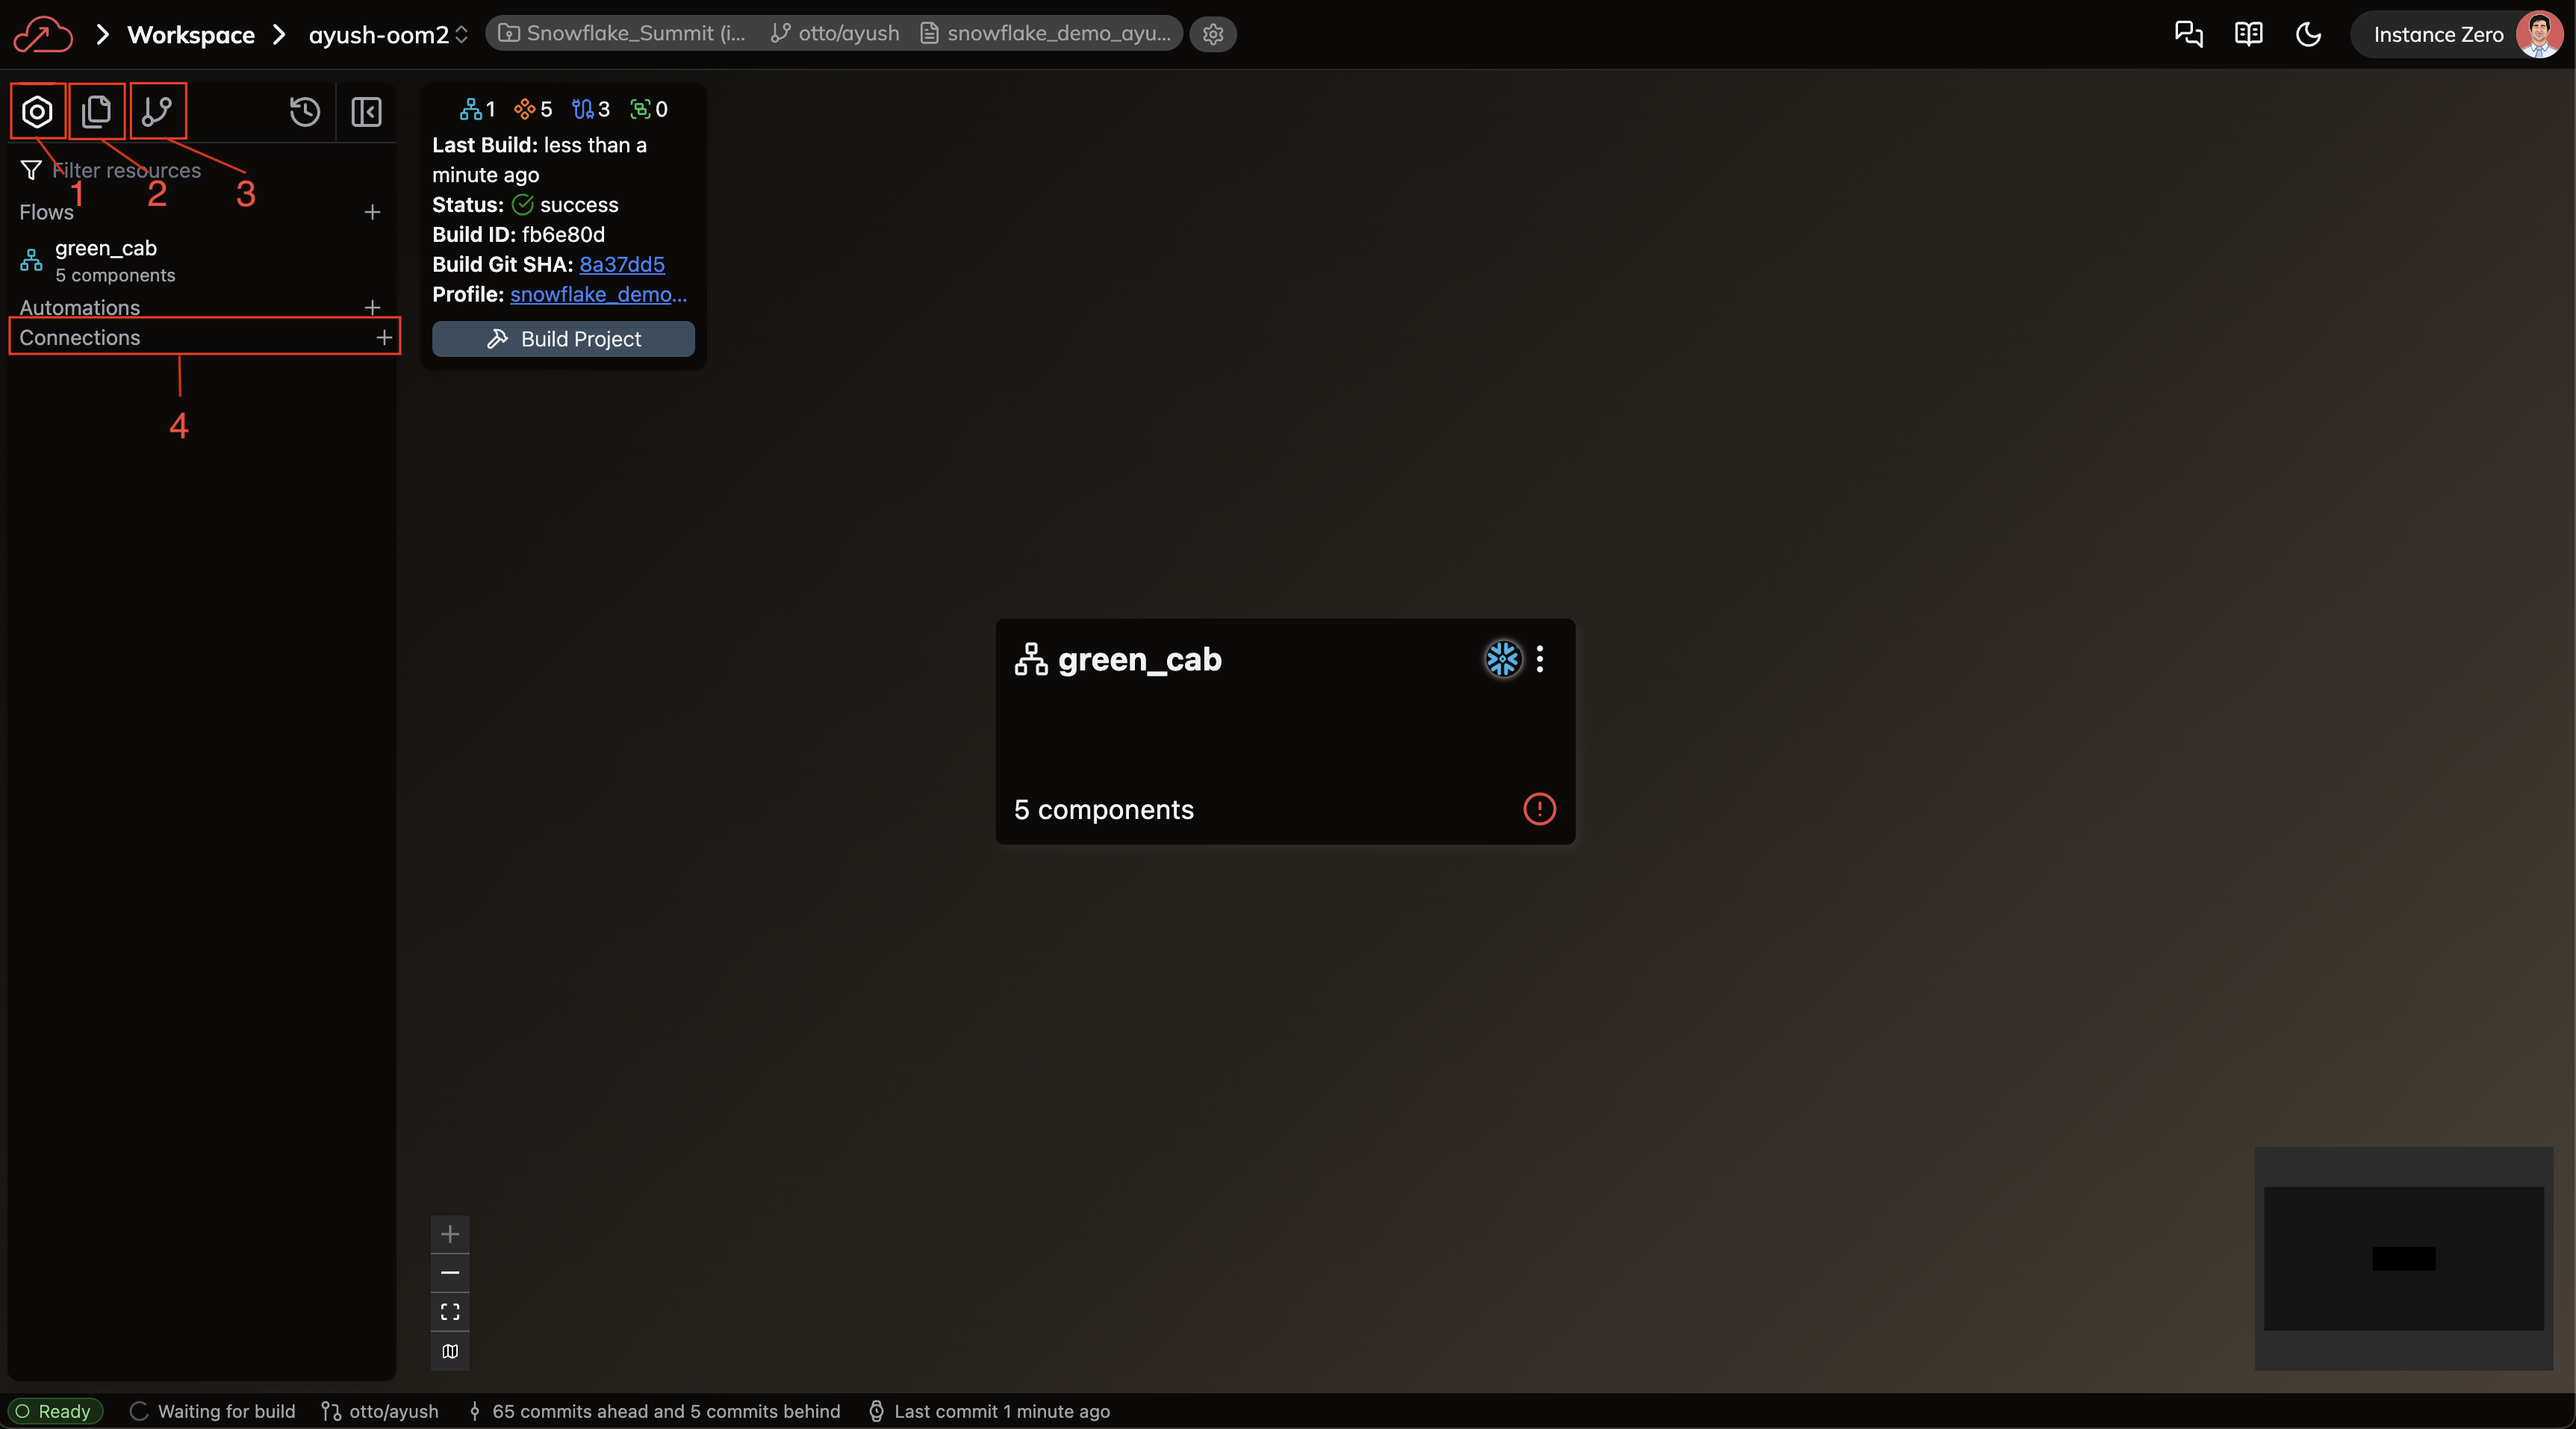
We're currently in the Build activity panel (see box 1 in the image above), which is the default view when entering a Workspace. There are four key areas to note:
- Build activity: Provides a high-level overview of your Workspace Components, including Flows, Automations, and Connections.
- Files activity: Displays a file system view of all Workspace files, offering a more detailed view of your Project structure.
- Source Control activity: Shows a historical log of changes recorded in your branch's source control.
- Connections: Lists all available Connections that your Workspace can use to interact with external systems.
The Build activity panel is your primary tool for running and viewing Flows. After building a Project, this panel displays all Flows with summary information about successful builds. Use it when navigating through Flows or when running and testing pipelines.
Click the + sign next to the Connections section (box 4 in the image above) to open the form for creating a new Connection.
Create a Connection using Forms
You should now see a form like this:
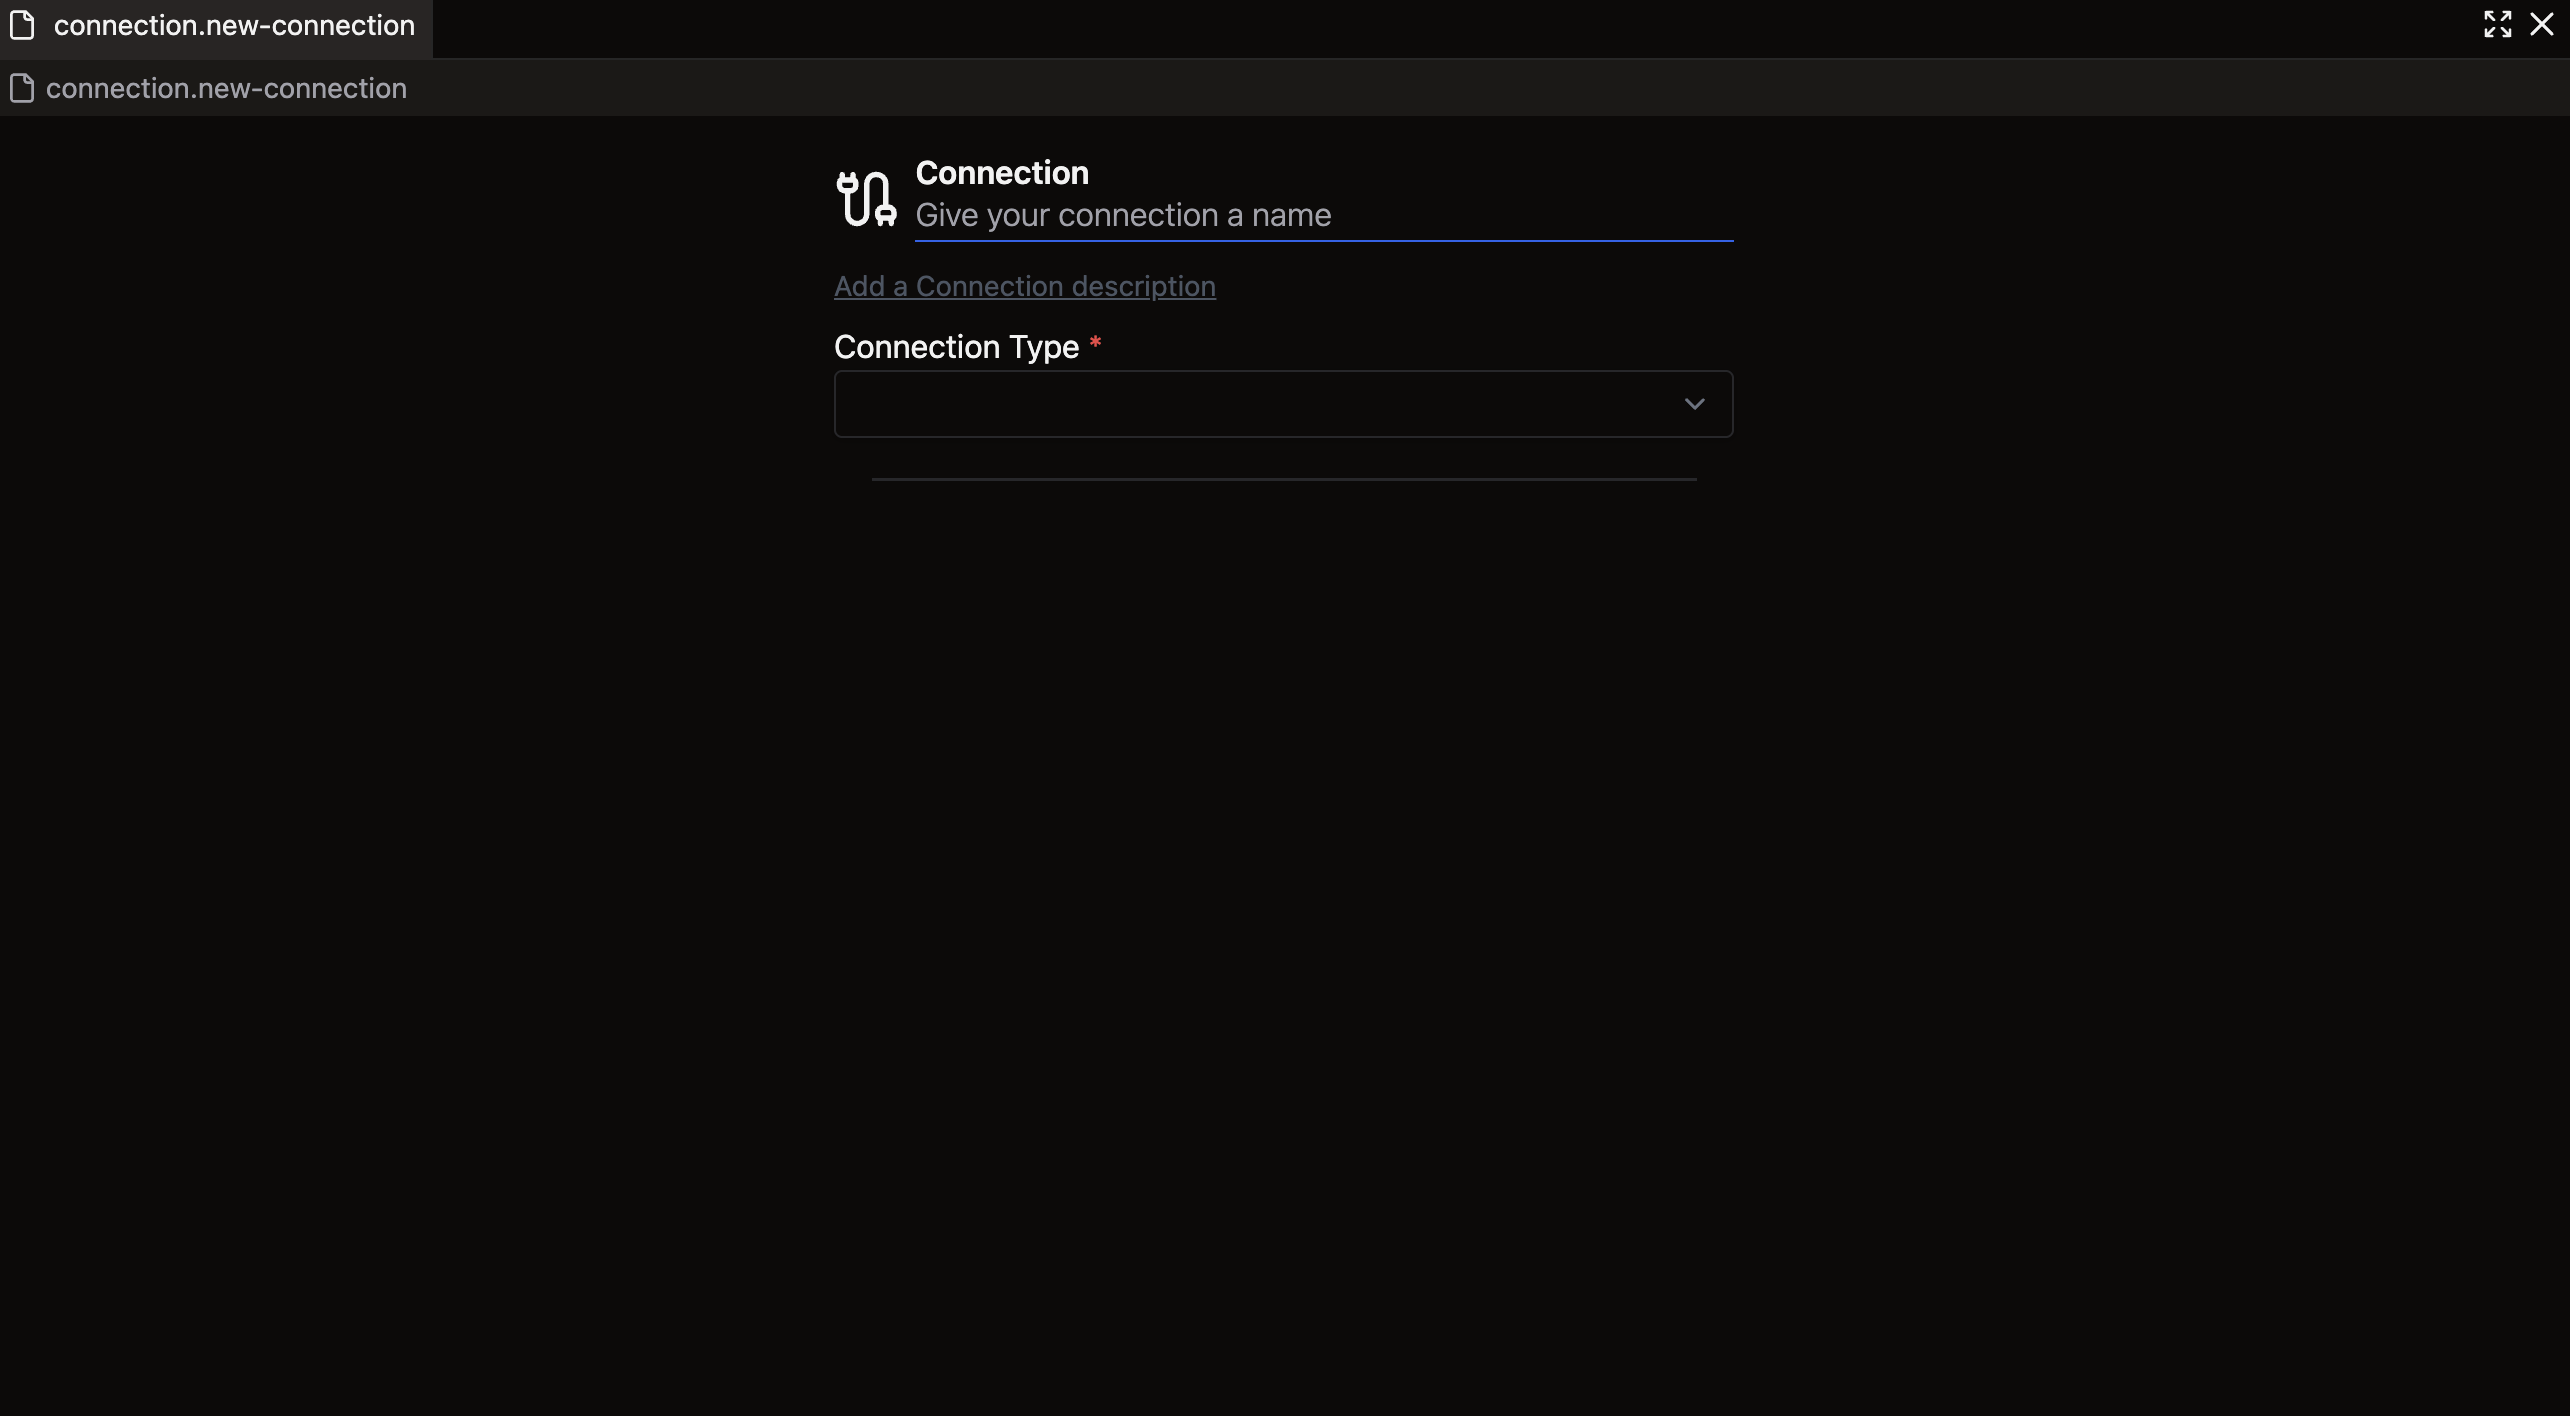
Forms provide a user-friendly way to configure Components without manually formatting YAML or Python files as per Ascend Flex Code approach. They offer quick configuration with standardized fields, although with less customization than direct code editing.
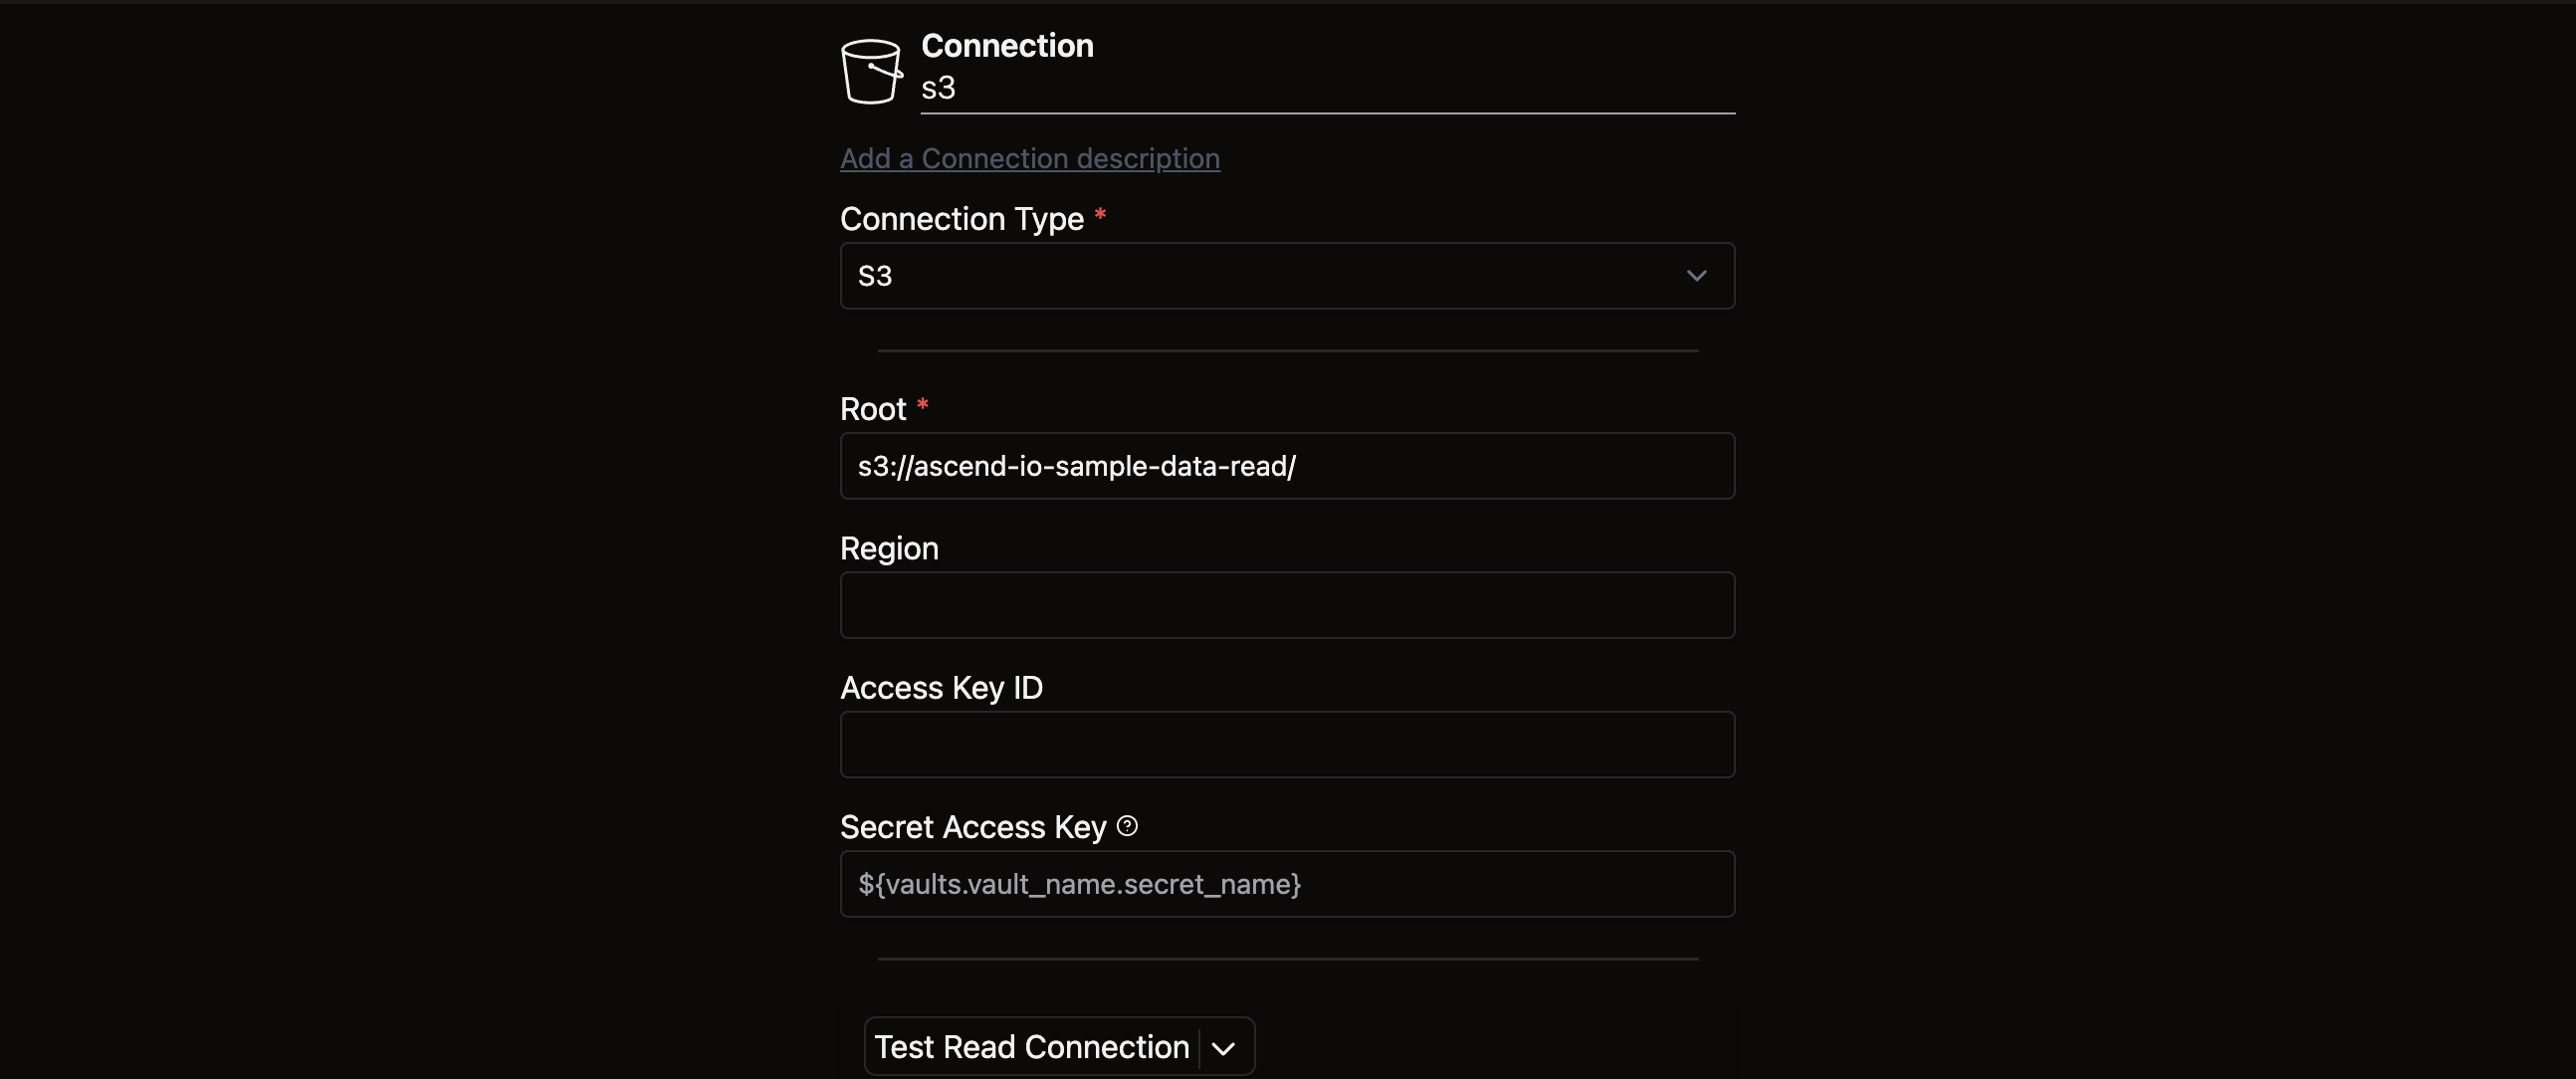
Let's complete the form:
-
Enter a name for the Connection:
s3_public_read. This name will be used to reference the Connection throughout your Project. -
Add a description by clicking Add a Connection description and entering:
Reading in public route closure data. -
Configure the Connection to point to the S3 bucket containing our route closure data:
- Connection Type: Select S3 from the dropdown menu.
- Root: Enter
s3://ascend-io-sample-data-read/to specify which bucket to access.
Your completed form should look like this:
Before proceeding, click Test Read Connection at the bottom of the form to verify that your Connection works properly. A successful test will display:
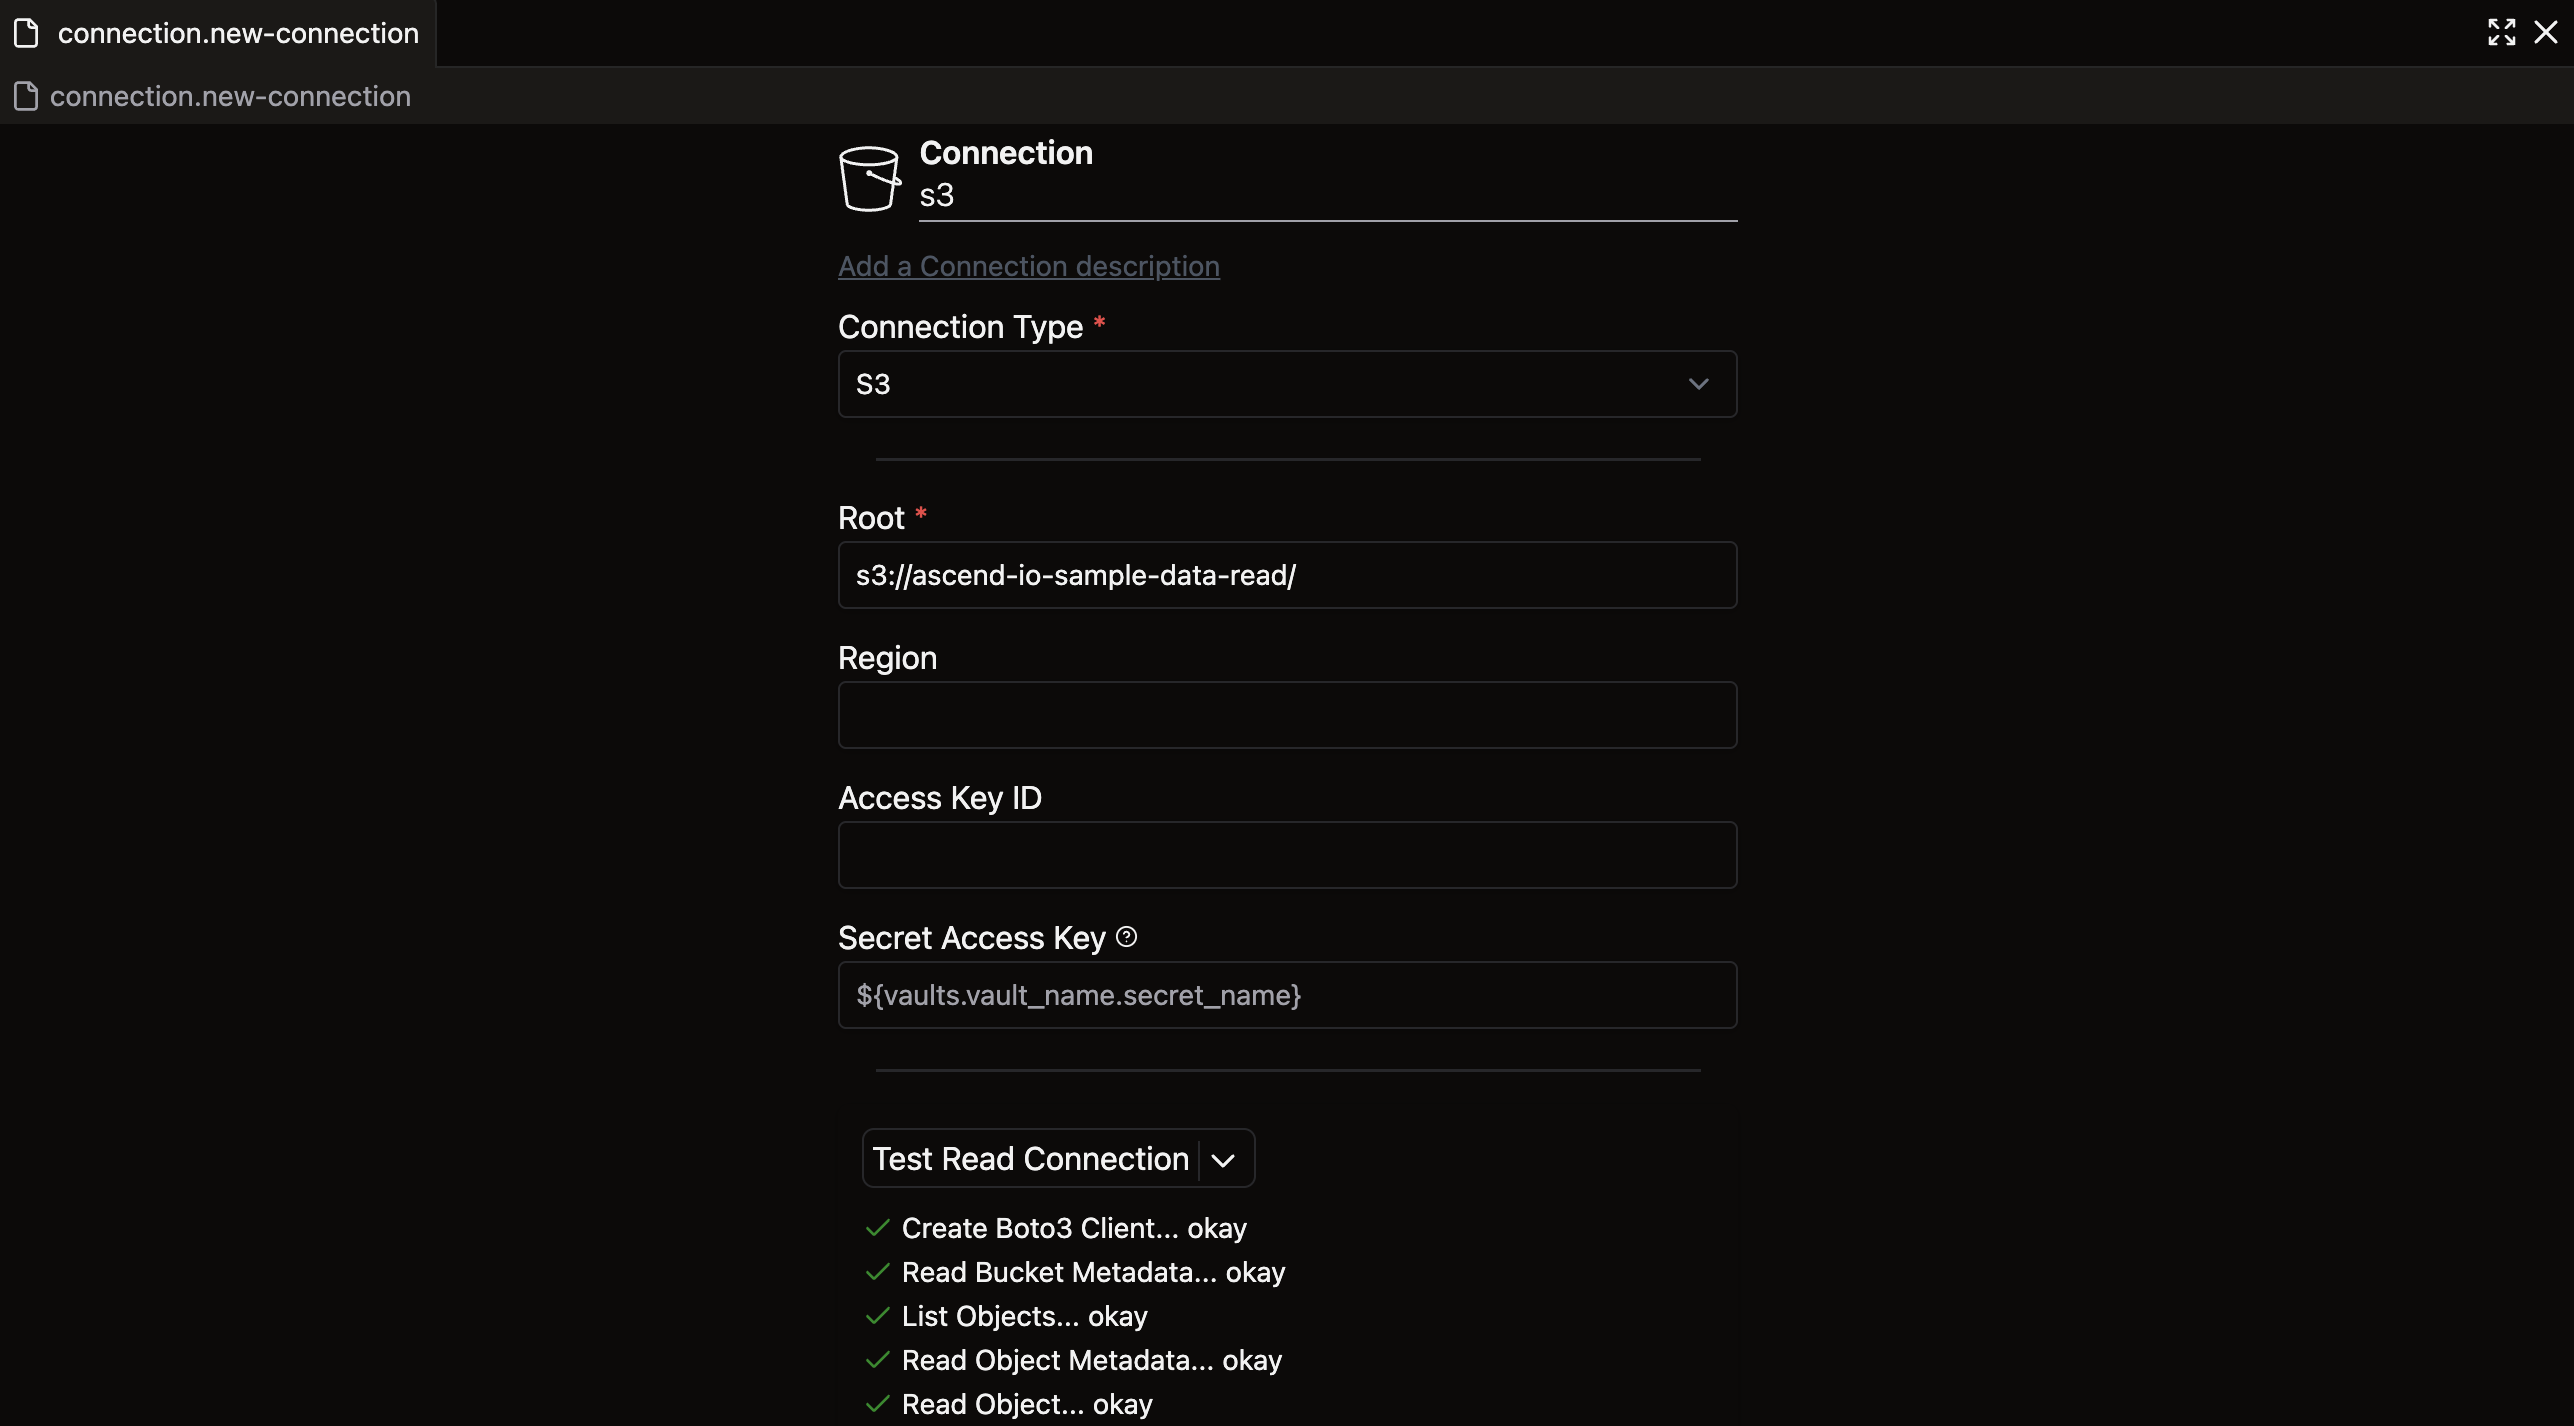
If your test fails, verify that you've entered the Connection name correctly and selected the proper Connection type and root. For this particular bucket, the other fields (Region, Access Key ID, etc.) aren't required. Failed tests will prevent you from successfully ingesting data later.
🎉 Congratulations! You've created your first Connection.
Note that we've only established a Connection to S3, not to GCS, and we haven't yet ingested any data—we've simply created the capability to do so. Let's continue building our pipeline. ⬇️
Files activity
In the previous section, we created an S3 Connection using the Build activity panel and forms. Now, let's create a GCS Connection using a more direct code approach.
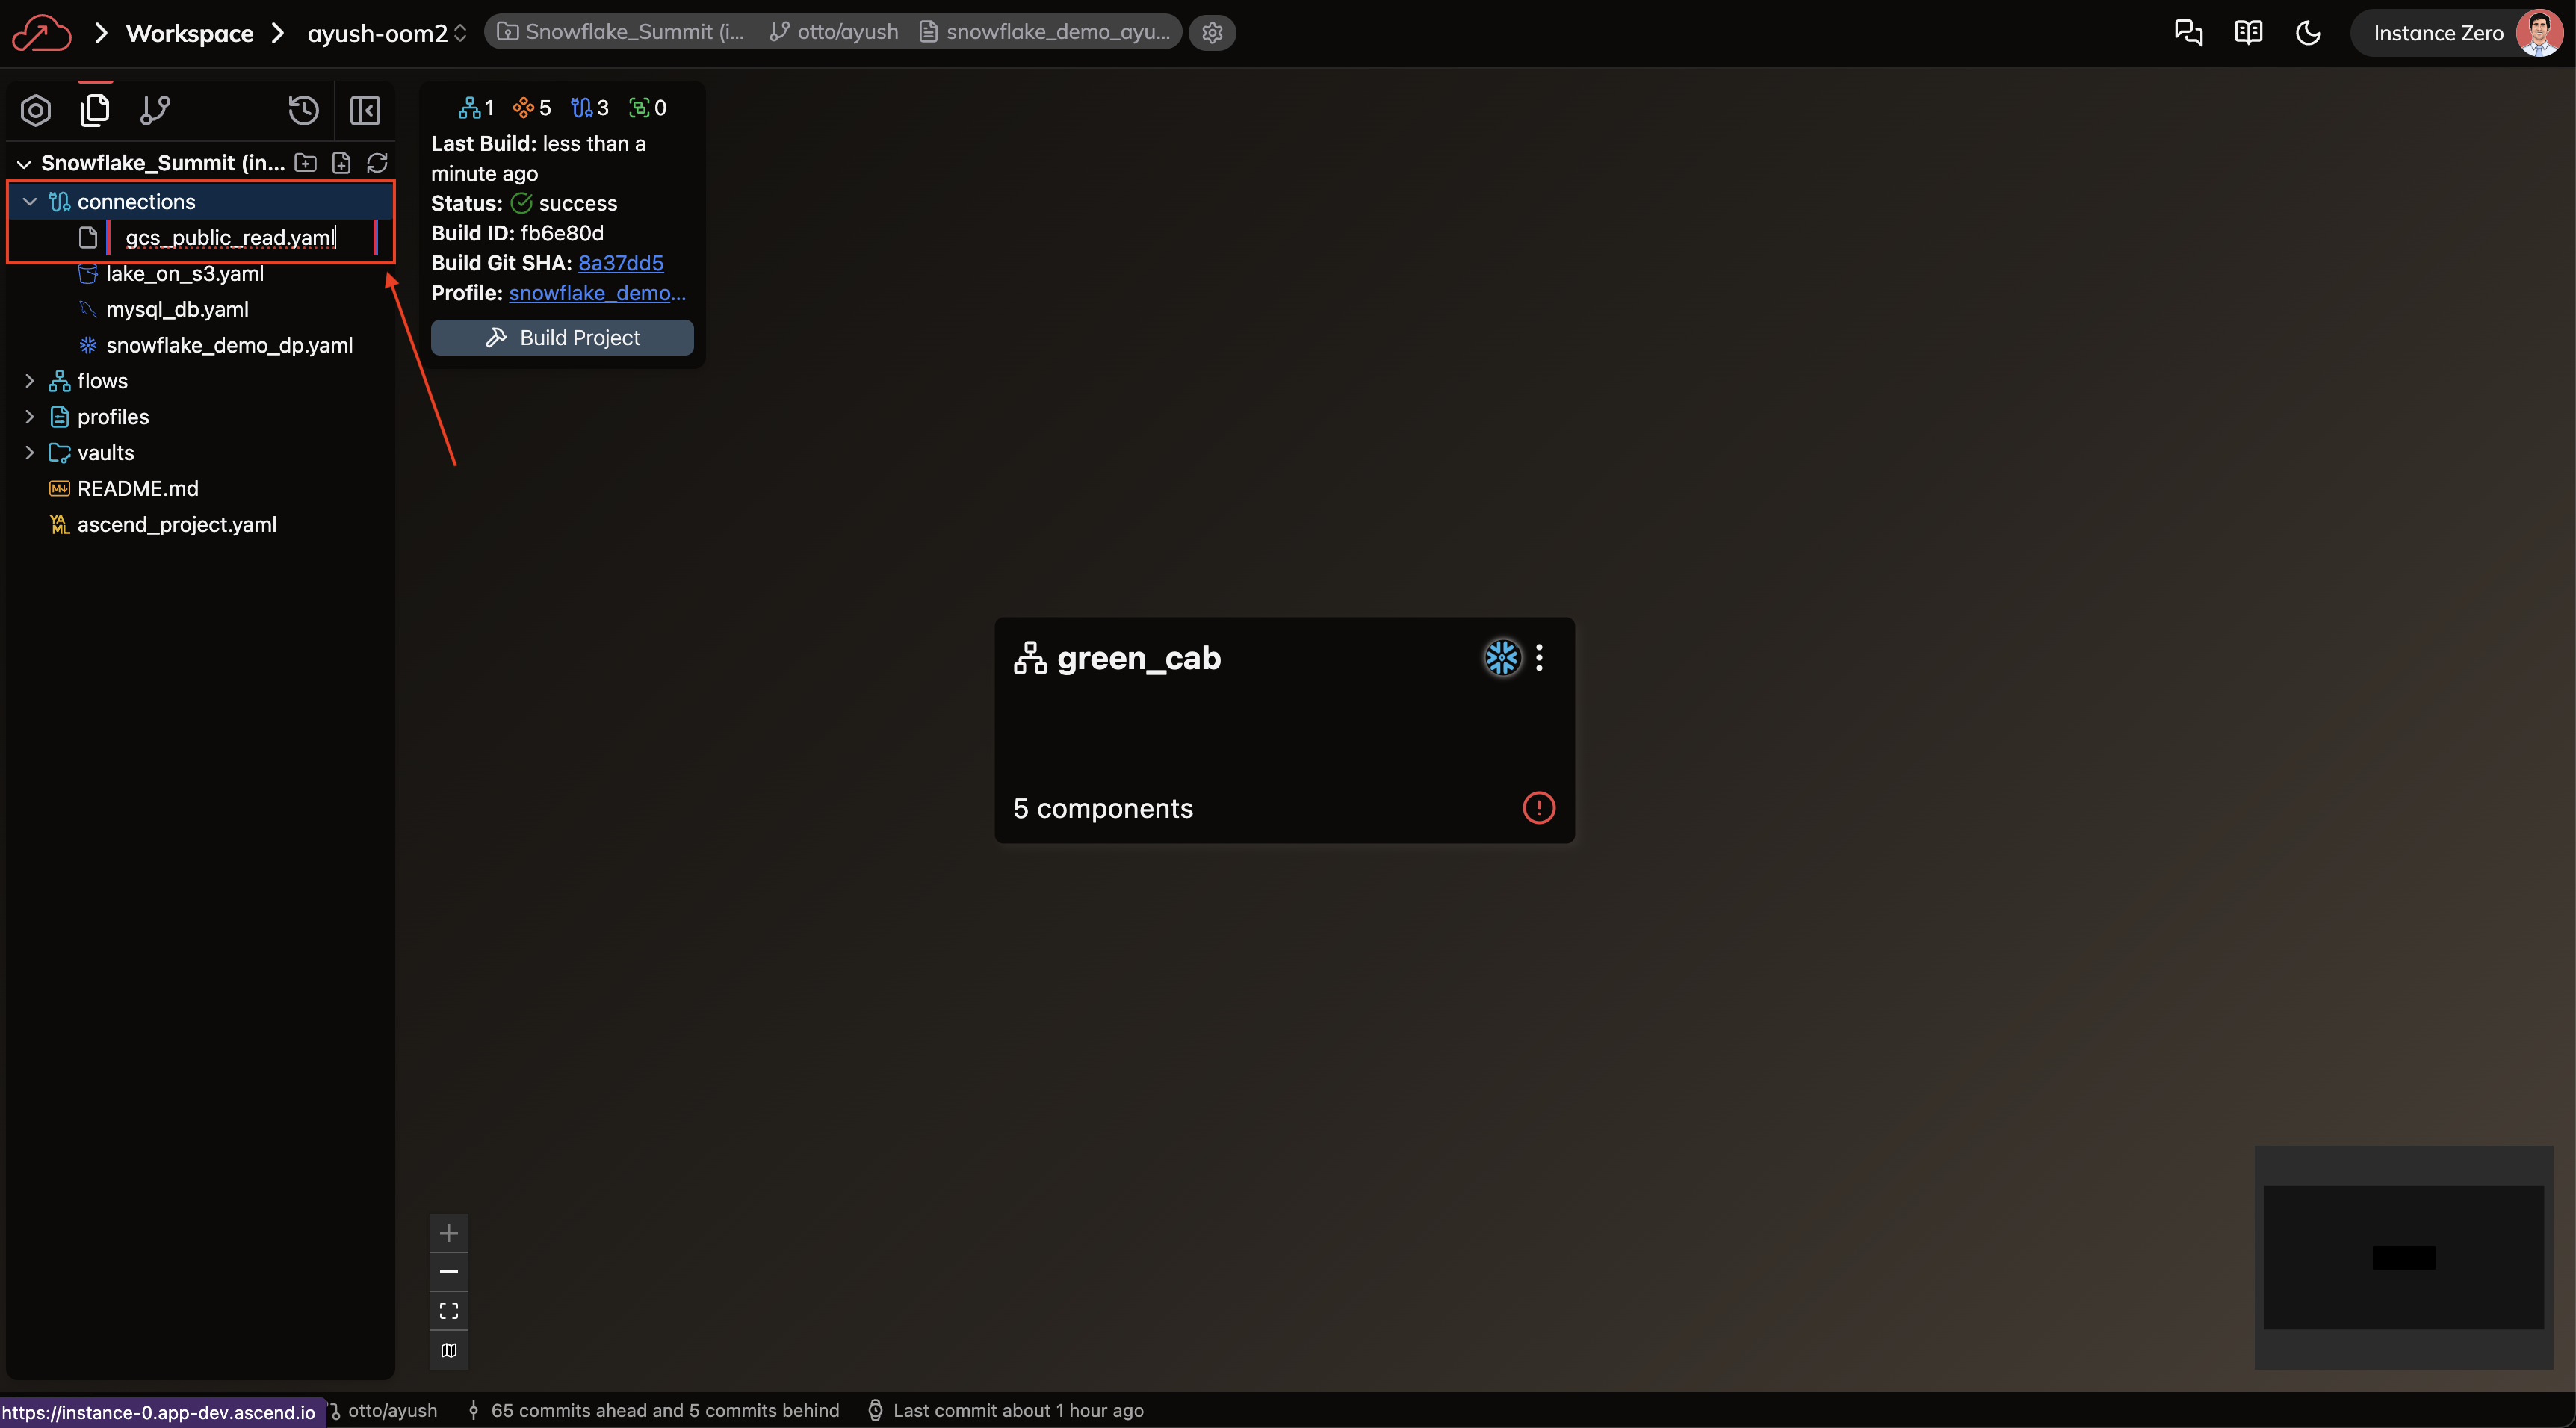
Navigate to the Files activity by clicking the Files tab at the top of the left sidebar (see figure 1, box 2). You'll see a view like this:
Like the Build activity panel, the Files activity panel shows all Flows in your Project, but in greater detail. This panel allows you to edit, manage, and organize files more efficiently.
Now that we're in the Files activity (note that "Files" is highlighted instead of "Build" in the top left), let's identify the key elements:
- New folder: Creates a new folder within your currently selected directory (Box 1)
- New file: Creates a new file within your currently selected directory (Box 2)
- Sync files: Refreshes the panel to show the latest state of files in your source control repository (Box 3)
- Connections: Displays all Connection files available to your Workspace (Box 4)
- Note that Connections is highlighted, indicating it's your current working directory
Click on the Connections folder to expand it (if it's not yet expanded). You'll know the folder is selected when it's highlighted.
Create a Connection using the Files activity
Click New File (see figure 5, box 2). When a prompt appears asking for a file name. Enter gcs_public_read.yaml, following the same naming convention as our S3 Connection. You should see:
When creating a file directly, you must include the .yaml extension in the filename. This differs from forms, where the extension is added automatically.
Press Enter or click elsewhere on the screen to create the file. The code editor will open automatically:
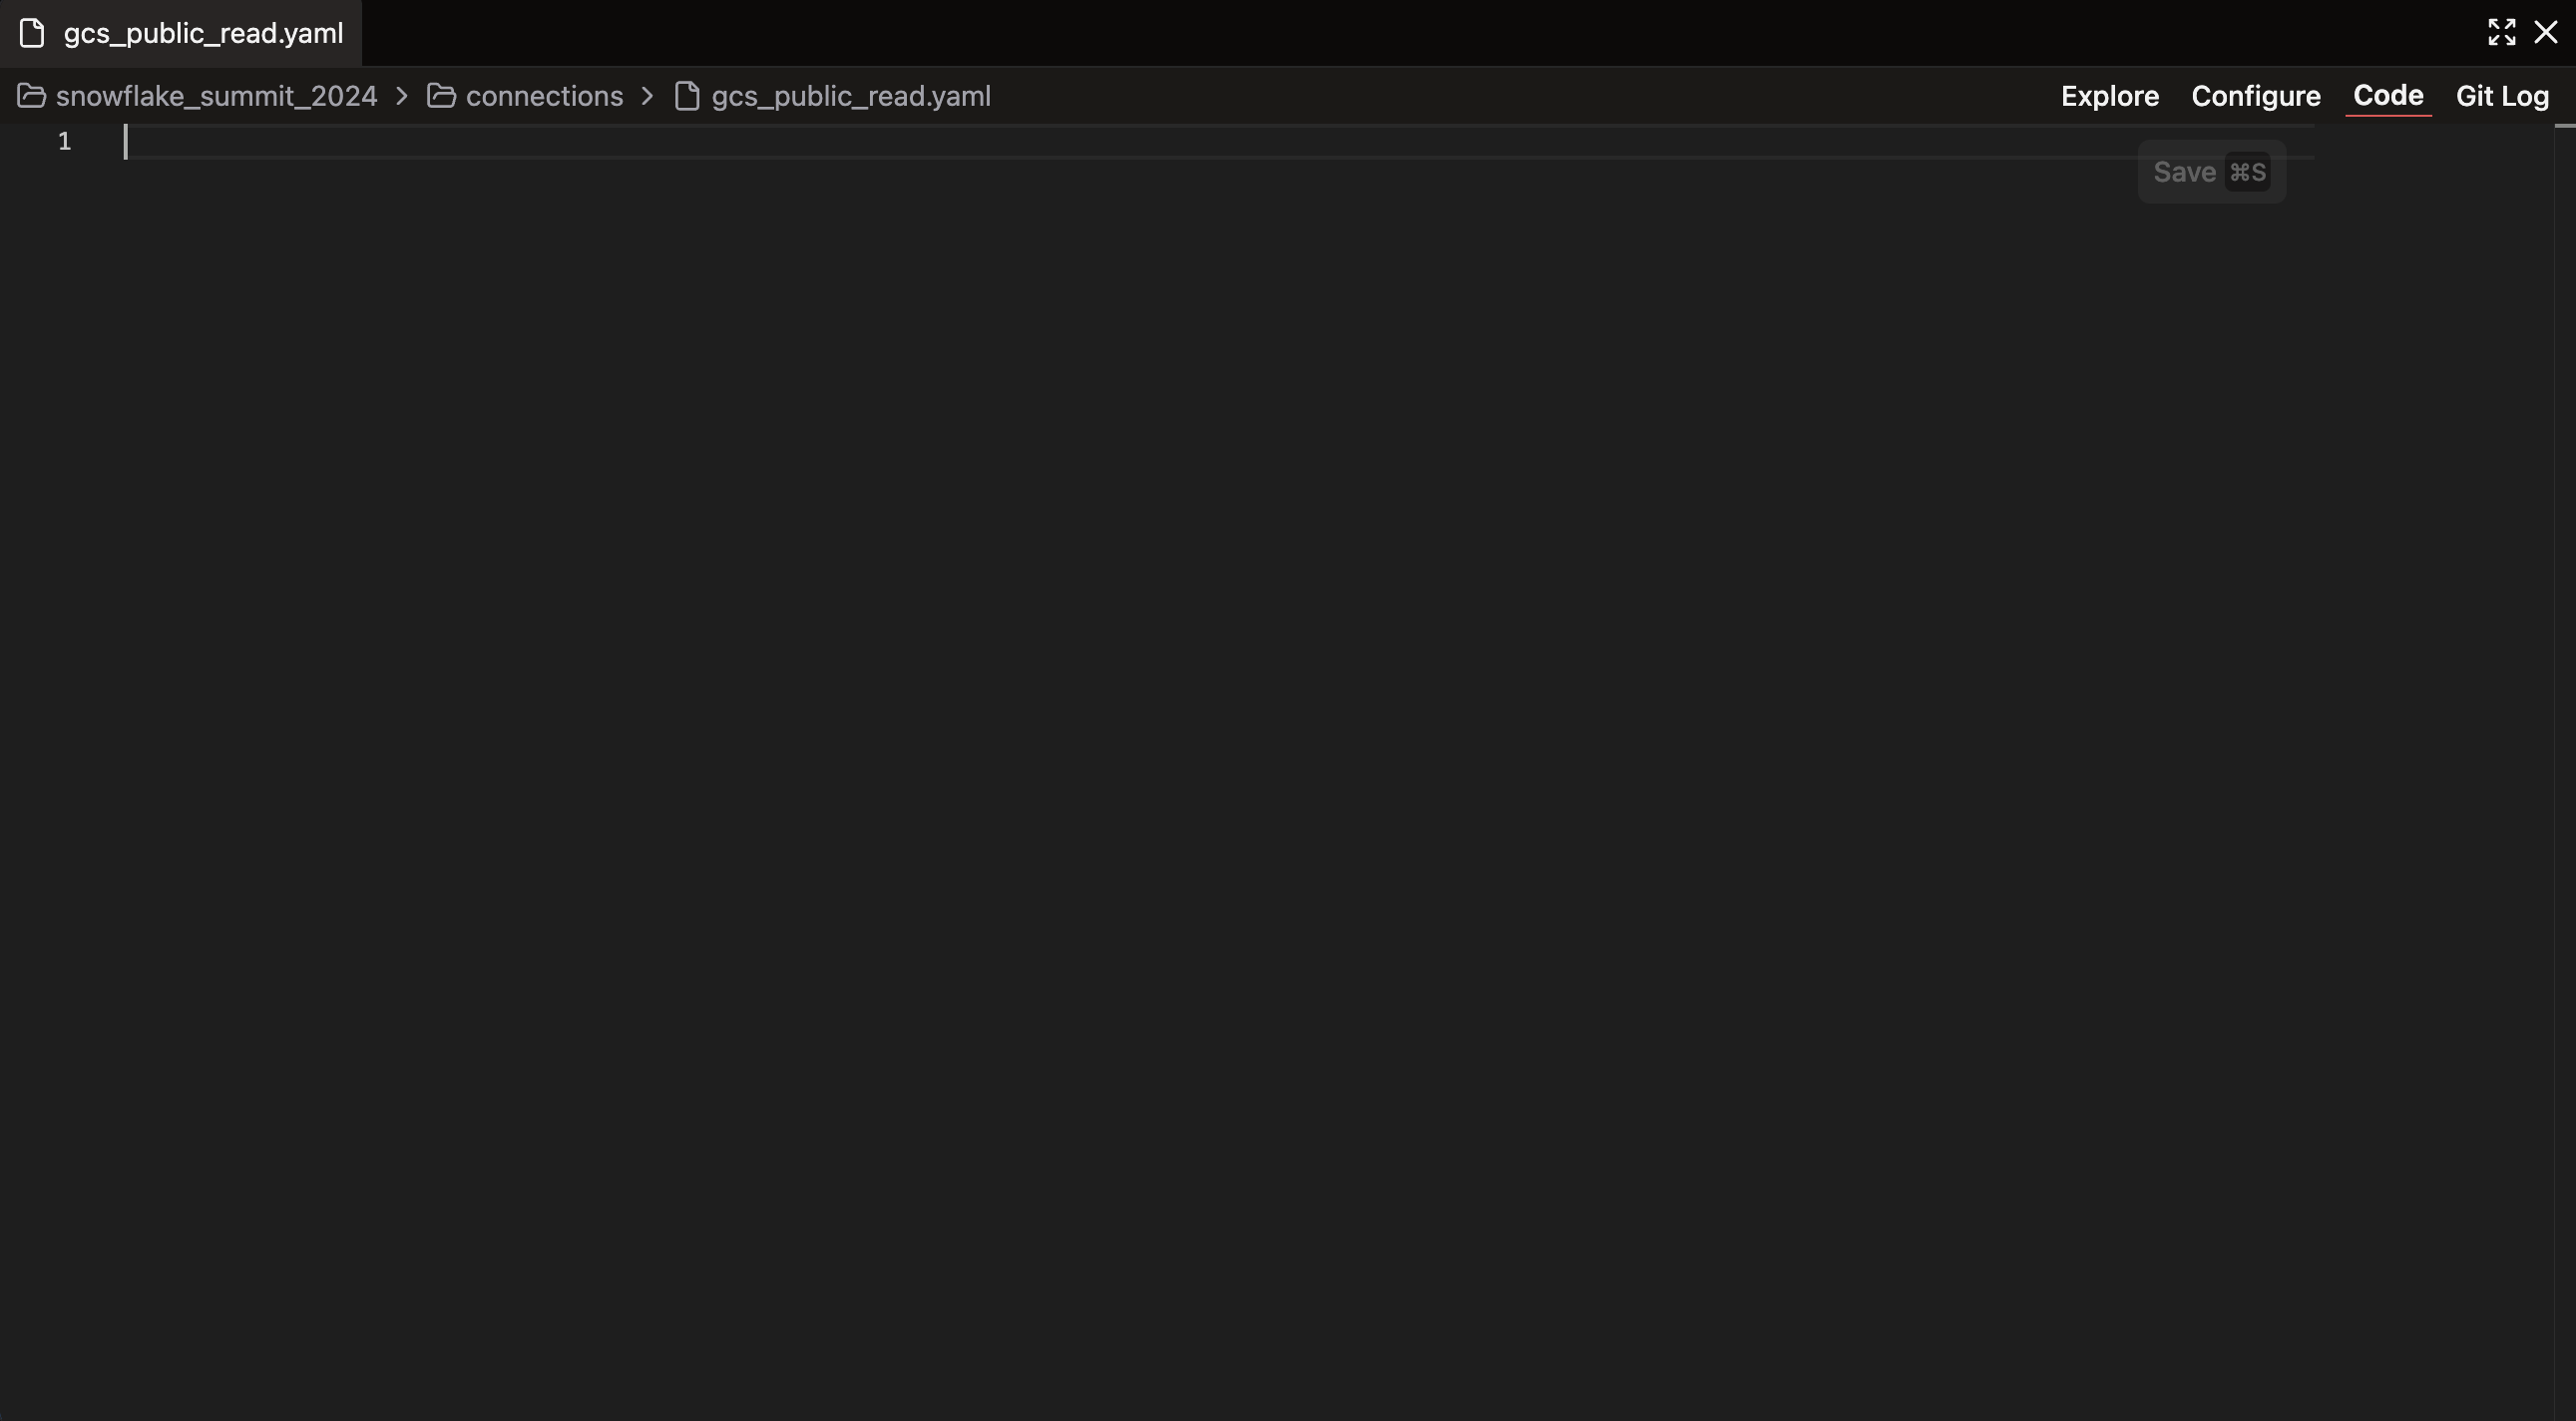
Notice in the top left that you're editing the file you just created. Since it's currently empty, copy and paste the following YAML code into the editor:
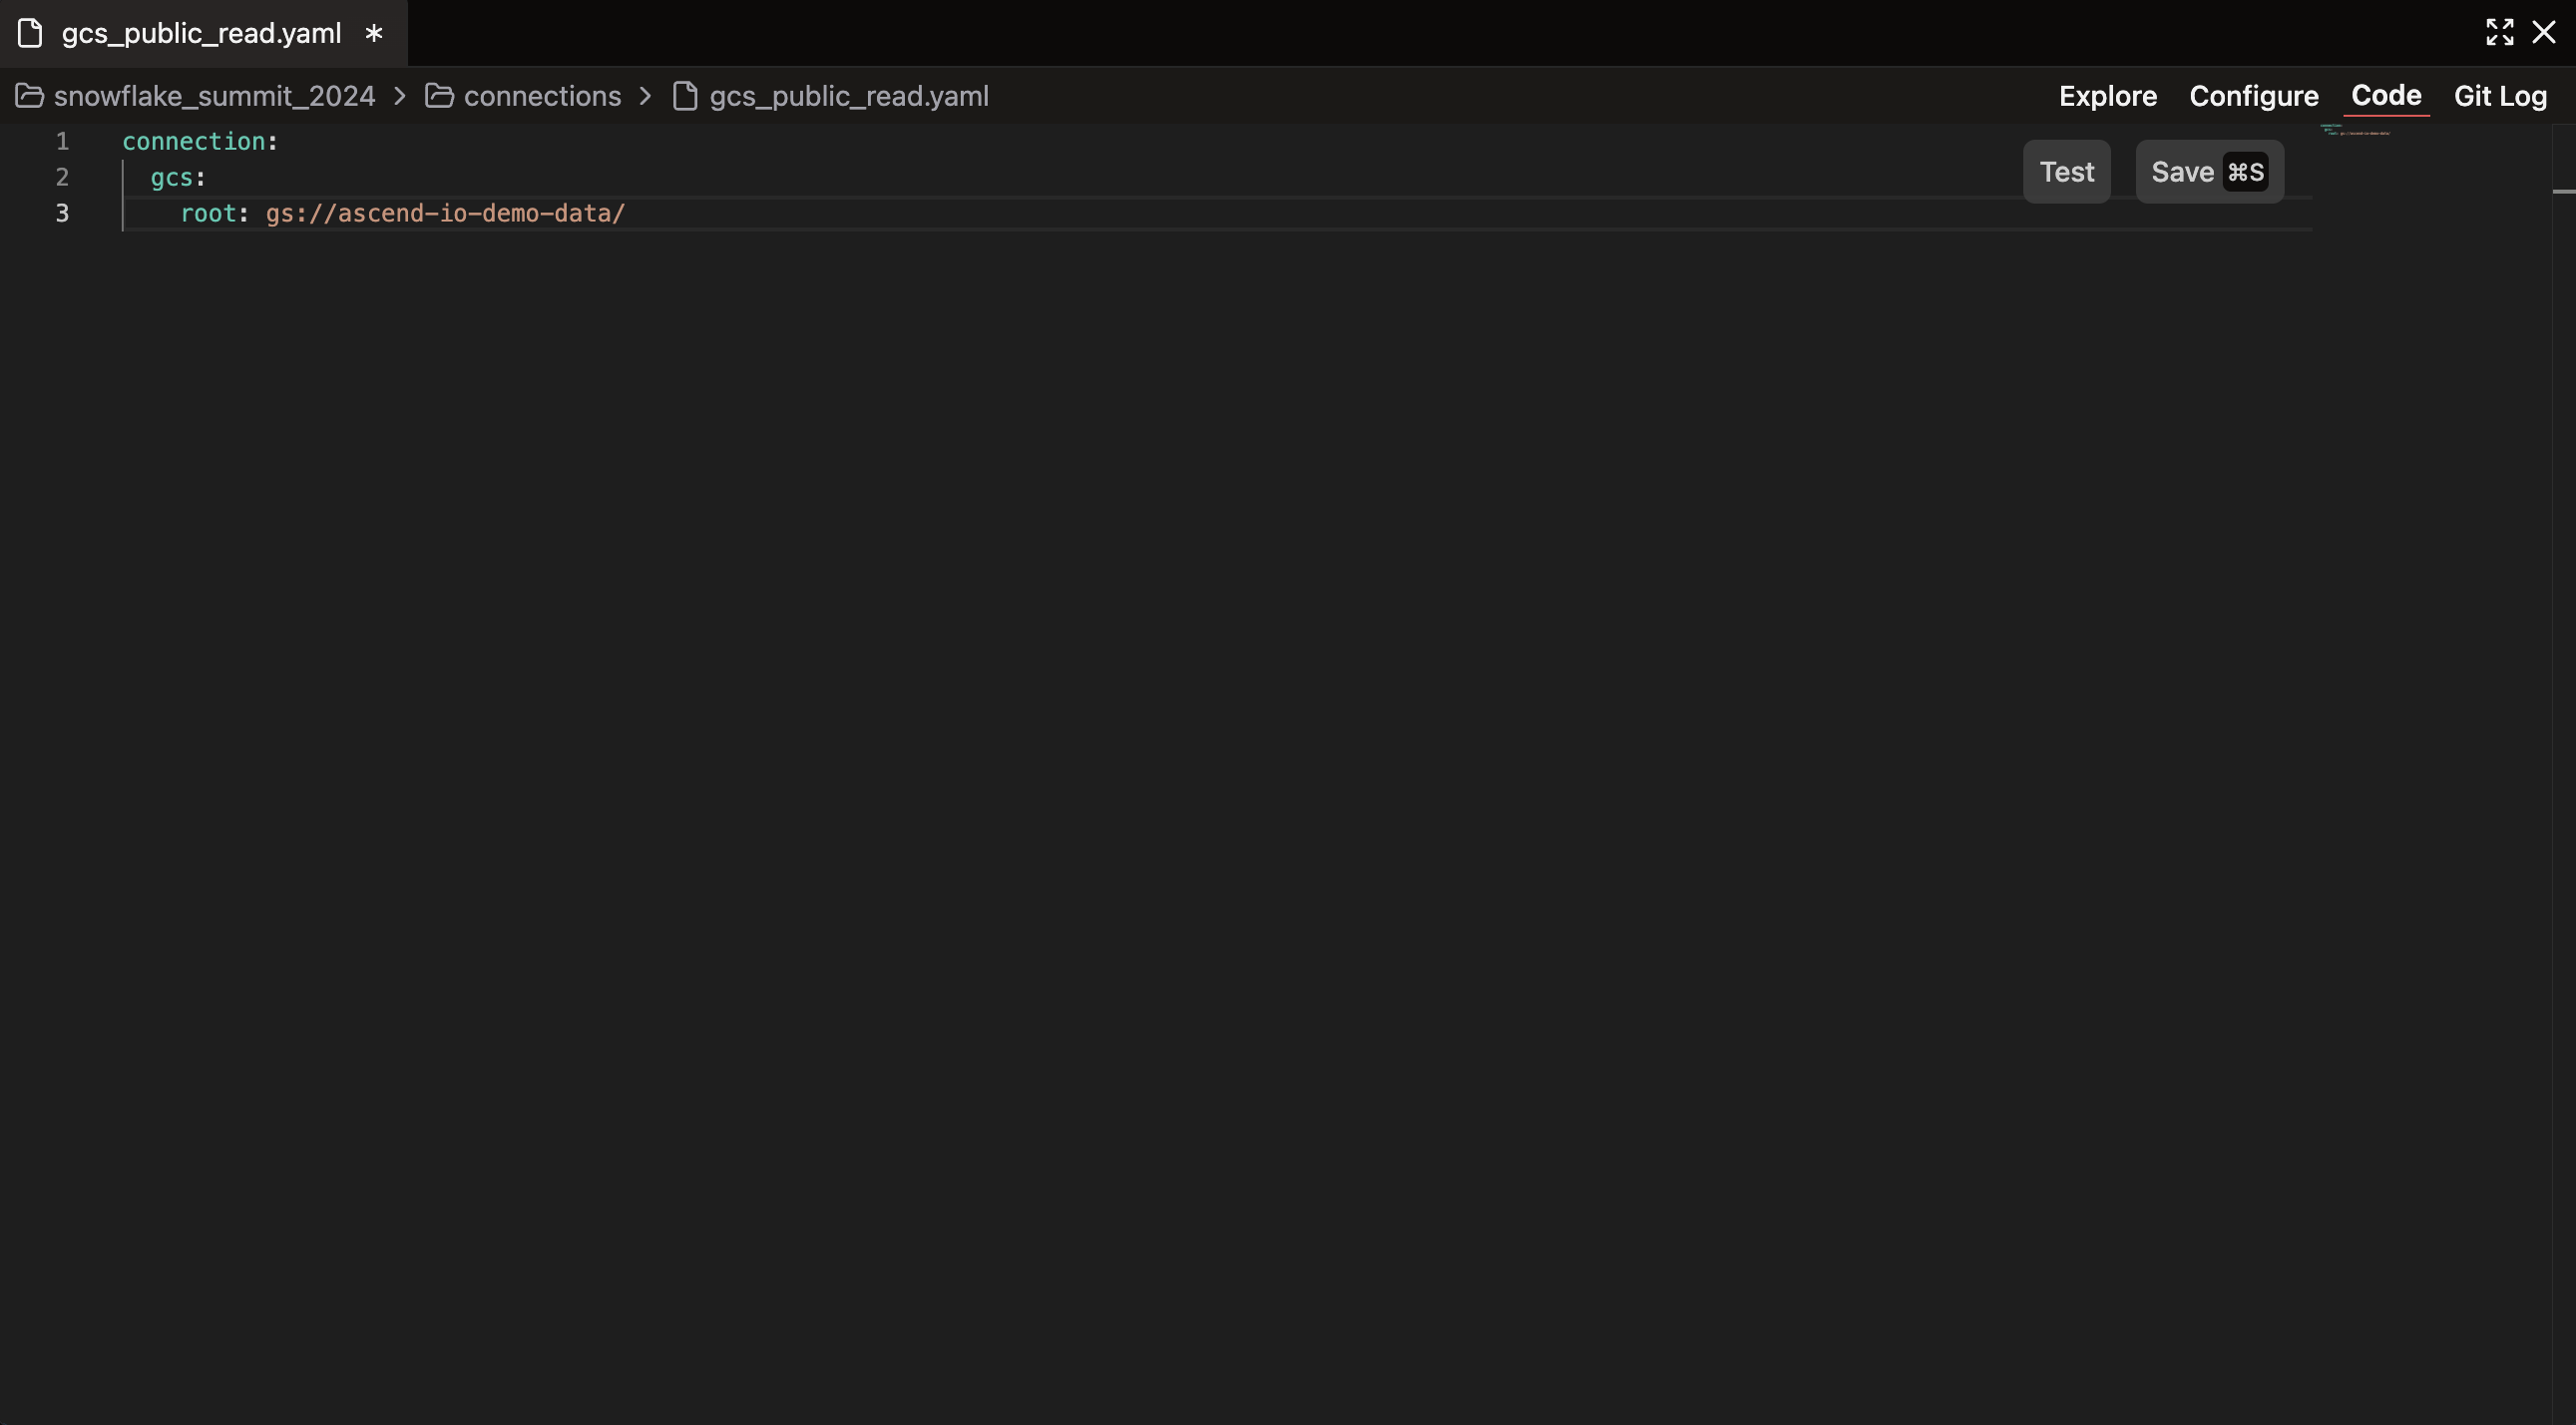
connection:
  gcs:
    root: gs://ascend-io-sample-data/
After pasting, your editor should look like this:
Ascend is a Flex Code platform that supports both low-code and code-first approaches. While forms provide an accessible interface, coding gives you maximum flexibility and control over Component configuration.
Click the Save button in the top right corner (or use the Cmd/Ctrl + S keyboard shortcut). You've now configured another Connection!
Let's test this one to ensure it works correctly, like we did with the S3 Connection. Click the Configure tab in the top right to access the form view of your Connection, which has been automatically populated based on your code. Click Test Read Connection and verify that all tests pass.
Regardless of how you initially create a Component — through forms or code — you can always use both the no-code and code-first views later.
For example, you can edit your S3 Connection using the Code Editor, even though you created it with a form.
Ingest data
Now that our Connections are established, we're ready to bring the data into our Data Plane for analysis. While Connections enable access to external systems, they don't automatically import data. To ingest, transform, and export data, we need to create Components within our pipeline.
In Ascend, Components are the fundamental building blocks of data pipelines that define the sequence and logic of data Flow. Depending on their type, Components are configured using either YAML, Python, or SQL files. These Components handle data ingestion, transformation, and output throughout the Ascend platform.
Review our concept guides to learn more about Components.
Let's set up our Flow structure to organize our Components.
Create your Flow
Picking up where we left off in the Files activity, let's shift focus from the Connections folder to the Flows folder. A typical Flow structure includes:
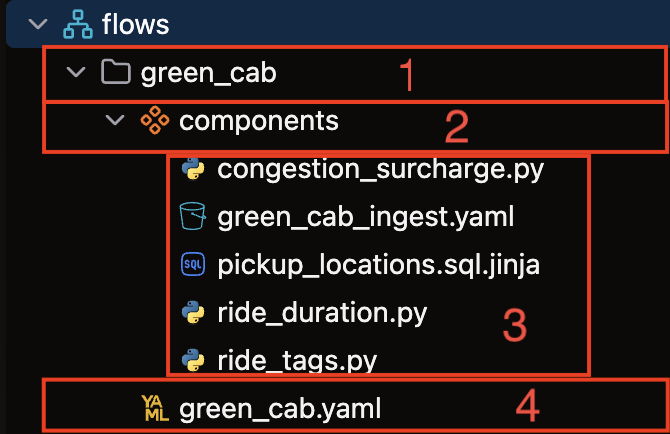
- Flows folder: The top-level container for all files related to the Flow
- Components folder: Container for all Component files used in the Flow
- Components: Individual files that each correspond to a single Component
- Flow definition file: Defines essential Flow properties including name, version number, and runtime parameters (required for every Flow)
Now, let's create our Flow structure:
-
Navigate back to Build Activity, the original view we began with in the left sidebar.
-
Click the
+symbol to the right of Flows. This will pop open theNew FlowForm. -
The only field we will need to fill out for this particular Flow will be the Flow name. We'll call this Flow essentials. The other fields in the Flow Creation Form will be filled with default values.
-
Save the new Flow by clicking the Save button at the bottom of the form.
-
After saving, this should open the Flow definition file for our newly created essentials Flow. When the code editor opens, replace the provided code with the following code:
flow:
    name: essentials
    version: null
Note that we're providing a name for the Flow in the code. This internal name is how Ascend will reference the Flow in its operations. While the folder name and definition file name are for user organization, this internal name is what matters to the system. In practice, these names are usually kept identical for clarity.
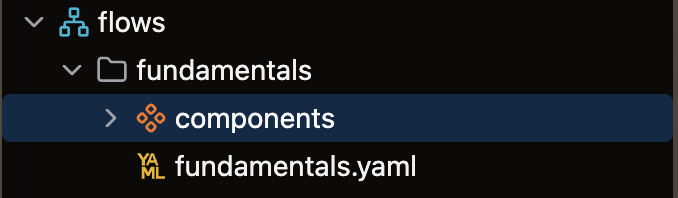
Hit Save and then close the code editor to finalize the creation of our essentials Flow. If you now take a look at Build Activity, you will see there is a new Flow, essentials, which has 0 Components (since we just created it). If you navigate back to the Files activity and expand the Flows directory, you'll see there is also a new folder called essentials. When expanded, you should now have a structure like this:
Create an S3 Read Component
With our Flow structure in place, we can create our first Read Component to ingest data from S3.
A Read Component in Ascend imports data from external sources into your Data Plane. It intelligently handles schema changes, tracks data updates, and efficiently ingests only new or modified records to minimize processing overhead. This ensures that downstream operations always work with current data without manual intervention.
Right-click on the Components folder and select Create New File. Name it s3_read.yaml and paste the following code into the editor:
component:
    name: route_closures
    read:
        connection: s3_public_read
        s3:
            path: /essentials/
            include:
            - glob: 'route_closures.csv'
            parser: auto
Save the file after pasting the code. Let's examine each part of this configuration:
- name: Defines the Component's identifier. It is used to reference this Component in downstream Components
- read: Specifies that this is a Read Component (as opposed to transform, write, or other Component types)
- Connection: References the specific Connection to use (in this case, the S3 Connection we just created)
Specifying the Connection becomes particularly important as you add more Connections of the same type (e.g., multiple S3 Connections) to your Ascend Instance.
- s3: Indicates the Connection type, which determines the parameters Ascend expects
- path: Specifies which directory to search for files, relative to the Connection's root. The full path here would be
s3://ascend-io-sample-data-read/essentials/
Using path in combination with glob patterns helps narrow your search scope to specific directories, making it easier to target particular files or tables that might share naming conventions with files in other locations.
- include: Tells Ascend to ingest only the specified files (as opposed to exclude, which would ingest everything except the specified files)
- glob: Defines the pattern for matching files, in this case,
route_closures.csv - parser: Determines how files are parsed; 'auto' automatically selects the appropriate parser based on file type, but you can explicitly specify formats like CSV, JSON, etc.
For more details on these configuration options, refer to our reference documentation.
For S3 Read Components specifically, see our how-to guide.
You just created your first Read Component! In simple terms, this Component will ingest the route_closures.csv file from the essentials folder in the ascend-io-sample-data-read bucket.
Create a GCS Read Component
Now, we want to create a similar Component to ingest data from GCS. Right-click on the Components folder again and select Create a New File. Name it gcs_read.yaml and paste the following code:
component:
    name: weather
    read:
        connection: gcs_public_read
        gcs:
            path: /essentials/
            include:
            - glob: 'weather.csv'
            parser: auto
Although this configuration is similar to our S3 Component, note these key differences:
- Connection: References our gcs_public_read Connection instead of s3_public_read
- GCS vs. S3: Specifies that this is a GCS-type Component rather than S3
It's essential to use the correct Connection type and parameters. Using an S3 configuration with a GCS Connection would cause errors since the systems expect different parameters.
Save this file.
🎉 Congratulations – you've successfully set up Read Components to ingest data from both S3 and GCS within the same Flow!
Create a Transform
With our data now imported into the Data Plane, we can transform it for our analysis. Transformations in Ascend can range from simple joins to complex data preparation for machine learning models. All these operations are handled through Transforms.
In Ascend, a Transform processes and manipulates data within a Flow. You can use SQL or Python to apply business logic, cleanse, reshape, and aggregate your data. Transforms intelligently track dependencies and only recompute when upstream data changes, ensuring both efficiency and accuracy. The platform offers various implementation strategies to accommodate different transformation requirements.
Our current task is straightforward: we need to combine our two datasets to identify potential correlations between route closures and weather conditions.
To create this Transform, right-click on the Components folder and create a new file named basic_join.sql.
For this task, we can leverage Ascend's AI assistant, Otto. Click the ✨ assistant icon in the top header to chat with Otto, who can help generate SQL code based on your requirements. Try entering the following prompt:
Hey Otto! For the basic_join.sql Transform Component, I'd like to join the route_closures Read Component and the weather Read Component on the id column. I want this to be an inner join. Can you write the code and add it to the file please?
After sending your message, Otto should respond with SQL code similar to:
SELECT
    rc.*,
    w.*
FROM {{ ref('route_closures') }} AS rc
    JOIN {{ ref('weather') }} AS w ON rc.id = w.id
The exact code might vary slightly. If Otto's suggestion doesn't match what you need, feel free to use the code provided above instead. Before doing so, first review Otto's response to see if meets your requirements.
Copy the SQL code into your basic_join.sql file and click Save.
🎉 Congratulations! You've created your first Transform and established the foundation of your ETL pipeline in Ascend.
Create a Snowflake Write Component
Our final step is to export the joined dataset to an external system where Otto can perform further analysis. In Ascend, this is accomplished using a Write Component.
A Write Component exports processed data from your Flow to external systems or storage locations. These Components support various destinations including object storage, databases, and data warehouses, ensuring that downstream systems receive your transformed data reliably and in the appropriate format.
Right-click on the Components folder, select Create a New File, and name it snowflake_write.yaml.
Both Read and Write Components (referred to as Connection-type Components) use YAML configuration files. This consistent approach makes them straightforward to create and maintain.
Paste the following YAML configuration to set up a Write Component that exports our data to a Snowflake table:
component:
    name: snowflake_write
    write:
        Connection: snowflake_data_plane
        snowflake:
            table:
                name: bad_routes
                schema: ascend_data
Let's highlight the key differences from our Read Components:
- Write vs. Read: Line 3 specifies that this is a Write Component rather than a Read Component
- Connection: We're using our Data Plane's Snowflake Connection to write data to a table named
bad_routes
Save your file, and you've successfully created a Write Component.
🎉 Congratulations – you've developed your first end-to-end pipeline in Ascend!
Run a Flow
We've created all the Component files for our Flow, but we still need to execute it and see it in action. Let's return to the Build Summary Panel by clicking the Build tab in the top left of the interface.
You'll see a button labeled Run Flow. This button performs two actions:
- Builds the Project: Formalizes all changes made since your last build and updates the UI to reflect these changes.
- Runs the pipeline: Executes your Flow, allowing you to observe each Component as it runs and completes in the UI.
In Ascend, a Flow run represents a single execution of your Flow. Each run processes data according to your defined Components and their dependencies.
Conclusion
You’ve just built and run your first complete pipeline in Ascend—from connecting to external data sources to transforming and exporting your results. Along the way, you learned how to:
- Create and manage Connections to external systems like S3 and GCS
- Ingest data using Read Components
- Write SQL transforms with help from Otto, Ascend’s AI assistant
- Export data using Write Components
- Structure and run a Flow in your Workspace
🏆 Congratulations on completing Ascend Essentials! You now have the foundation to build powerful data pipelines in Ascend.
Next steps
Choose your path:
- 🤖 Explore Otto's capabilities - Discover how Ascend's AI assistant can accelerate your development with code suggestions, error explanations, and automated documentation
- 🔄 Set up Automations - Schedule your pipelines and create event-driven workflows to run automatically
- 🧪 Add data testing - Implement quality checks using SQL, Python, or YAML to ensure your data meets business requirements
- 🚀 Deploy across environments - Set up Development, Staging, and Production environments with proper CI/CD workflows
- ⚡ Apply best practices - Optimize performance and cost management for your specific data plane (Snowflake, BigQuery, or Databricks)